Implementation
OpenID Sequence
- Frontend web application contacts backend application to request information of which URL the user will be directed to (when user starts the login process by clicking the “Sign-In” button. Frontend web application informs backend application, via which address it made a request of the authorization code info (the redirect address in the web application).
(You can find relevant examples under Backend Implementation code samples) - Backend application generates a redirect_url that a user can log in by using the client_id, authorization server endpoint and the address, which the authorization code info will return, and responds to the requesting frontend web application. (You can find an example in Backend Implementation.)
- Frontend web application directs user to this redirect_url.
- User reaches the mIDentity login screen to authenticate and authorize login process.
- After user successfully logs in, browser redirects user to the specified redirect_url, to which the authorization code should be sent, and then sends authorization_code as a query parameter.
- Frontend web application sends the code taken from the query parameter to backend application.
- Backend application sends a POST request to the token server to determine user info by using authorization_code, client_id, grant_type, redirect_url and client_secret information.
- Token server sends access_token, refresh_token and id_token as a response to the backend application.
- Backend application decodes id_token by JWT and sees which user is logged in with user information.
- If user is not registered in the database, it can register or update info.
- Login session_token is sent to frontend web application and user logs in.
General Structure
You can get all the necessary parameters you require for the backend implementation from the mID Provider dashboard where you performed the OpenID configuration. The parameters required in the OpenID backend side: You will be provided with the necessary prod and test environment information to use this API.
| Parameter | Description |
|---|---|
| Client Id | Application/Client name created at the dashboard level |
| Client Secret | Unique secret or value generated for the Client Id |
| Authorization Endpoint | The server endpoint URL that enables login with mID Provider |
| Token Endpoint | The server endpoint URL where an access_token, refresh_token and id_token is generated after exchanging with authorization code (after successful authentication) |
After we got our parameters from the panel, we need two endpoints in our backend project for OpenID backend implementation according to the diagram in OpenID Sequence Diagram section.
The endpoints we define in backend side in our exemplary:
- /auth/oidc (GET)
- /auth/code (POST)
/auth/oidc (HTTP GET): This endpoint returns the redirect_url for an authentication process to the request made by the frontend web application. This endpoint can get the redirect_uri information from the frontend web application as a query parameter and returns an output as shown below. Frontend web application starts an authentication process by using a Composed_url address.
Composed url is generated by adding client_id, redirect_uri, response_type, response_mode and nonce values to the Authorization URL address in your OpenID configuration. You can reach the explanations of these in OIDC Debugger Test section OIDC Debugger OpenID Test.
You can see how the Composed_url is generated from the HTTP GET sample as shown below:
/auth/oidc Response should be:
{
	"client_id": "openidtestclient",
	"auth_url": "https: //tenantname.aws1.test1.com/auth/realms/{tenantname}/protocol/openid-connect/auth",
	"composed_url": "https://tenantname.aws1.test1.com/auth/realms/{tenantname}/protocol/openid-connect/auth?client_id={client_id}&redirect_uri=https%3A%2F%2Foidcdebugger.com%2Fdebug&scope=openid&response_type=code%20token&response_mode=form_post&nonce=2wfzjk80tki"
}
/auth/code (HTTP POST): After the login process, the authorization code value and the redirect_uri, that was also sent to /auth/oidc, are sent to backend as seen below:
/auth/code Request body:
{
"code":"92354e83-1232-43eb-abce-7676c009333e.32c5d12f-3215-4bb7-86d8-
c2a260659ec1.d86bf04d-046e-4b6c-ac5f-9eac49e4ce98",
"redirect_uri":" https://localhost:3000/callback"
}
A POST request including the authorization code, redirect_uri, client_id , client_secret and grant_type information is sent to Token Endpoint address by backend side. When all the information is correct, token endpoint returns an output as below:
{
    "access_token": "eyJhbGciOiJSUzI1NiIsInR5cCIgOiAiSldUIiwia2lkIiA6ICI1eHdTR2lMekJOX0VSRm9XTU1RQ3gtd0RlVFdfckUwQTQ3WGNEUXJ4T2pVIn0.eyJleHAiOjE2Mjg1MjQ0NTMsImlhdCI6MTYyODQ4ODQ1MywianRpIjoiNzIwZjVmM2ItZTc0MC00MTljLTgxNjMtOWEwZDlmZTg2N2QxIiwiaXNzIjoiaHR0cHM6Ly9kZW1va2MxLmF3czEua29iaWwuY29tL2F1dGgvcmVhbG1zL2RlbW9rYzEiLCJhdWQiOlsicmVhbG0tbWFuYWdlbWVudCIsImFjY291bnQiXSwic3ViIjoiODlkZjk1MzItMDk5MC00NmViLTkzZjMtOTIwMTM3MDYzYWI5IiwidHlwIjoiQmVhcmVyIiwiYXpwIjoiR3Jvb3QiLCJzZXNzaW9uX3N0YXRlIjoiZDVjZTNjNWMtNTNhMS00OWZmLTkzZjgtZTU2MTEyYjBiOTIwIiwiYWNyIjoiMSIsImFtciI6W10sInJlYWxtX2FjY2VzcyI6eyJyb2xlcyI6WyJkaWdpdGFuaXVtX3VzZXIiLCJvZmZsaW5lX2FjY2VzcyIsImFkbWluIl19LCJyZXNvdXJjZV9hY2Nlc3MiOnsicmVhbG0tbWFuYWdlbWVudCI6eyJyb2xlcyI6WyJ2aWV3LXJlYWxtIiwidmlldy1pZGVudGl0eS1wcm92aWRlcnMiLCJtYW5hZ2UtaWRlbnRpdHktcHJvdmlkZXJzIiwiaW1wZXJzb25hdGlvbiIsInJlYWxtLWFkbWluIiwiY3JlYXRlLWNsaWVudCIsIm1hbmFnZS11c2VycyIsInF1ZXJ5LXJlYWxtcyIsInZpZXctYXV0aG9yaXphdGlvbiIsInF1ZXJ5LWNsaWVudHMiLCJxdWVyeS11c2VycyIsIm1hbmFnZS1ldmVudHMiLCJtYW5hZ2UtcmVhbG0iLCJ2aWV3LWV2ZW50cyIsInZpZXctdXNlcnMiLCJ2aWV3LWNsaWVudHMiLCJtYW5hZ2UtYXV0aG9yaXphdGlvbiIsIm1hbmFnZS1jbGllbnRzIiwicXVlcnktZ3JvdXBzIl19LCJhY2NvdW50Ijp7InJvbGVzIjpbIm1hbmFnZS1hY2NvdW50IiwibWFuYWdlLWFjY291bnQtbGlua3MiLCJ2aWV3LXByb2ZpbGUiXX19LCJzY29wZSI6InByb2ZpbGUgZW1haWwgYWNyMSIsImVtYWlsX3ZlcmlmaWVkIjp0cnVlLCJuYW1lIjoiZGVtbyB1c2VyIiwicHJlZmVycmVkX3VzZXJuYW1lIjoiZG9jdGVzdCIsImdpdmVuX25hbWUiOiJkZW1vIiwiZmFtaWx5X25hbWUiOiJ1c2VyIiwiZW1haWwiOiJzdXJlc2gubWFubmFyQGdyb290YW4uY29tIn0.N22VJ_RbFvP0kNPF5X-nypWU8fyE_CgF-kJd0Jzfud80MUfsiUkif3LeZ0qm69ZyJp5K0JL7R6uudu0XZM2eNhkiybWB1_EYLUoLsGfqZX1pfy7olIFmDNYeKUaTMRifkPB_CprbhRBwiaUYOe7-g5y_ki93IEPB-K-3t7hl_f0vs8CYKCiD1LGStEVWP-KEYd9Mj8-arSmY1yfYLCxpqmRa_eLHTV_b_xjCW8Wr-VgGSWC7HGPveEMJ4gkKfBjOEalu7uv5RW1ylWnZvgaCx1GcBSU2749JfYo_1_gSUKO5UNmAUF-dso-r0p_PWMGwJxMPgupDtAvxSbXpdAyI5A",
    "expires_in": 36000,
    "refresh_expires_in": 1800,
    "refresh_token": "eyJhbGciOiJIUzI1NiIsInR5cCIgOiAiSldUIiwia2lkIiA6ICIwYzY1ZTExYy1hNjM4LTQzZmItYjRlNi1jMzI3NWFmMDU5ZDIifQ.eyJleHAiOjE2Mjg0OTAyNTMsImlhdCI6MTYyODQ4ODQ1MywianRpIjoiMDlhMzI1YmMtNTAyZi00ZmUxLWE1ZTYtNmU5OGIzOTFjYTkxIiwiaXNzIjoiaHR0cHM6Ly9kZW1va2MxLmF3czEua29iaWwuY29tL2F1dGgvcmVhbG1zL2RlbW9rYzEiLCJhdWQiOiJodHRwczovL2RlbW9rYzEuYXdzMS5rb2JpbC5jb20vYXV0aC9yZWFsbXMvZGVtb2tjMSIsInN1YiI6Ijg5ZGY5NTMyLTA5OTAtNDZlYi05M2YzLTkyMDEzNzA2M2FiOSIsInR5cCI6IlJlZnJlc2giLCJhenAiOiJHcm9vdCIsInNlc3Npb25fc3RhdGUiOiJkNWNlM2M1Yy01M2ExLTQ5ZmYtOTNmOC1lNTYxMTJiMGI5MjAiLCJzY29wZSI6InByb2ZpbGUgZW1haWwgYWNyMSJ9.nz6L_kYg8X37IWUluRv5zMxX6iHBjd3E5VKu_ev1yHg",
    "token_type": "Bearer",
    "not-before-policy": 0,
    "session_state": "d5ce3c5c-53a1-49ff-93f8-e56112b0b920",
    "scope": "profile email"
}
User information can be reached by decoding the id_token value with any jwt library.
/auth/code Response: You can first view the ‘User Login Activities' section, where you can review the response and then review ‘User Authentication Options’ section.
You can find relevant implementations of these endpoints in different languages under samples.
User Login Activities
We see a json data, that has the user information as below when we decode the id_token value with jwt.
If a user does not exist in your app’s own database with the data which is used to login to your app via mID Provider OpenID, you can save this user into the database with relevant data.
For example, in your database, you can query email address of this user which is in the ID Token data set, and if a record does not exist in the frontend web application database, you can perform registration process and save the information including any other information of this user provided in the data set.
When the e-mail of the user in the ID Token data set cannot be found in the web application database, you can do the registration with this e-mail and other information you get from the data set.
A decoded ID Token:
{
  "jti": "1665171e-1bf8-4dab-8132-9f2c018c3c18",
  "exp": 1591190686,
  "nbf": 0,
  "iat": 1591190386,
  "iss": "https://testopenid.aws1.test1.com/auth/realms/testopenid",
  "aud": "test-application",
  "sub": "e0686f5d-cee3-4b4d-acfc-b4a725f31b3e",
  "typ": "ID",
  "azp": "test-application",
  "nonce": "9oy1dz81j5j",
  "auth_time": 1591190377,
  "session_state": "459cbb3d-5382-43c8-97db-dfdc91b87644",
  "acr": "2",
  "amr": "k_verify",
  "email_verified": true,
  "preferred_username": "username@gmail.com",
  "given_name": "",
  "family_name": "",
  "email": "username@gmail.com"
}
User Authenticate Options
There are several ways to show the user as authenticated in the web application too after the user is authenticated with the OpenID system. These are generating a session, a jwt token and using an access token, that came as a response from token endpoint.
- Continue with the current Client-Server
- Generating a JWT Token: You can complete the authentication process on the web application side by generating a jwt token with the user information taken from ID Token (if you use jwt token in your current application, you can keep using this form) and sending this token to the web application.
- Creating a session: When you use a session form in your current web application, you can complete the process by creating a session for the user, that is authenticated by OpenID.
- Using the access_token obtained from the token endpoint: You can complete the authentication by sending the access token, that came from token endpoint, to the web application but in this case, you may need to find a mechanism to check the validity of the token, that is sent back again by the web application.
Details of the Scope Parameter
- OpenID Connect Scope parameter is used for when a user tries to login via an application and it determines which data will be allowed to be accessed, like username or profile picture.
- Each scope parameter contains user features called “claim”. Which scope the application will use to do the OpenID Connect depends on the user data that application needs. When the user allows the claims in the scope, the data will be returned in id_token and it will be accessible in the /userinfo endpoint with the access_token.
Standard Claims:
- Standard Claims are the information about the user and defined as standard in the OpenID Connect protocol. These information can be found in id_token and also /userinfo endpoint.
- You can define your own claims and add these to id_token following some rules.
- The essential and required scope claim is openid and this claim shows that the application uses OpenID Connect.
- The other claims than
openidare put side by side and with a space between them. - You can see the most used standard claims below. And for all the standard claims, you can visit here
- openid: It returns a unique sub claim that can represent the user in id_token. Also, in id_token, it returns
iss,aud,exp,iatandat_hashclaims. For more information about id_token claims, you can click here. - profile: The claims, that contain the basic profile information, are put in id_token. Such as
name,family_name,given_name,middle_name,nickname,picture, andupdated_at - email: The email claim that contains the user email is put in id_token. Also,
email_verified, a Boolean that shows if the user email is verified or not, is put in id_token.
- openid: It returns a unique sub claim that can represent the user in id_token. Also, in id_token, it returns
Test with ID Number
You can see an example to use TCKN, mobile and birth date in the scope where it is adjusted for a tenant. You can reach the information related with this scope value for this tenant using the keywords while creating the redirect URL which the user will use to log in.
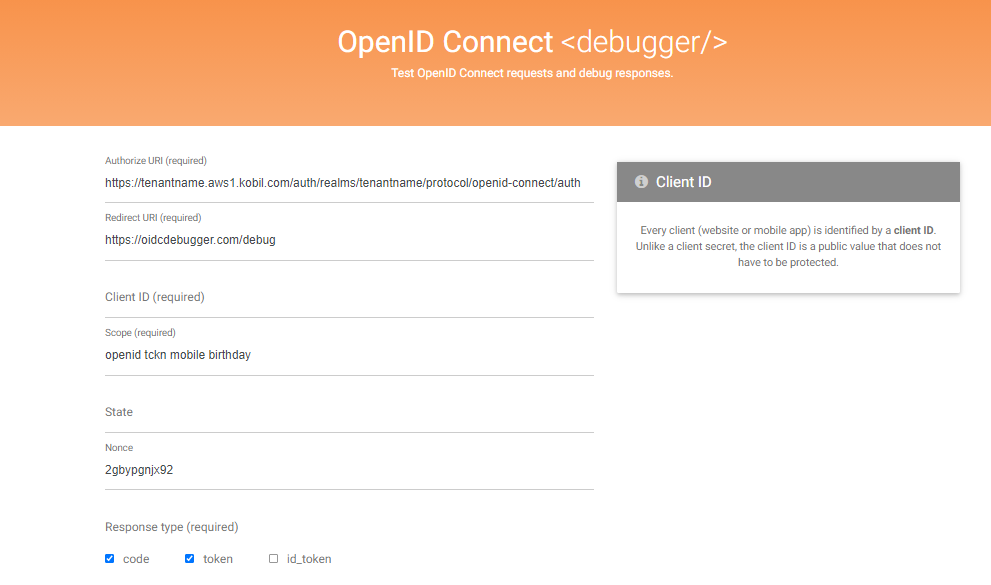
Below you can see the example shown with oidcdebugger for getting TCKN, birth date and telephone number.
Example: When we send a request in oidcdebugger set as below and we enter midentitiy, we get authorization code
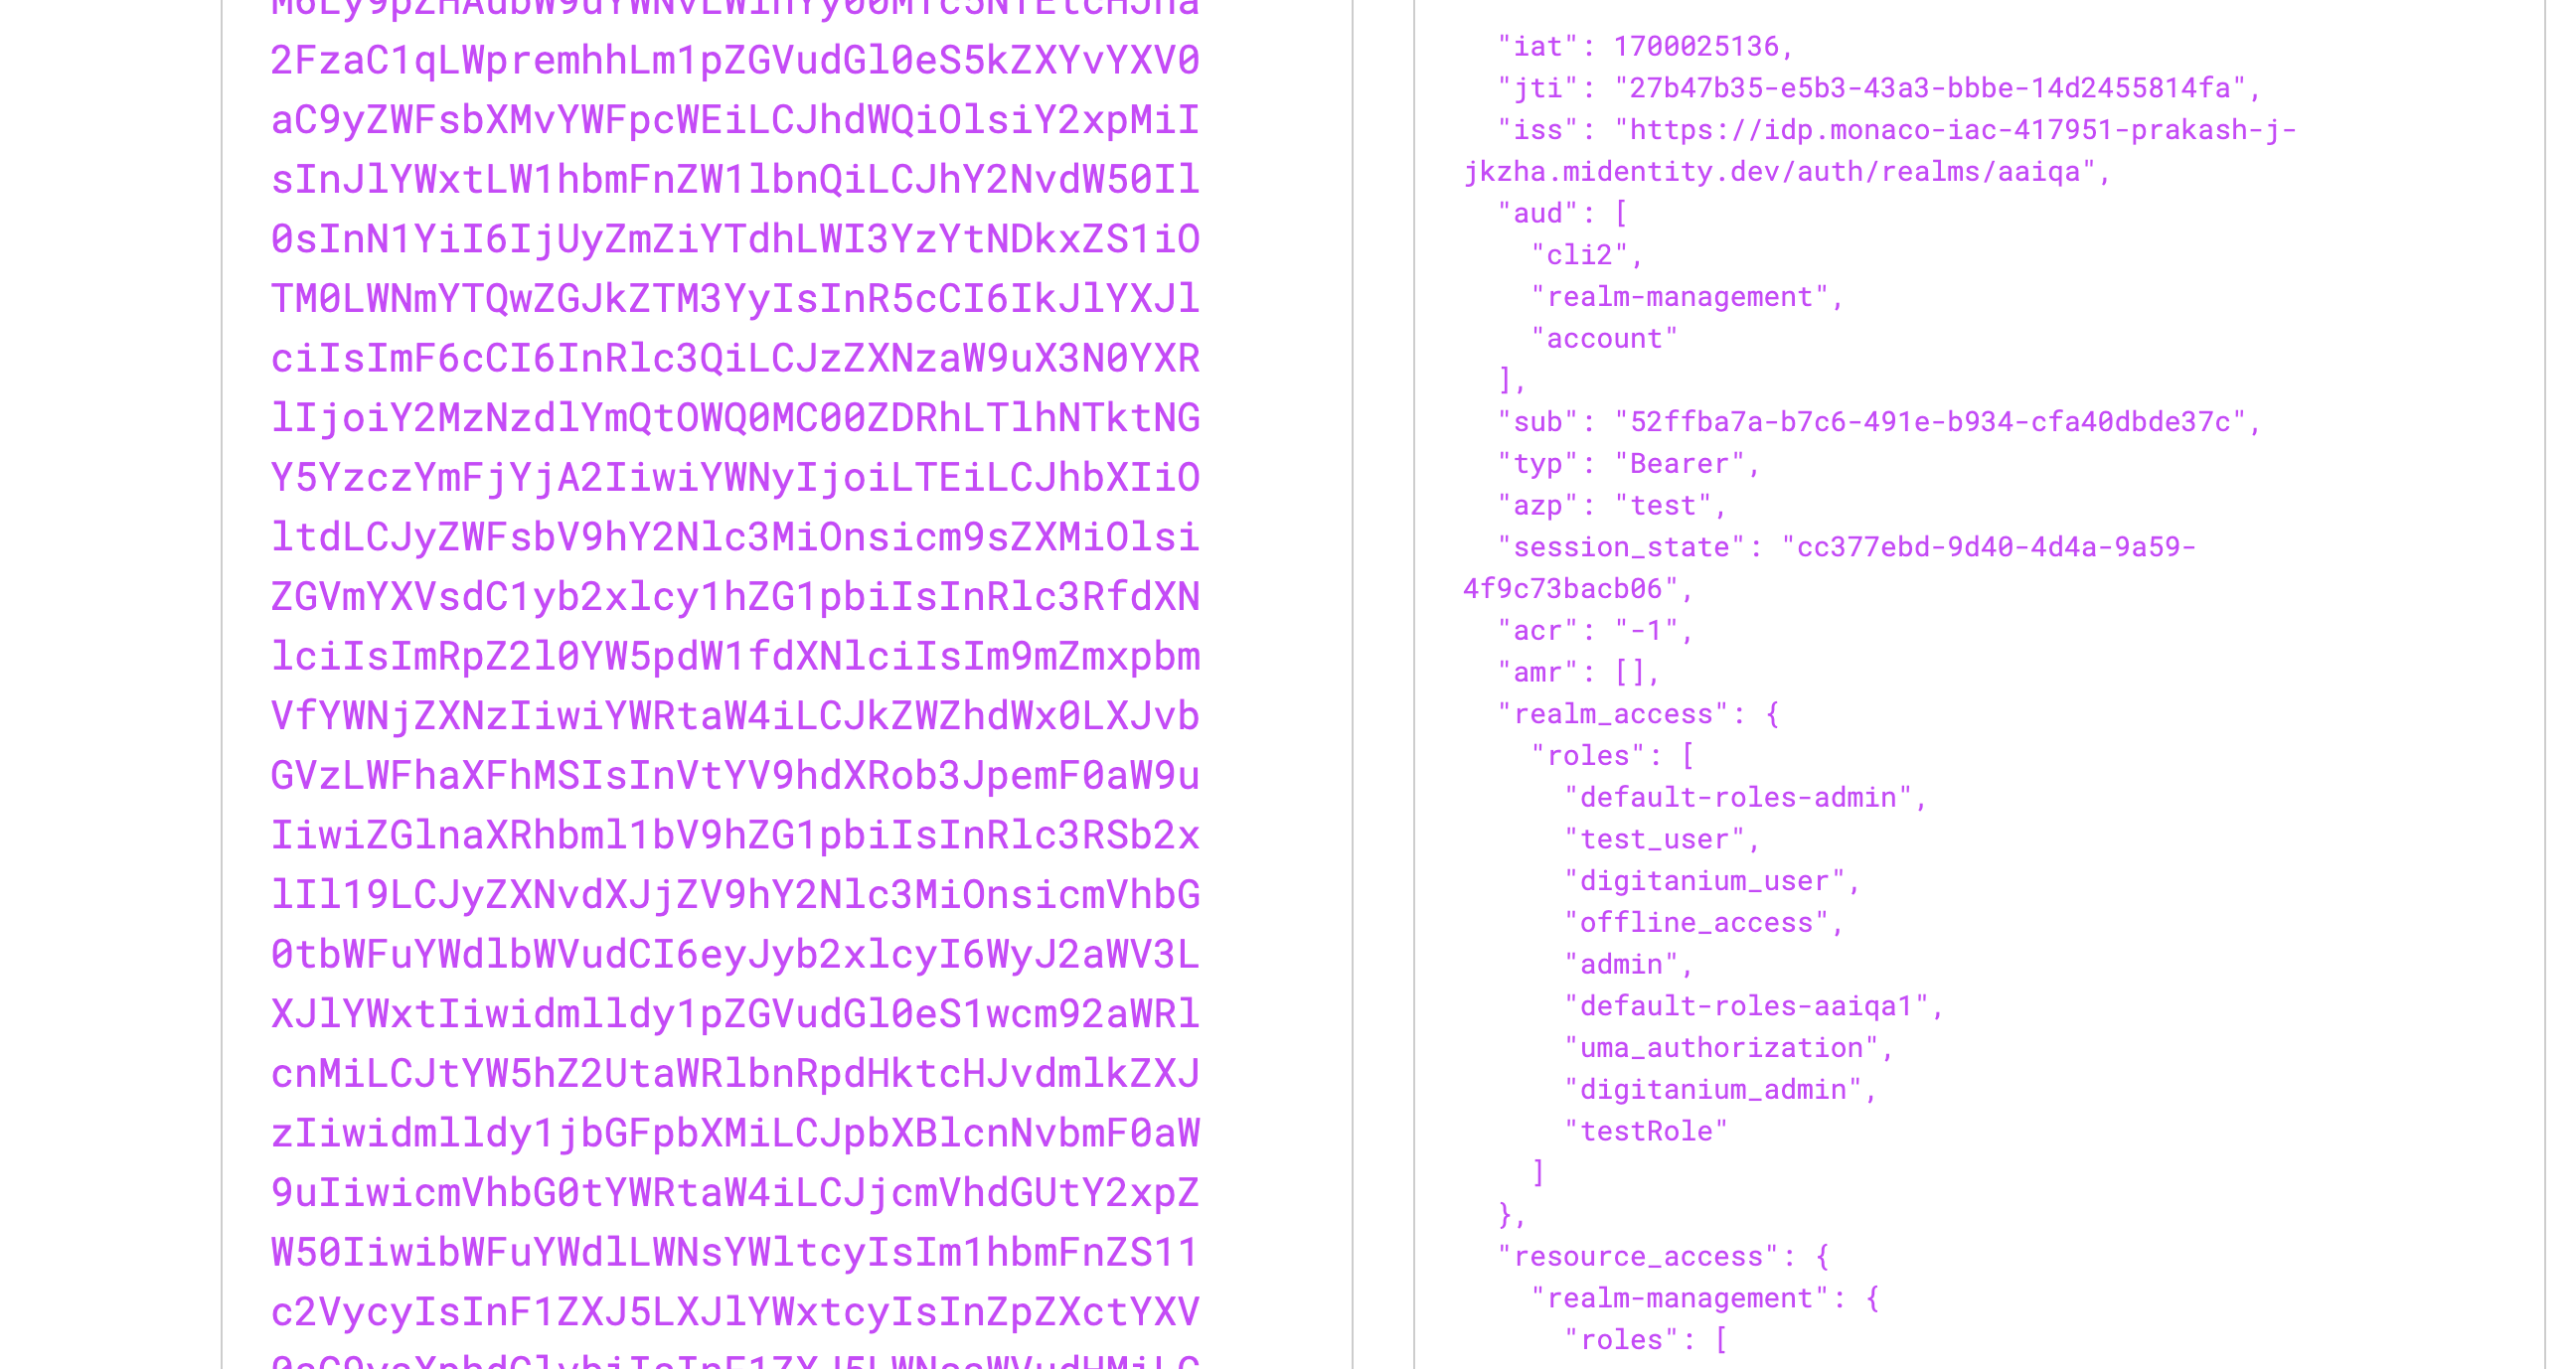
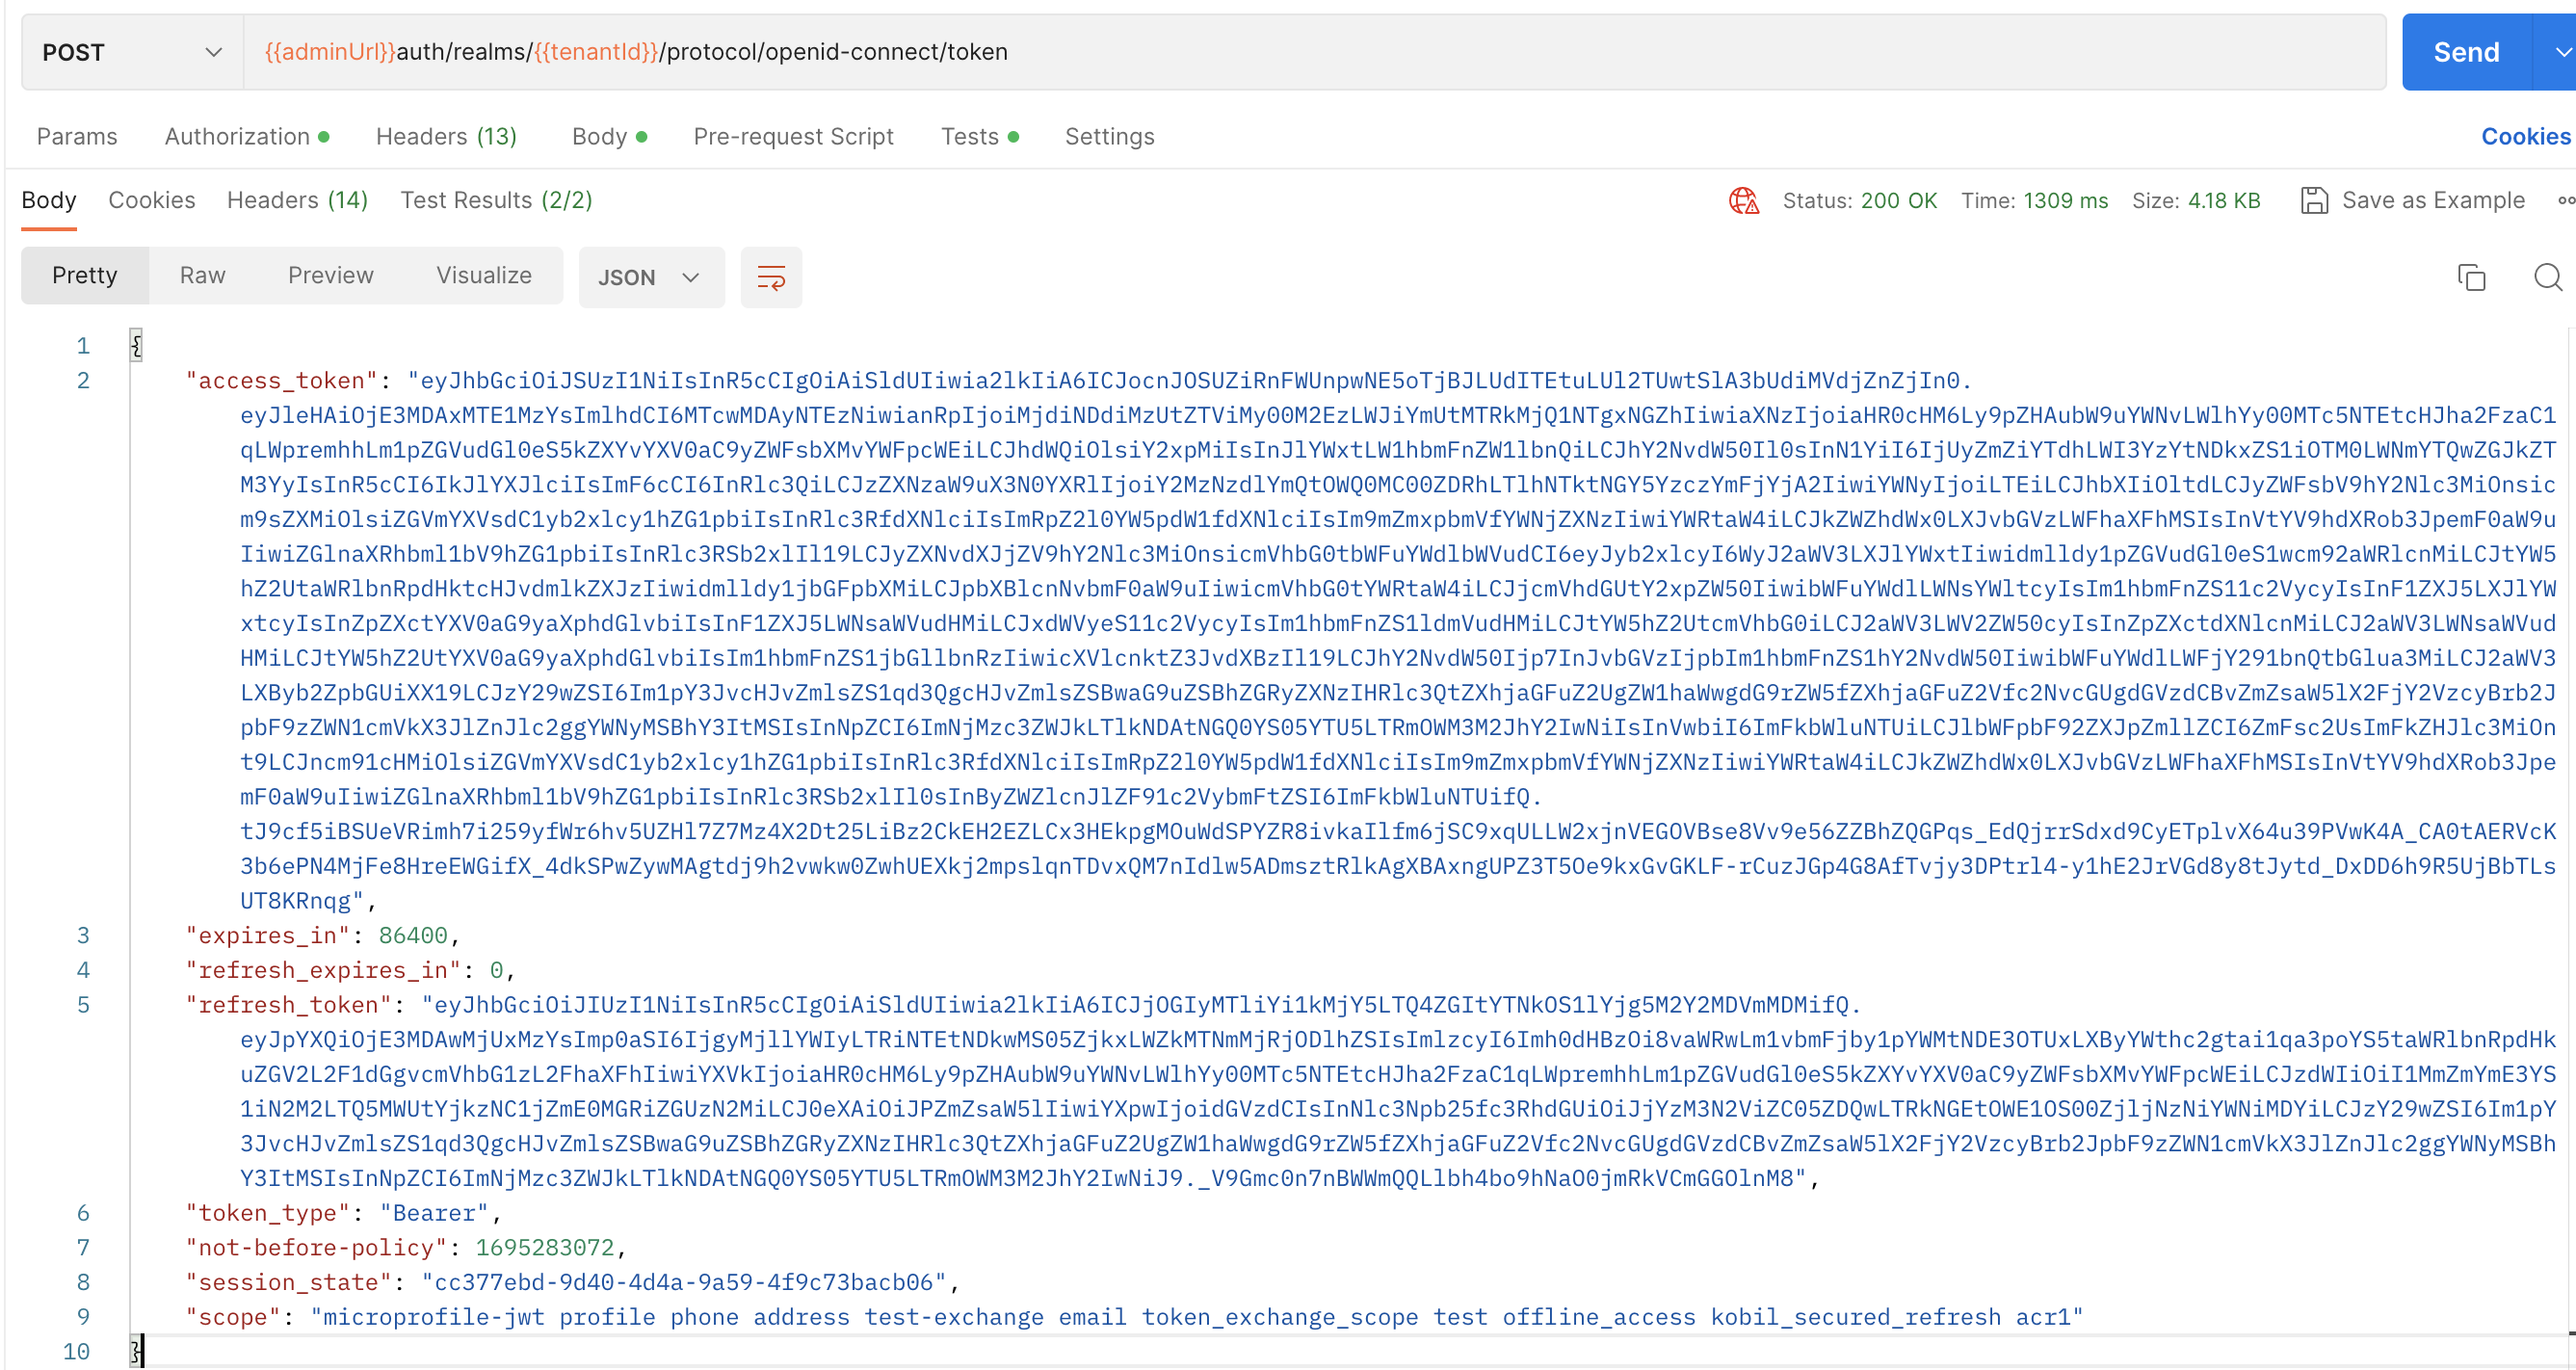
With this authorization code we make a request to token endpoint by postman as below and copy the returned id_token. Note that there are tckn, mobile and birthday in the returning scope.
We decode this id_token in jwt.io address and as you can see it contains the id number, mobile phone number and date of birth.