Authentication Rest API
To integrate Postman we offer a comprehensive walkthrough of utilizing Postman API requests to seamlessly interact with KOBIL IDP services. Covering backend operations, each section dives into specific functionalities, providing detailed explanations and visual representations. From generating authorization tokens to triggering transactions, this guide ensures a robust understanding of integrating Postman effectively into your workflow.
General Structure
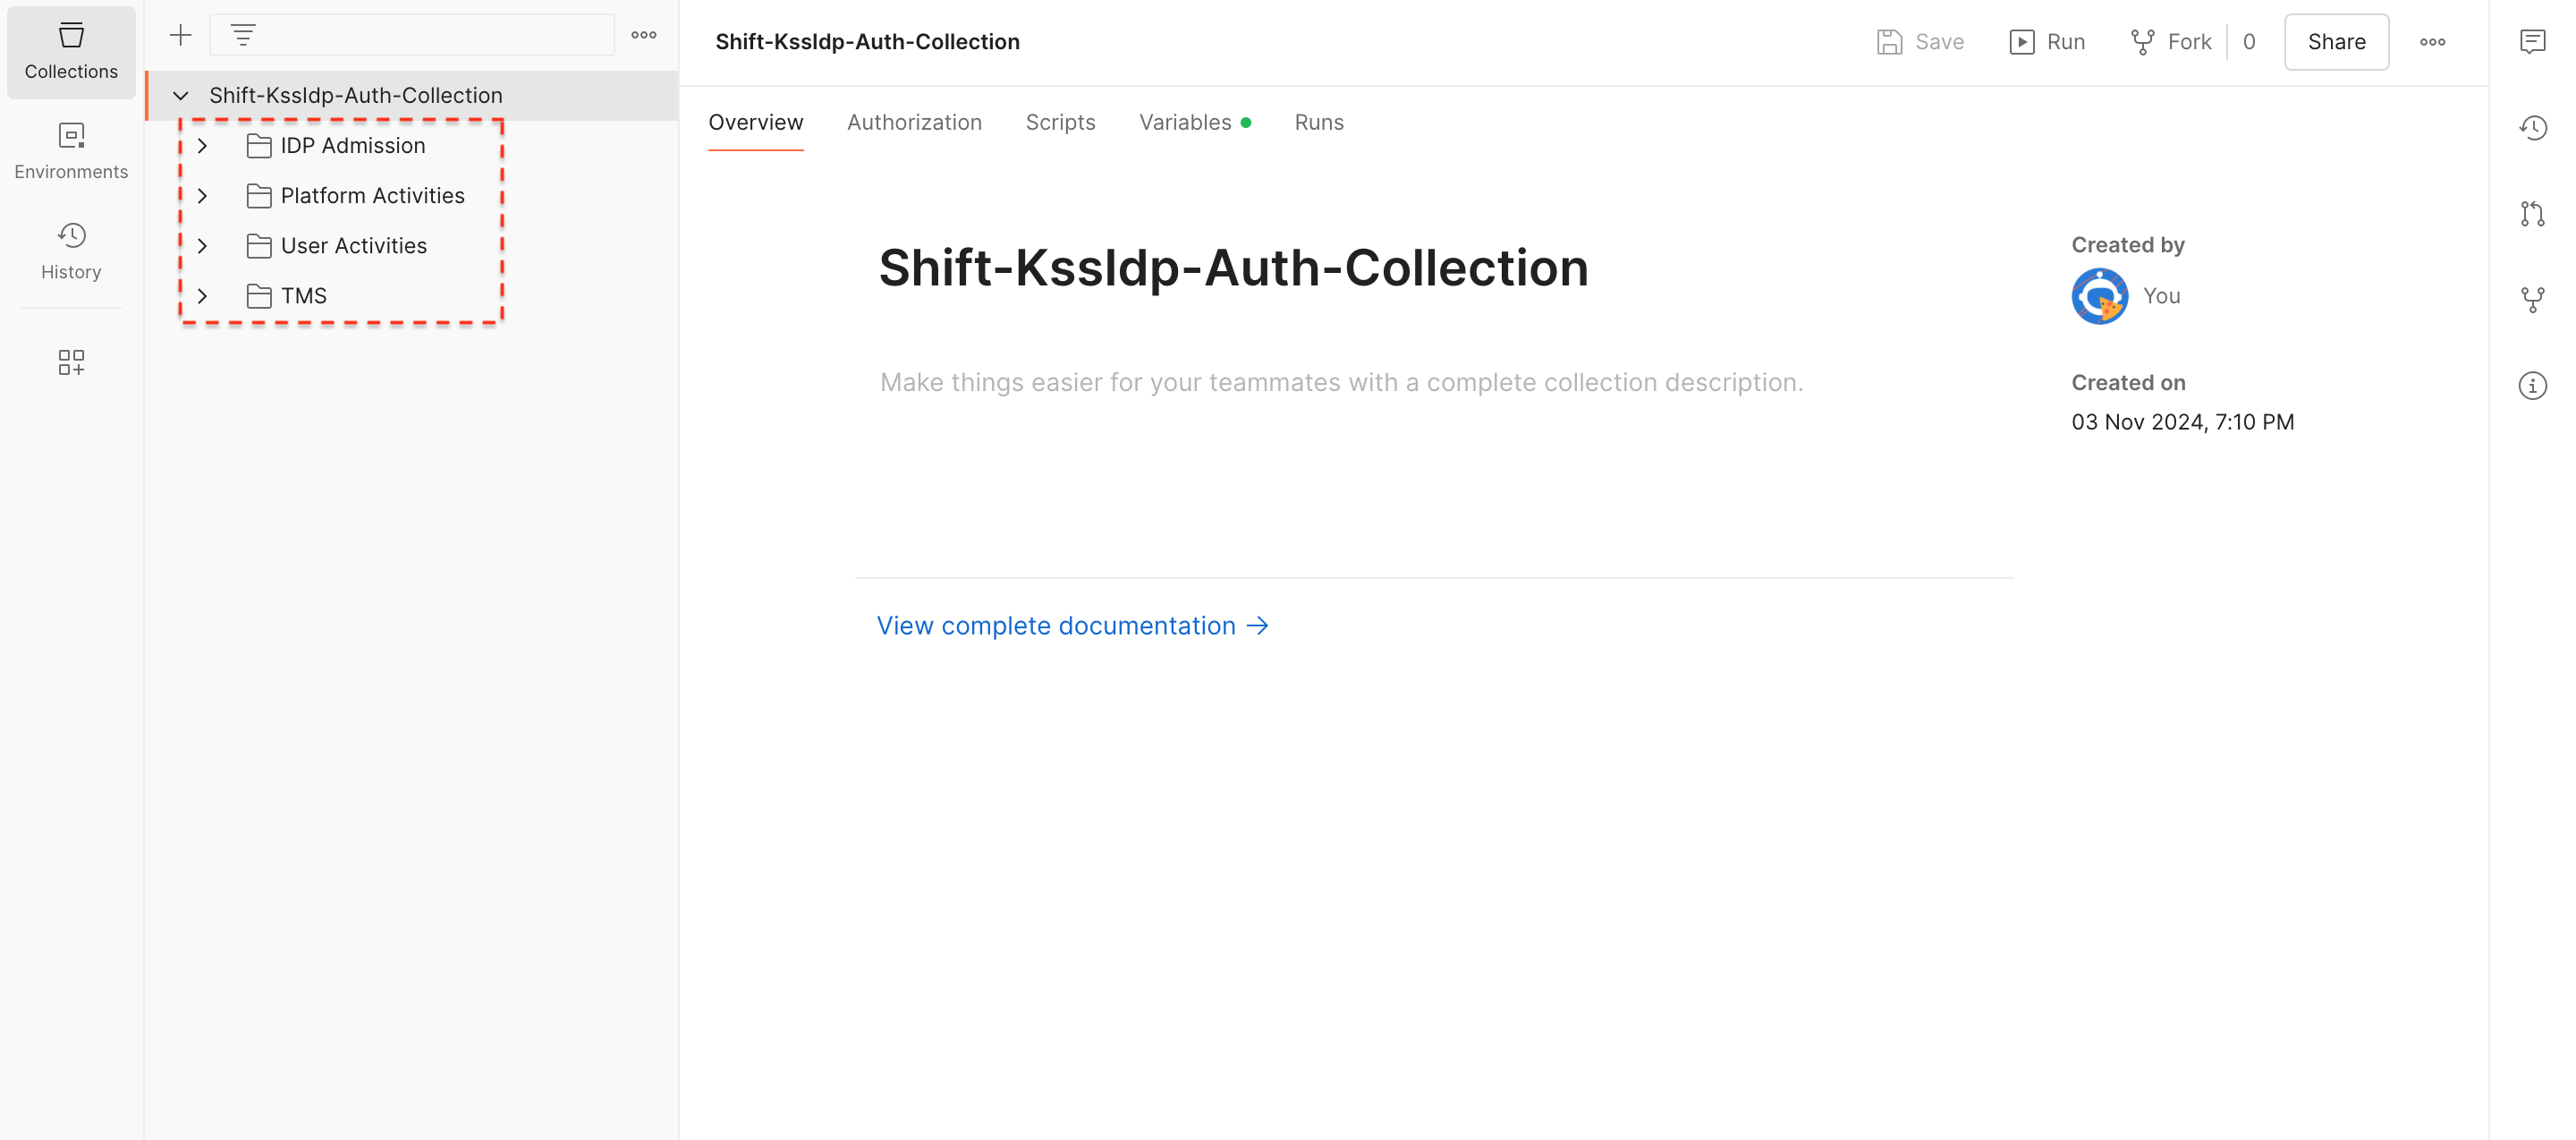
In general, the KSSIDP Auth Collections are divided into 4 different file structures, while receiving the access token in the IDP Admission section, you could control your workspace in the platform / user activities sections. Further, you can easily perform and secure your transactions to your app users via TMS APIs.
IDP Admission
Generate Authorization Token
- General Info:
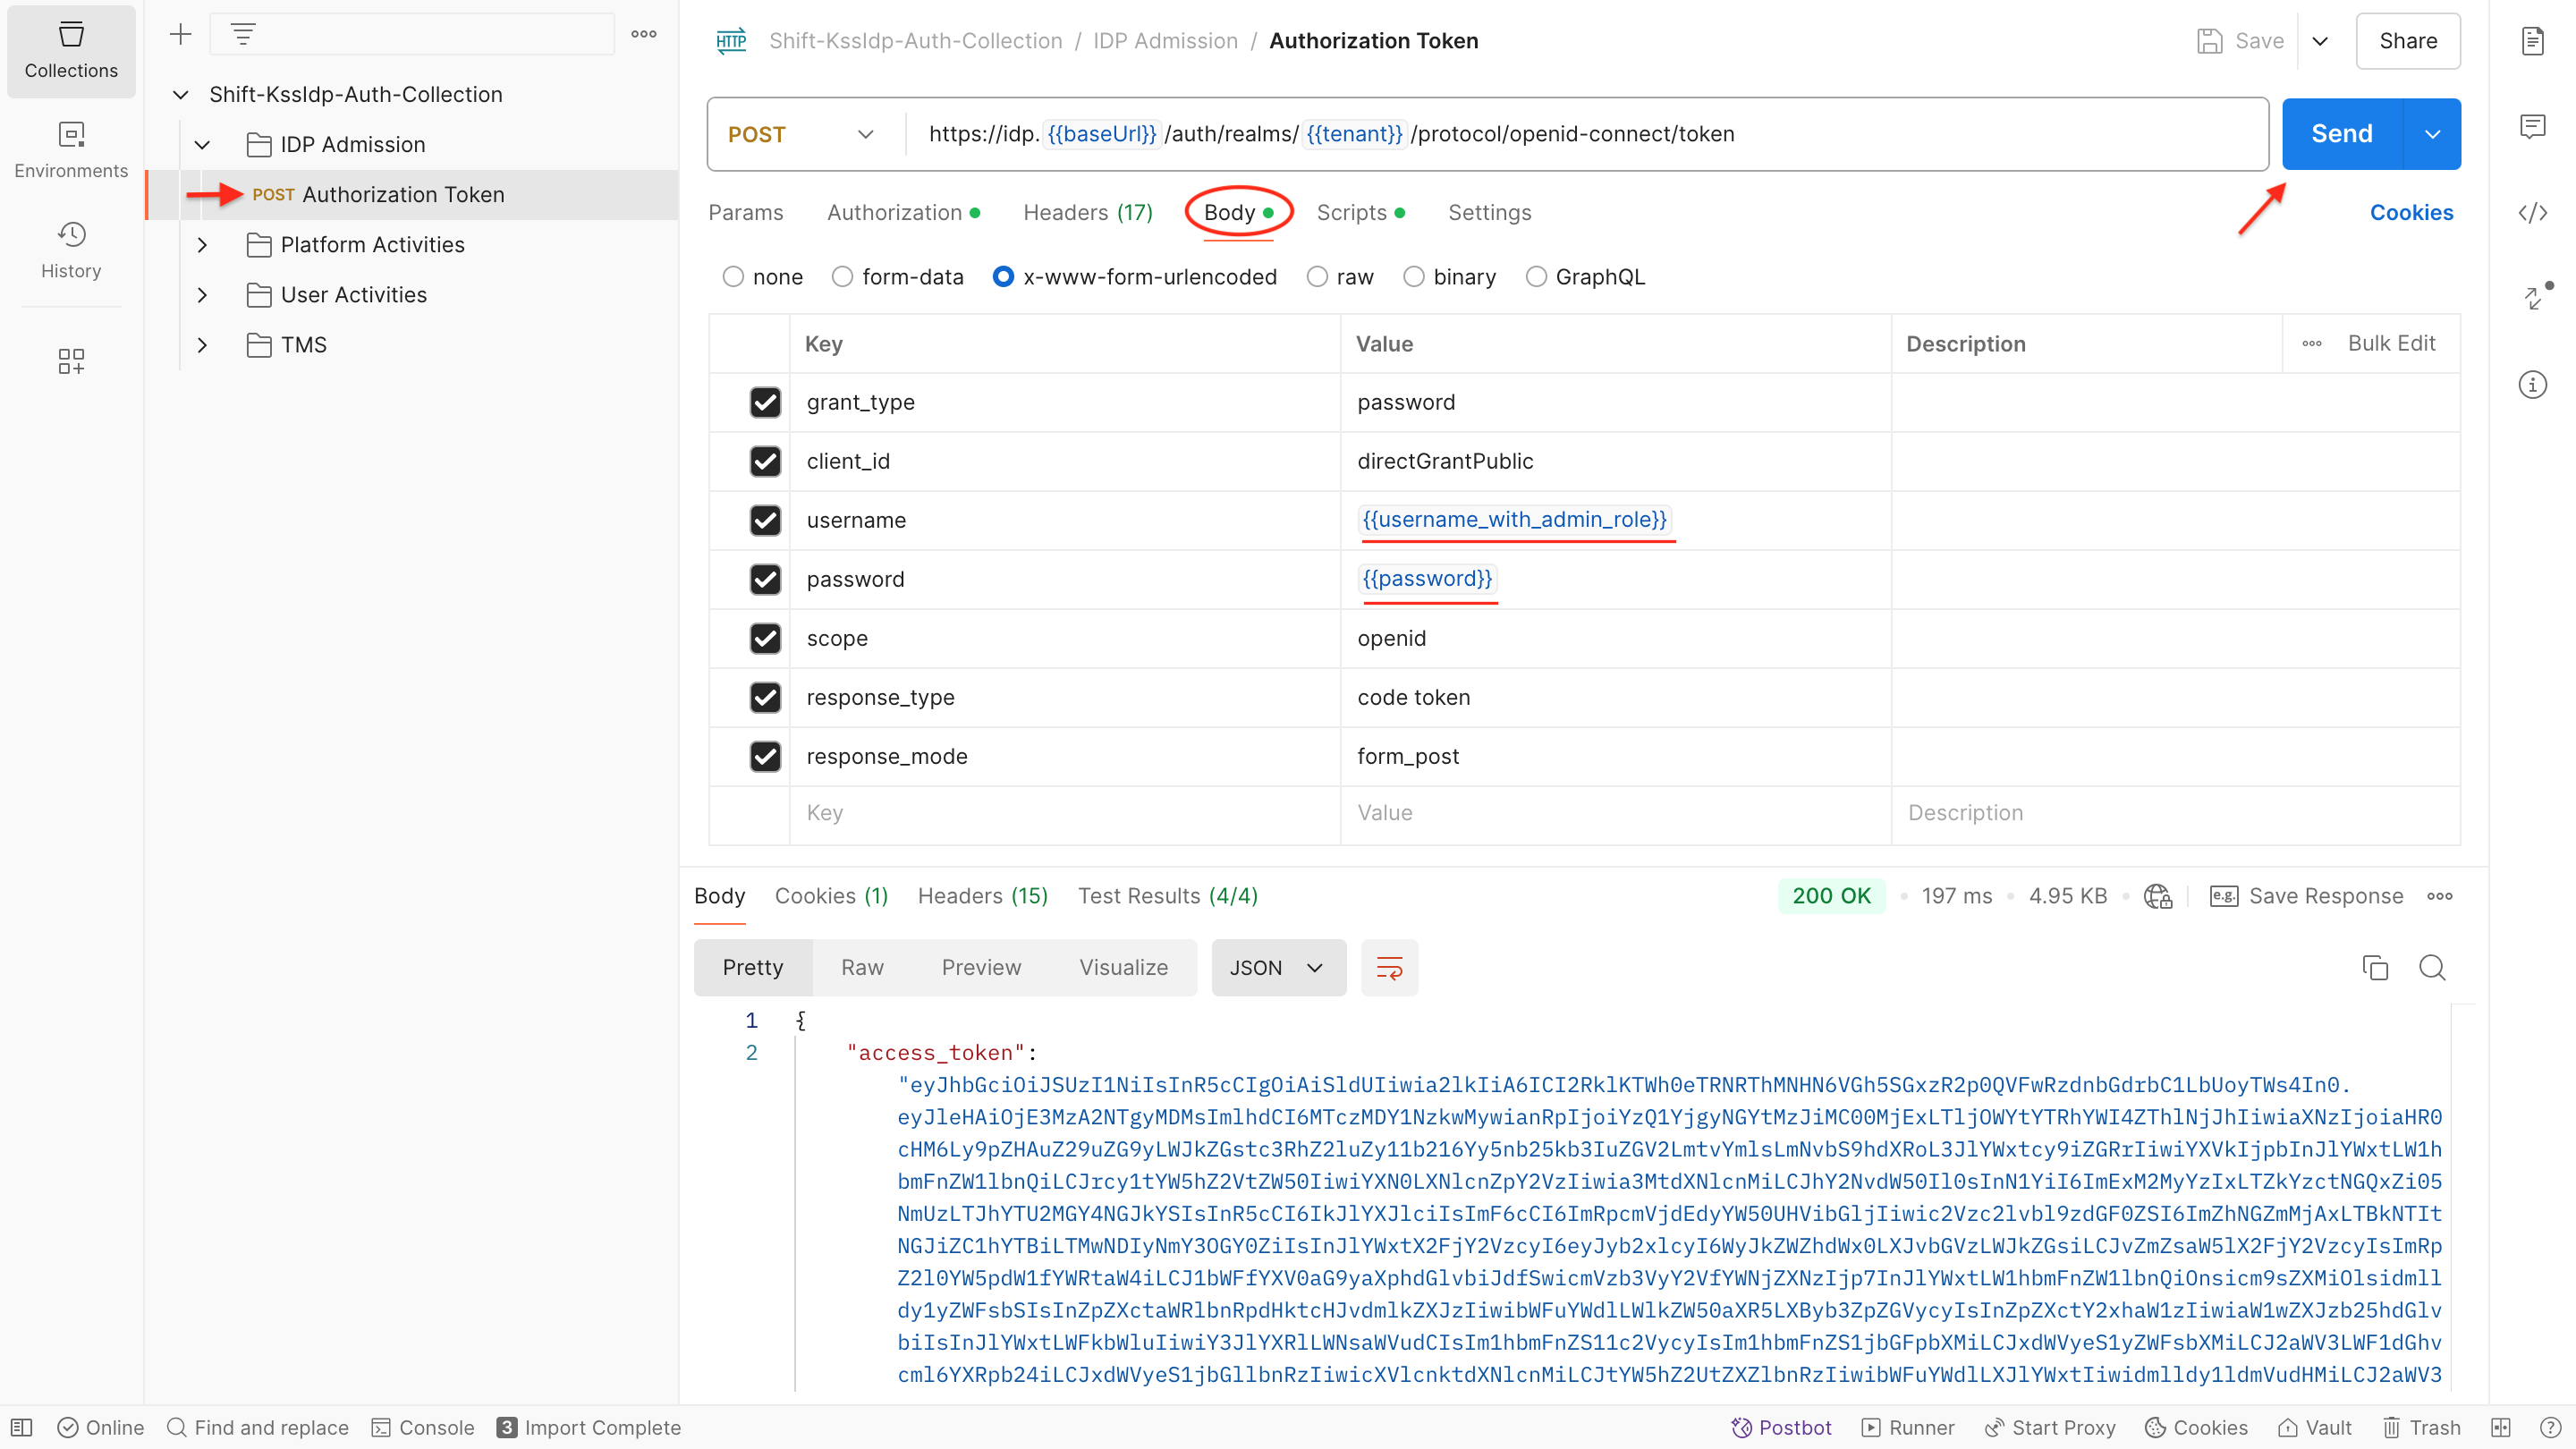
- All the Postman API requests are processed with access_token values, and tokens are valid for every 300 seconds.
- To get the access_token in your Workspace, please configure the body part of the Authorization Token request.
- Performing the API Request and Response:
- To get more information about the request body configurations and responses, please follow the Authorization Token API methods.
KOBIL - IDP services will provide you username and password values, and these credentials will allow you access to the IDP console, and Smartdashboard of your workspace.
Platform Activities
KSSIDP Supported Platforms
-
General Info:
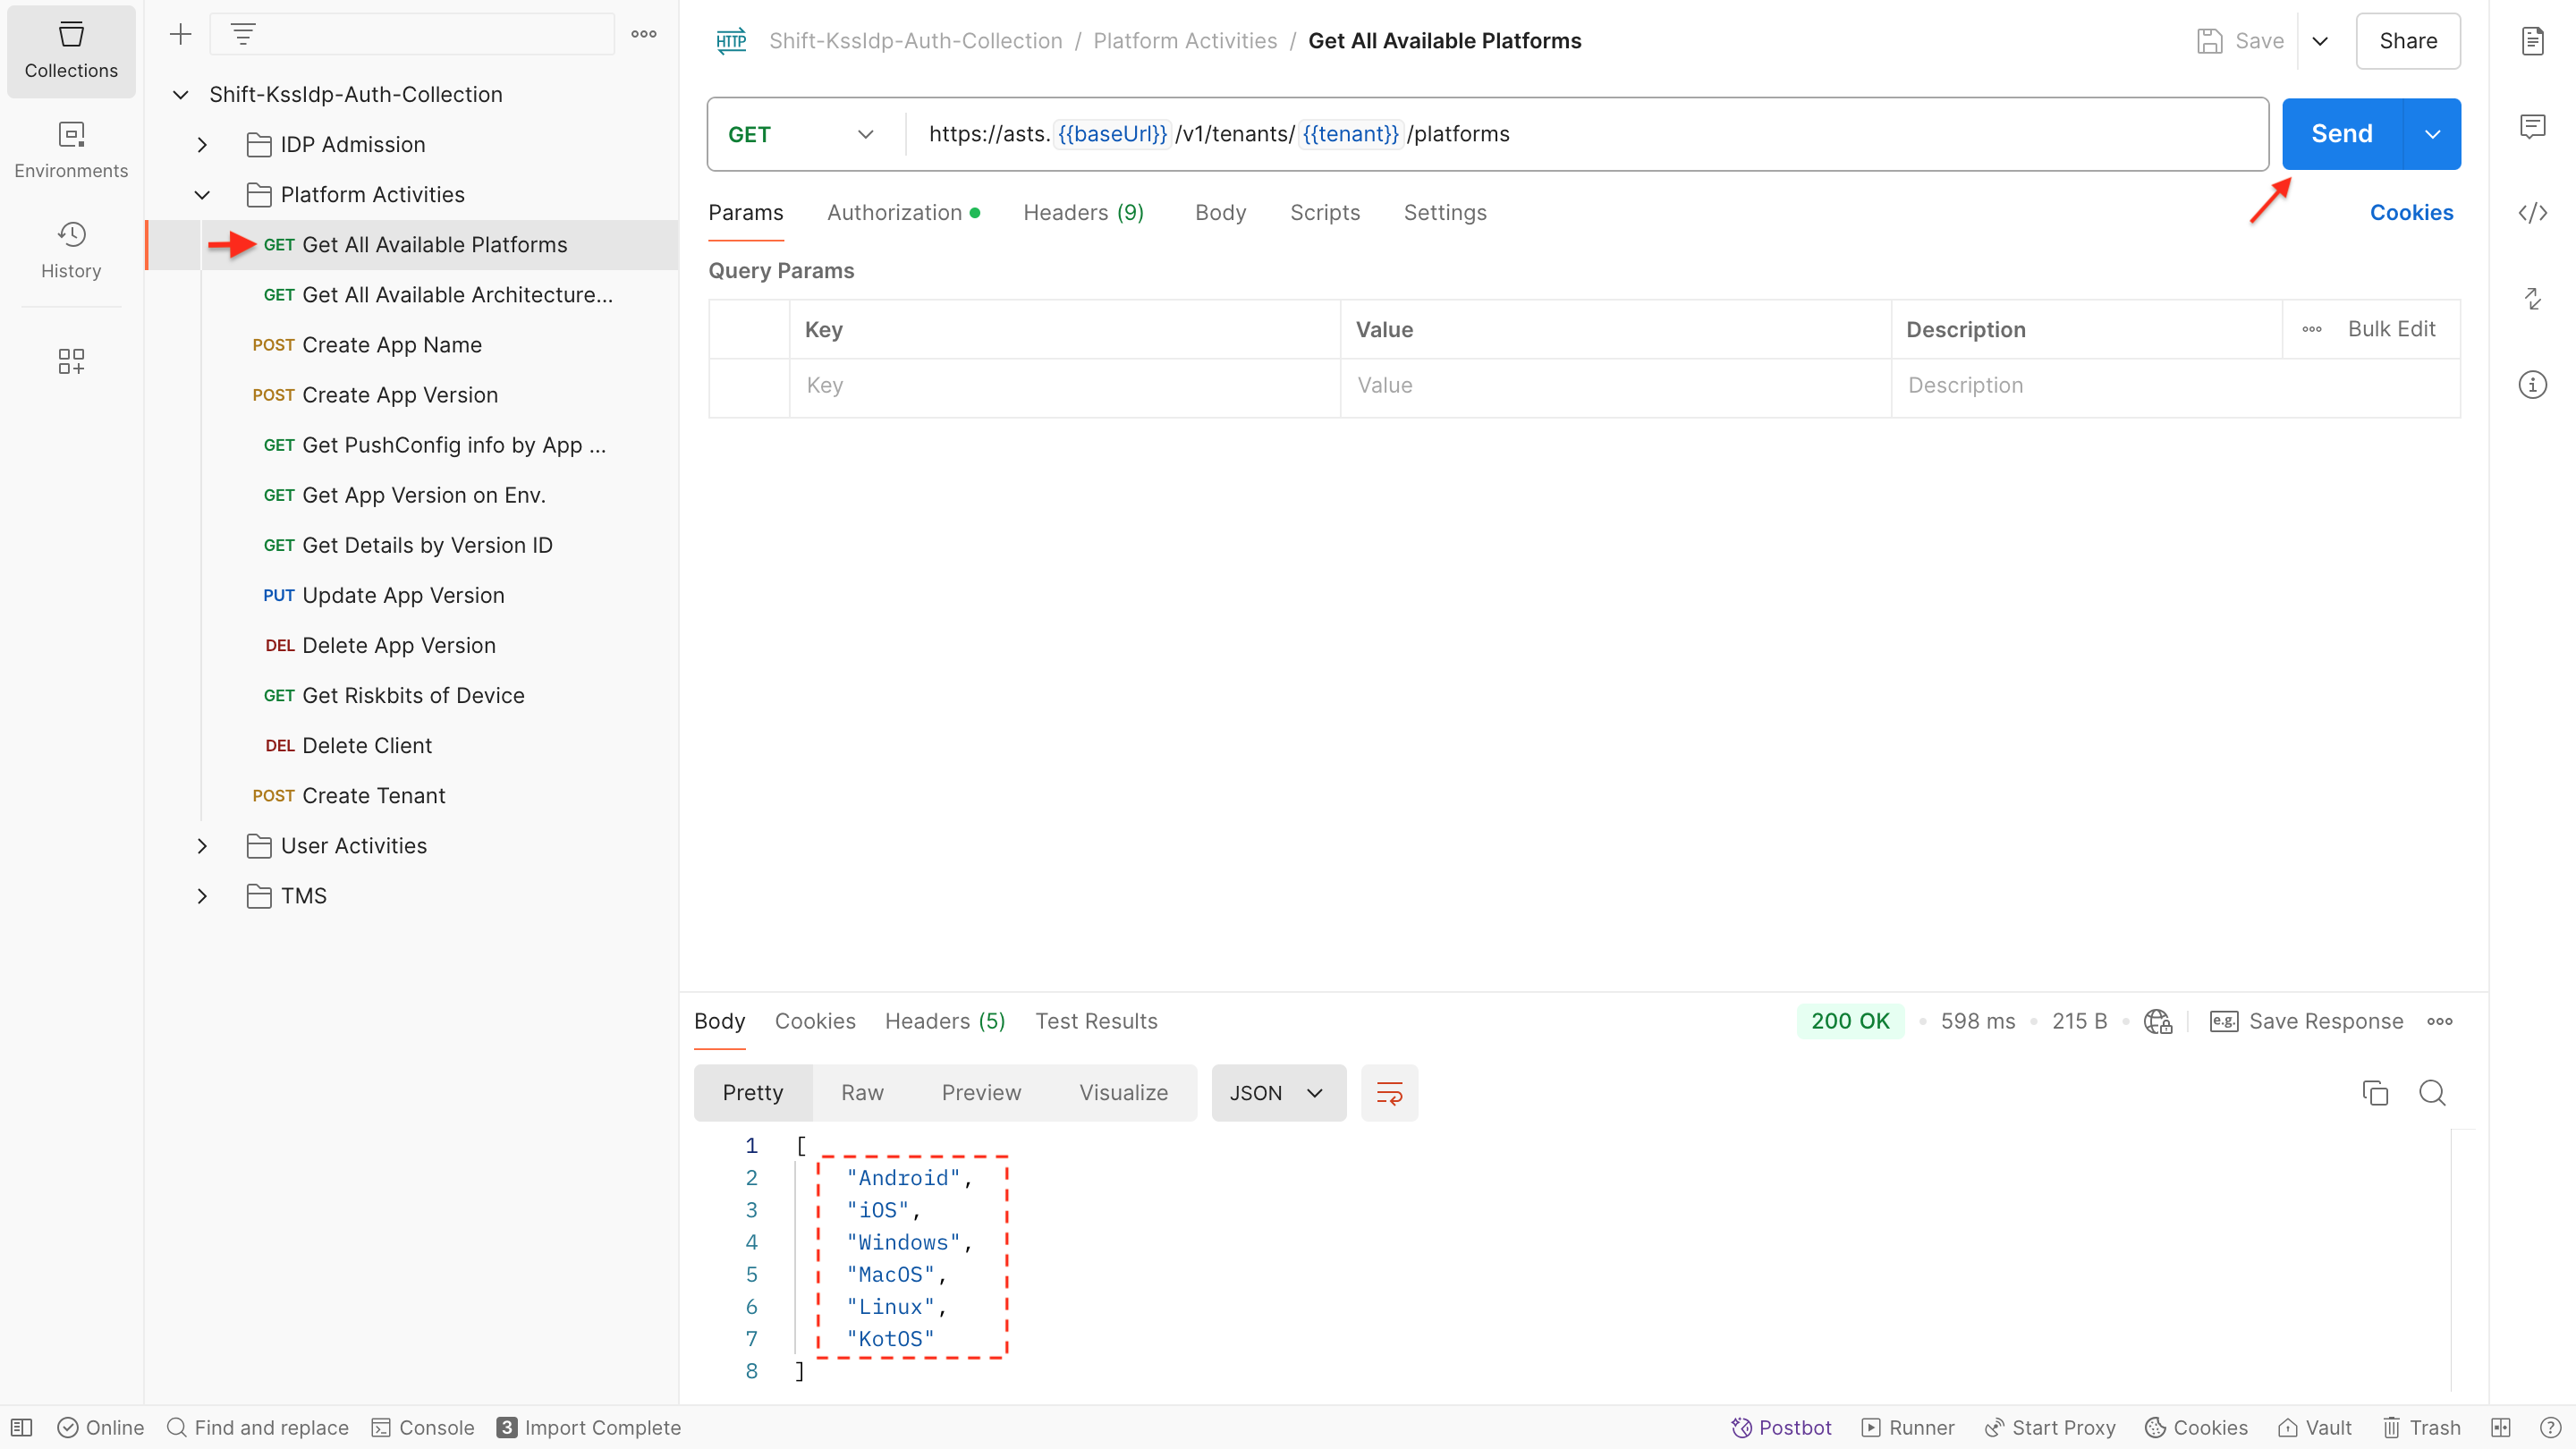
- Indicates the operating system that KSSIDP supports
-
Performing the API Request and Response:
- For more information about the request body configurations and responses, please follow the List All Platforms API methods.
Create App Name
-
General Info:
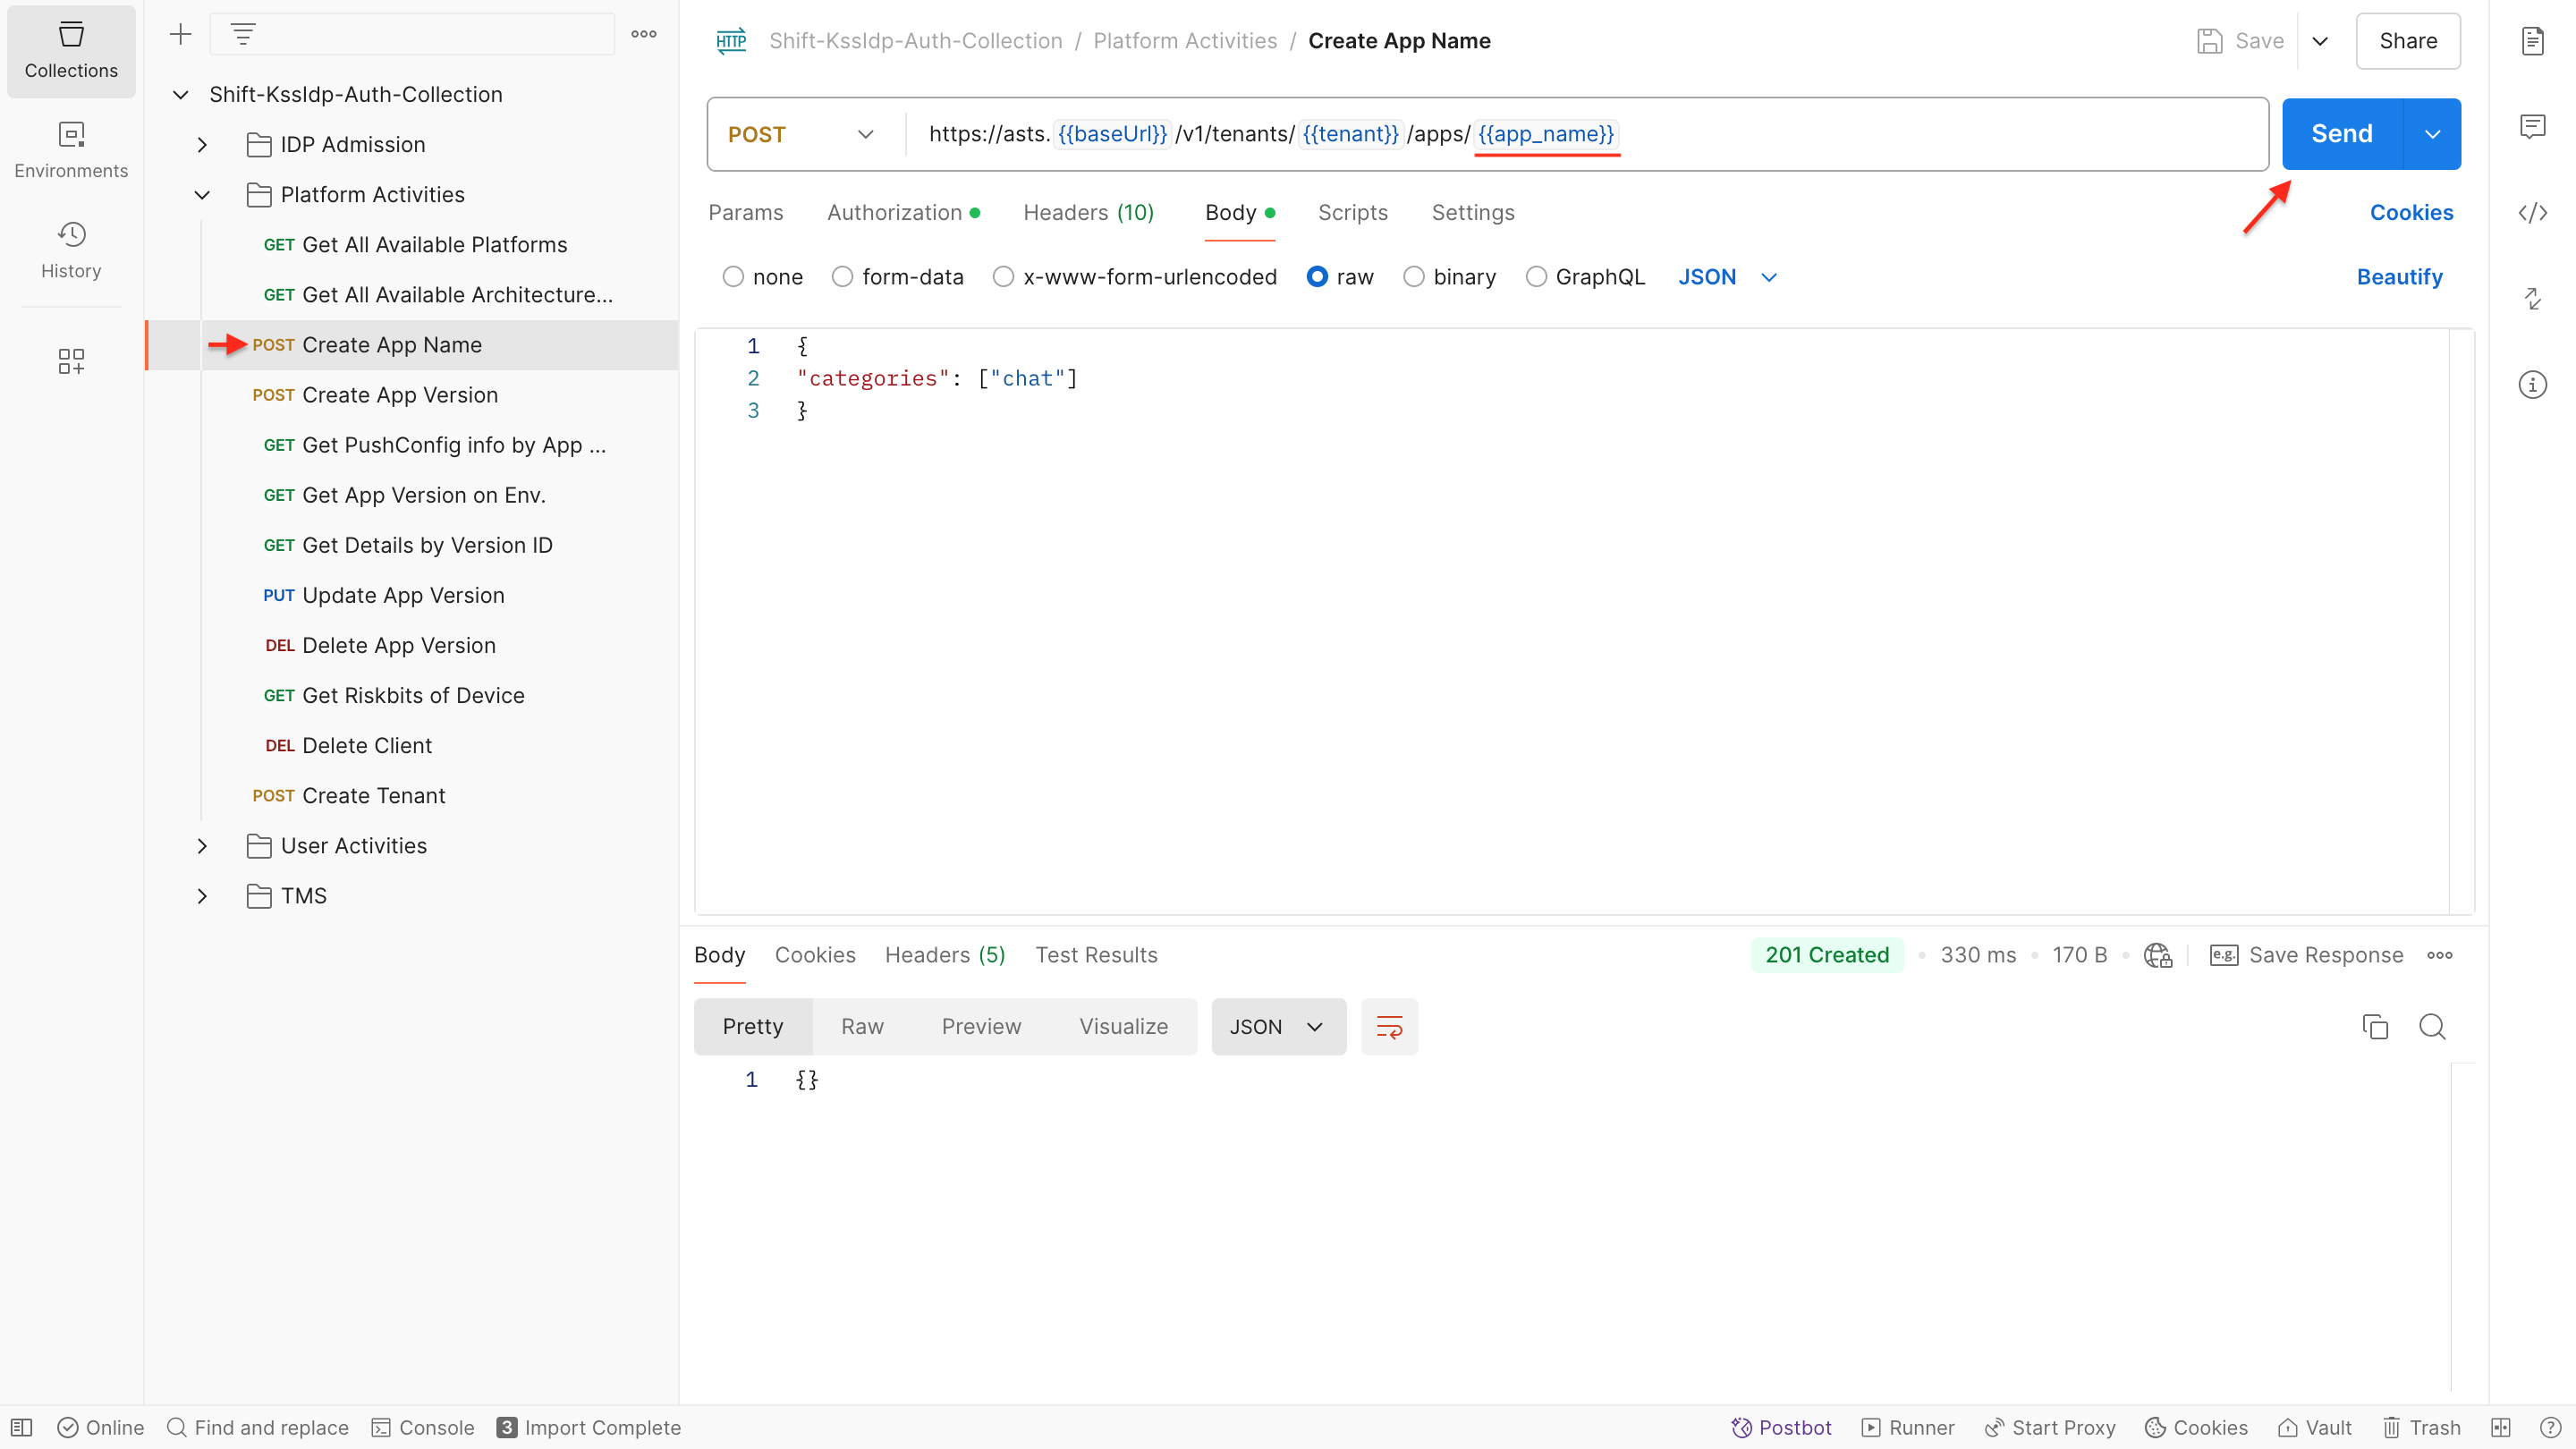
- The primary objective is to create an app by specifying its name, and the newly created app will be promptly displayed on the Smartdashboard in real-time.
- In Postman request calls, you can configure your categories of the app, choosing between CHAT and TMS.
-
Performing the Request:
- To create an app by utilizing the Create App API use following request:
POST https://asts.{{baseUrl}}/v1/tenants/{{tenant}}/apps/{{app_name}} -
Request Body:
- Configure the request body parameters as outlined below and ensure that the specified parameters in the request body are set up according to the provided guidelines.
{
"categories": ["chat"]
}
NOTE: If push notification features are required for the created app, customers must define their Android API key, iOS Bundle ID, or HPK Client ID values in the body of the request call, see section Add App in Security Server in KOBIL Shift Lite for the details of how to obtain the needed values.
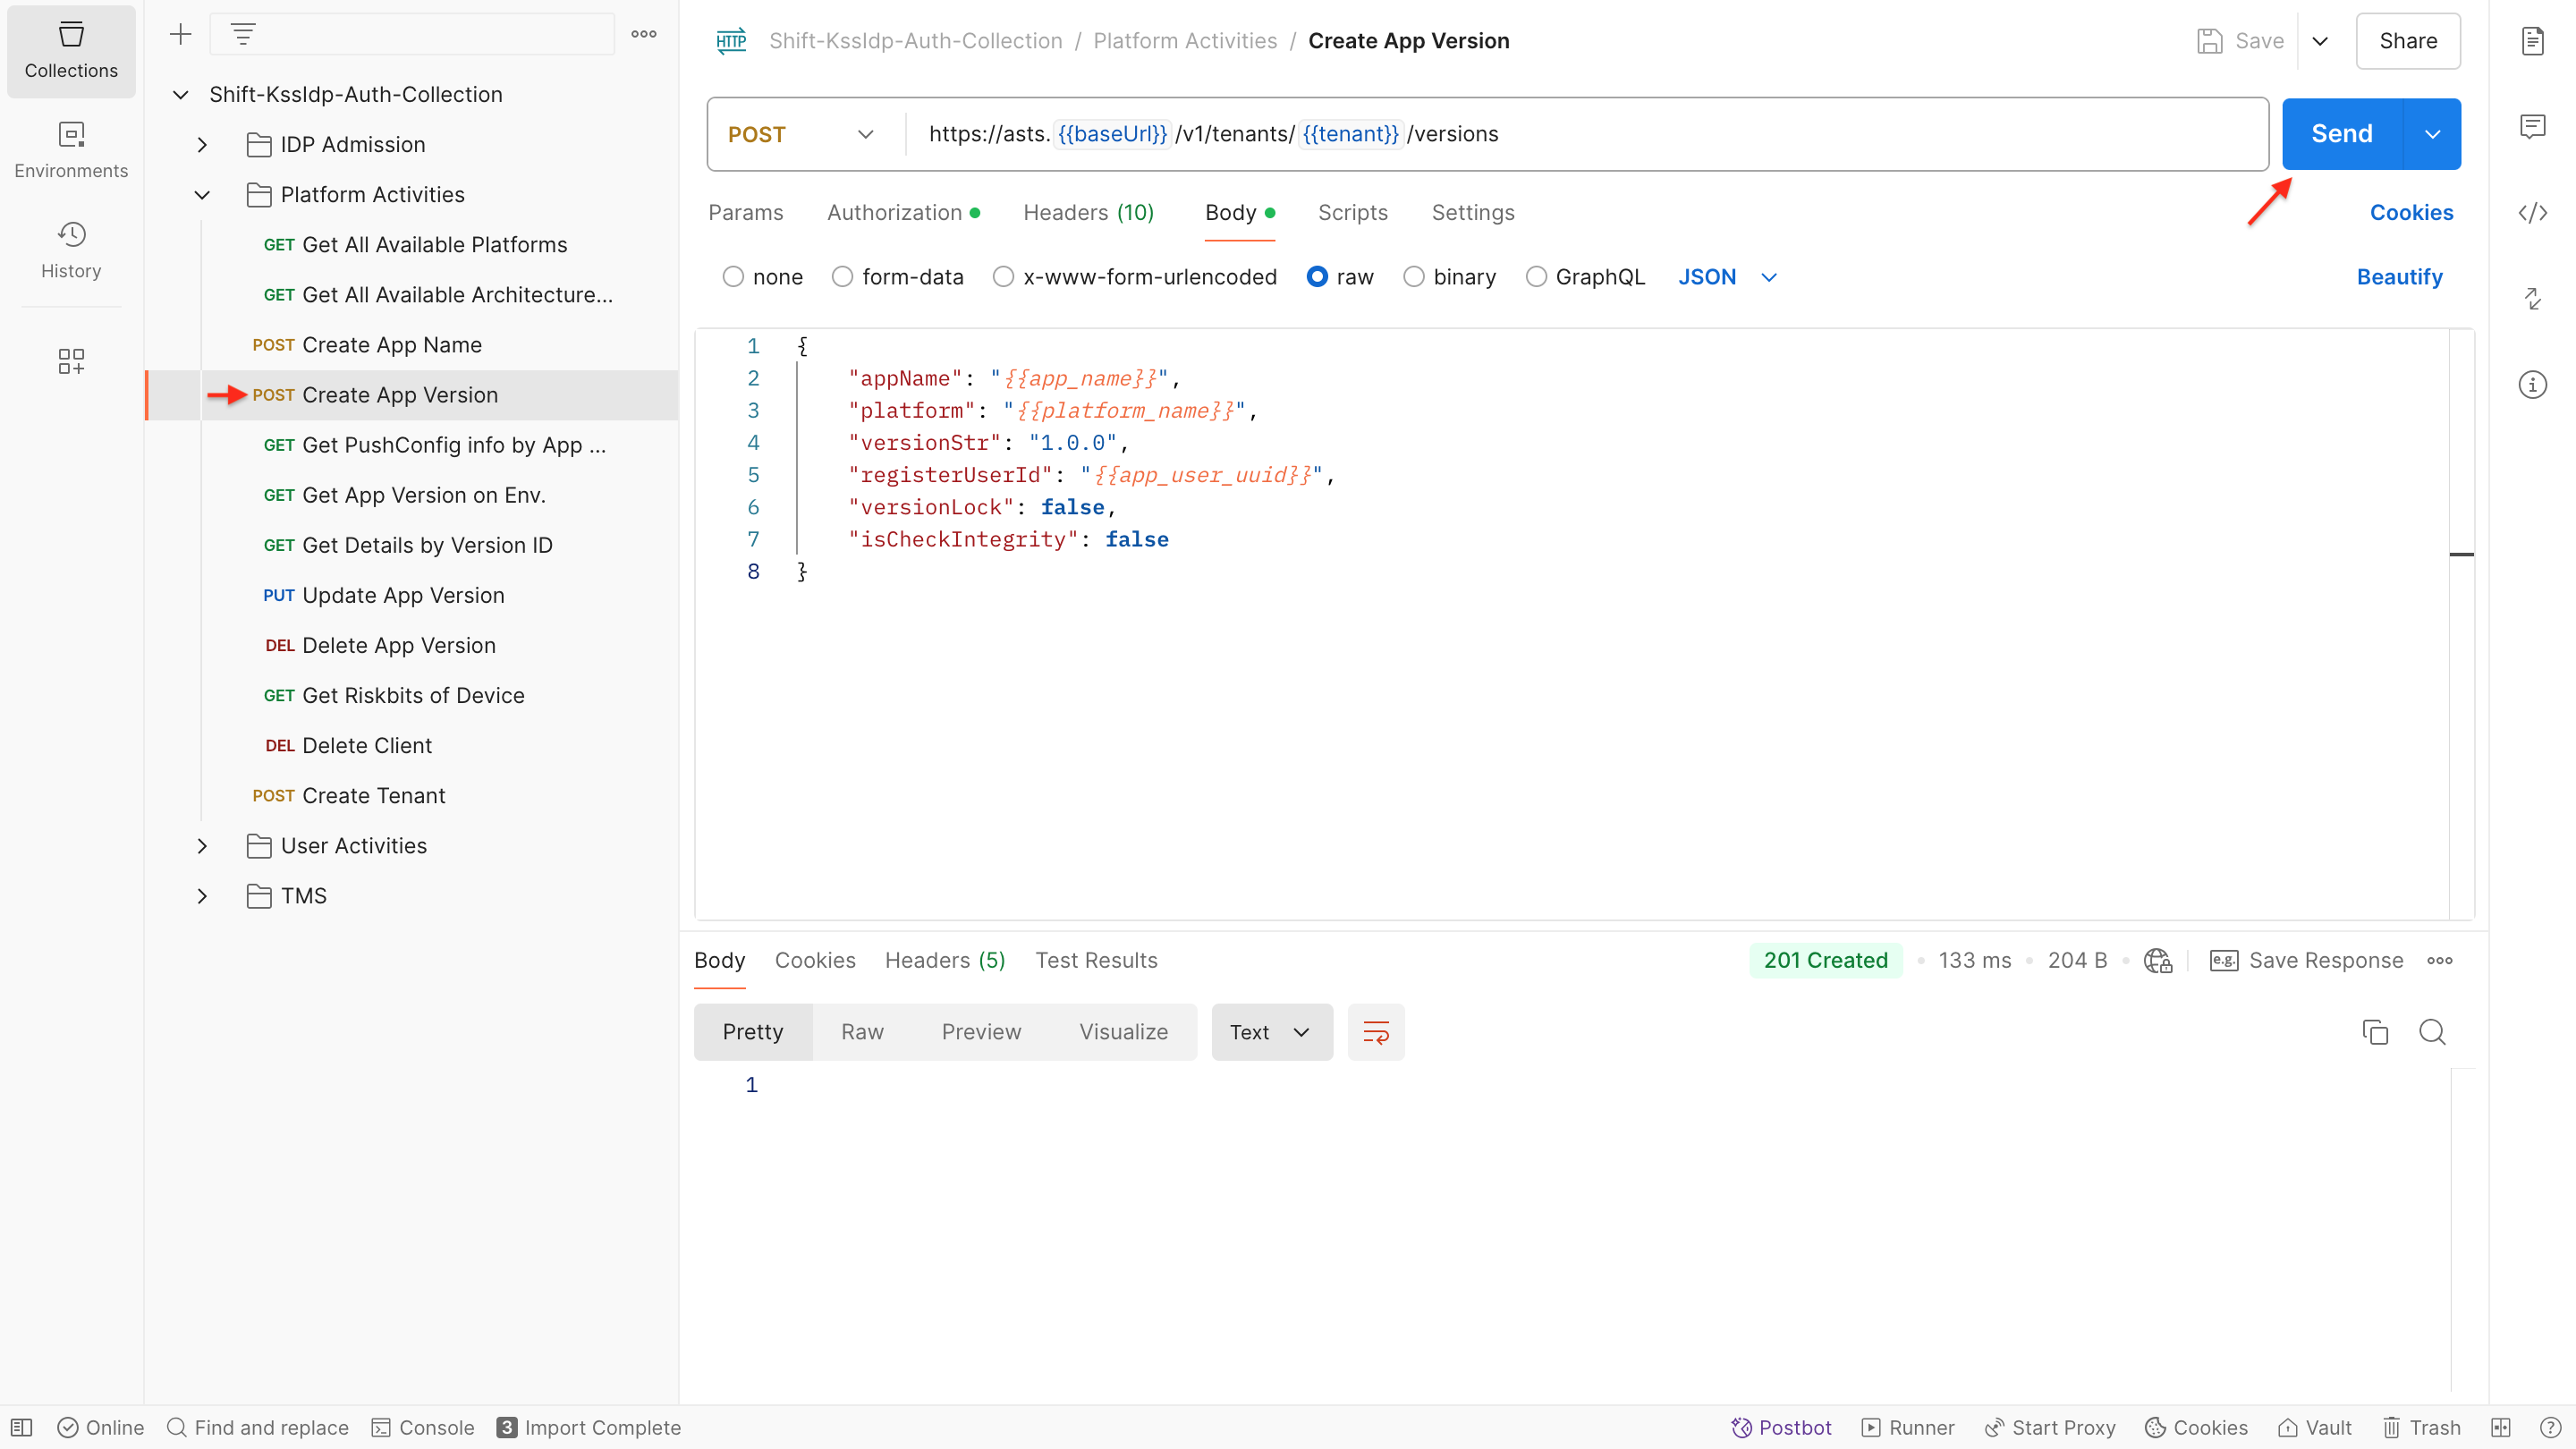
Create App Version
-
General Info:
- The app version registration is performed with the ID of the created users.
- Based on the operating system where the app will be executed, platform can be selected as Android / iOS.
- The version number setup represents the major, minor, build numbers of your app, and it is defined in the versionStr parameter.
-
Performing the API Request and Response:
- To get more information about the request body configurations and responses, you check the Create App Version API methods.
-
Sample of Request Body:
- Configure the request body parameters as outlined below and ensure that the specified parameters in the request body are set up according to the provided guidelines.
{
"appName": "TestApp",
"platform": "Android",
"versionStr": "1.0.0",
"registerUserId": "a13c2c21-6dc7-4d1f-96e3-2aa560f84bda",
"versionLock": false,
"isCheckIntegrity": false
}
NOTE: A user can register as many app versions as desired, but app names must be different from the others.
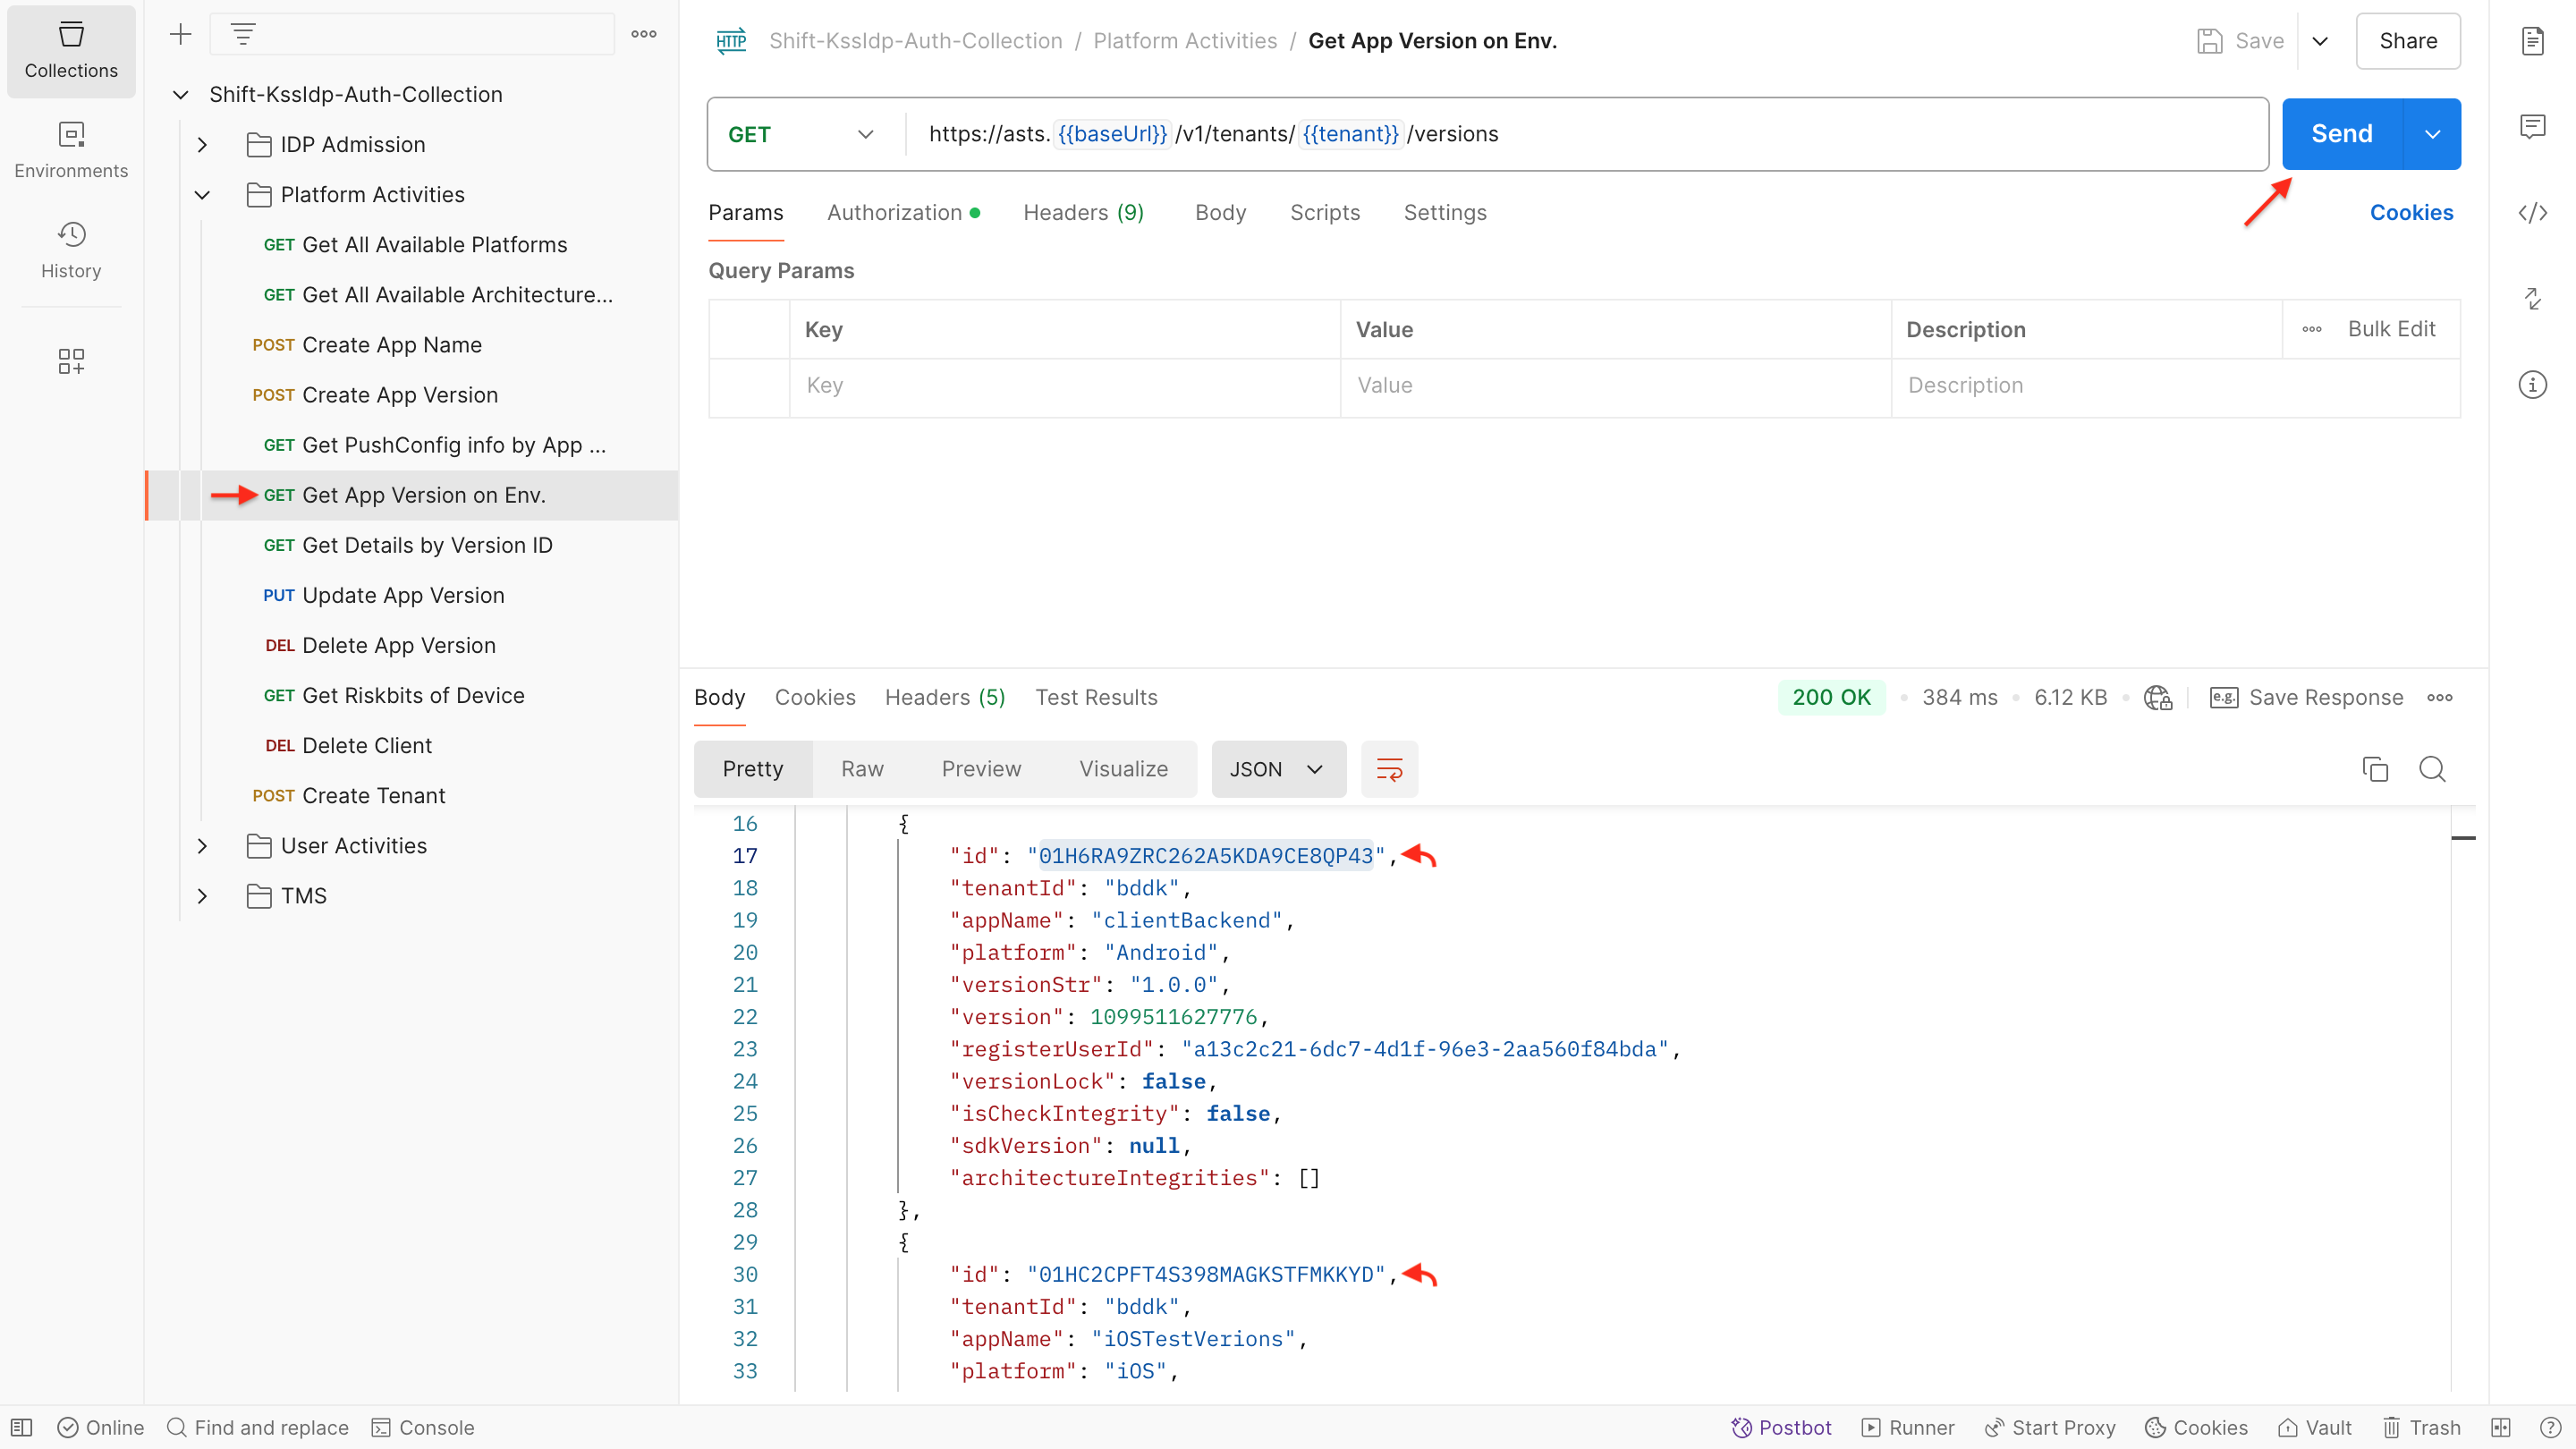
Get App Details by Version ID
-
General Info:
- This API call facilitates the retrieval of app version details based on Tenant/Workspace name.
-
Performing the API Request and Response:
- For more information about the request body configurations and responses, please follow the Get Version ID API methods.
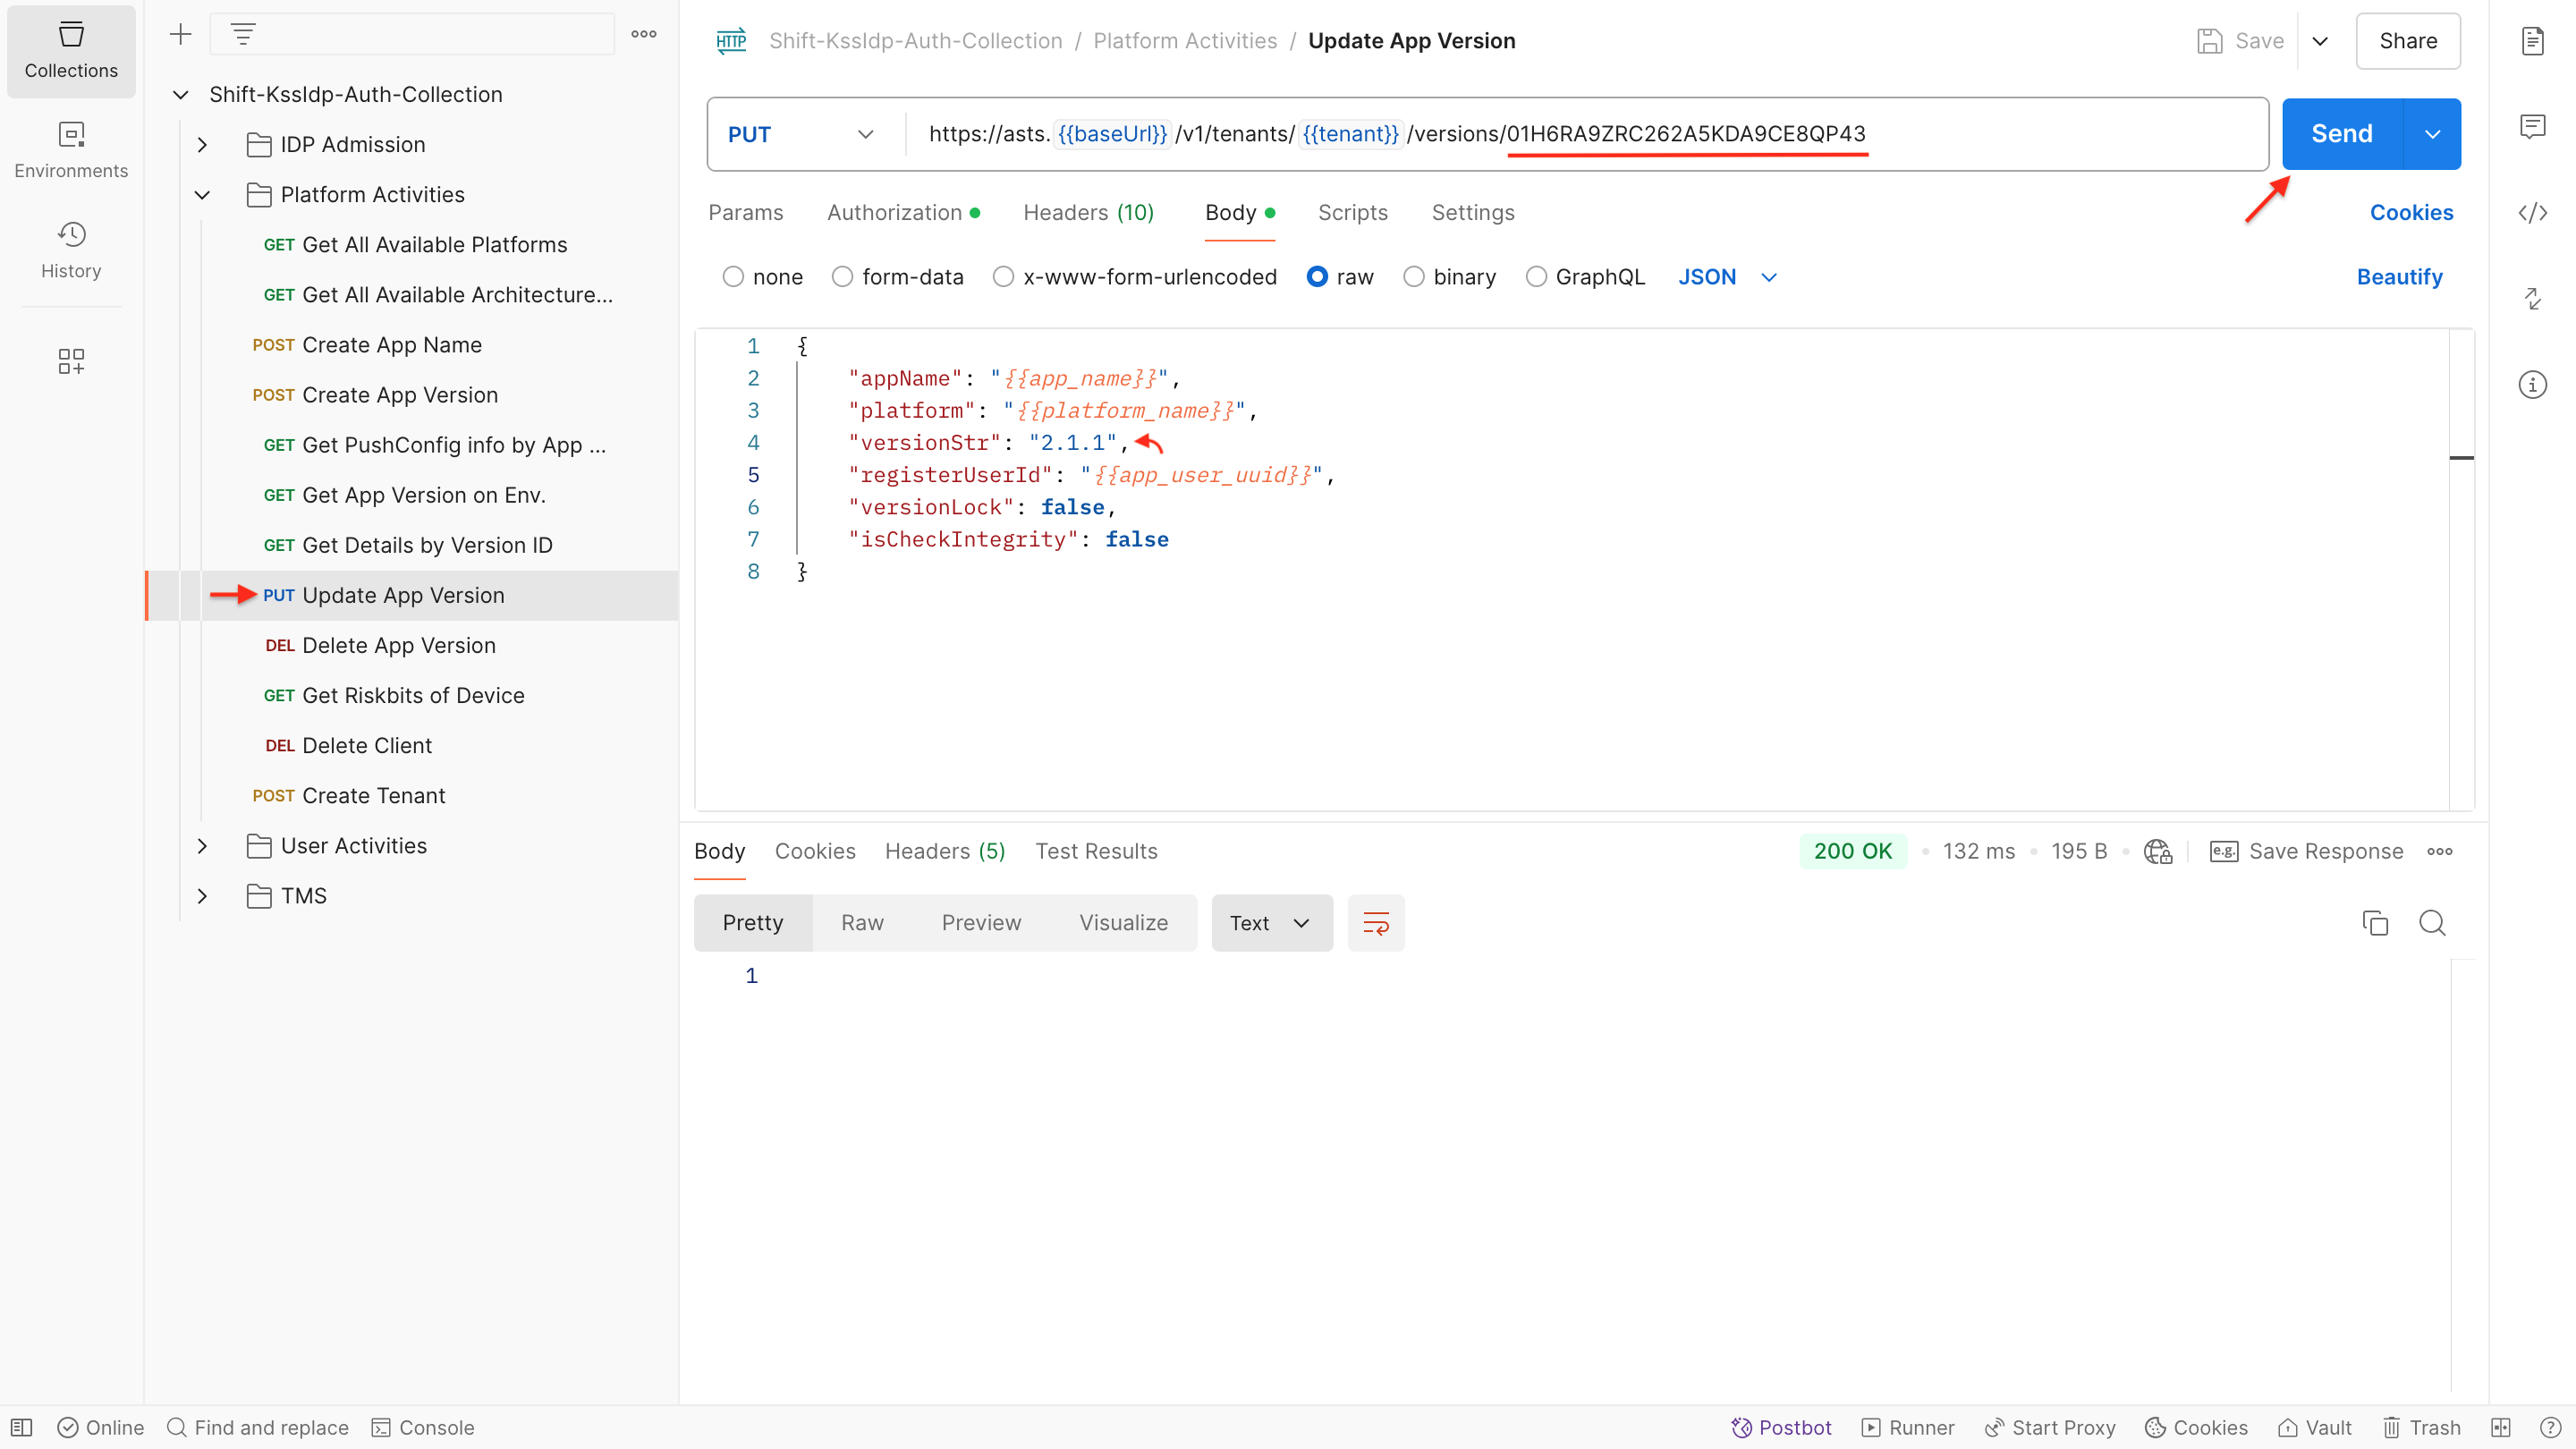
Update App Version
-
General Info:
- Application upgrade is performed with the ID of created app version.
- Please note that, the version of your application defined in the versionStr parameter of your request body.
-
Performing the API Request and Response:
- For more information about the request body configurations and responses, you check the Update App Version methods.
NOTE: A user can update the same app as many times as want, however the appName, platform, and registerUserId parameters must be equal to, when the app was first created.
Delete App Version

-
General Info:
- To delete an existing app version, an ID of the version is required.
- The deleted versions will not be displayed on your Workspace anymore.
-
Performing the API Request and Response:
- To get more information about the request body configurations and responses, please follow the Delete App Version API methods.
Delete App's Integrity Check Value
Method of obtaining Architecture Integrity Values.
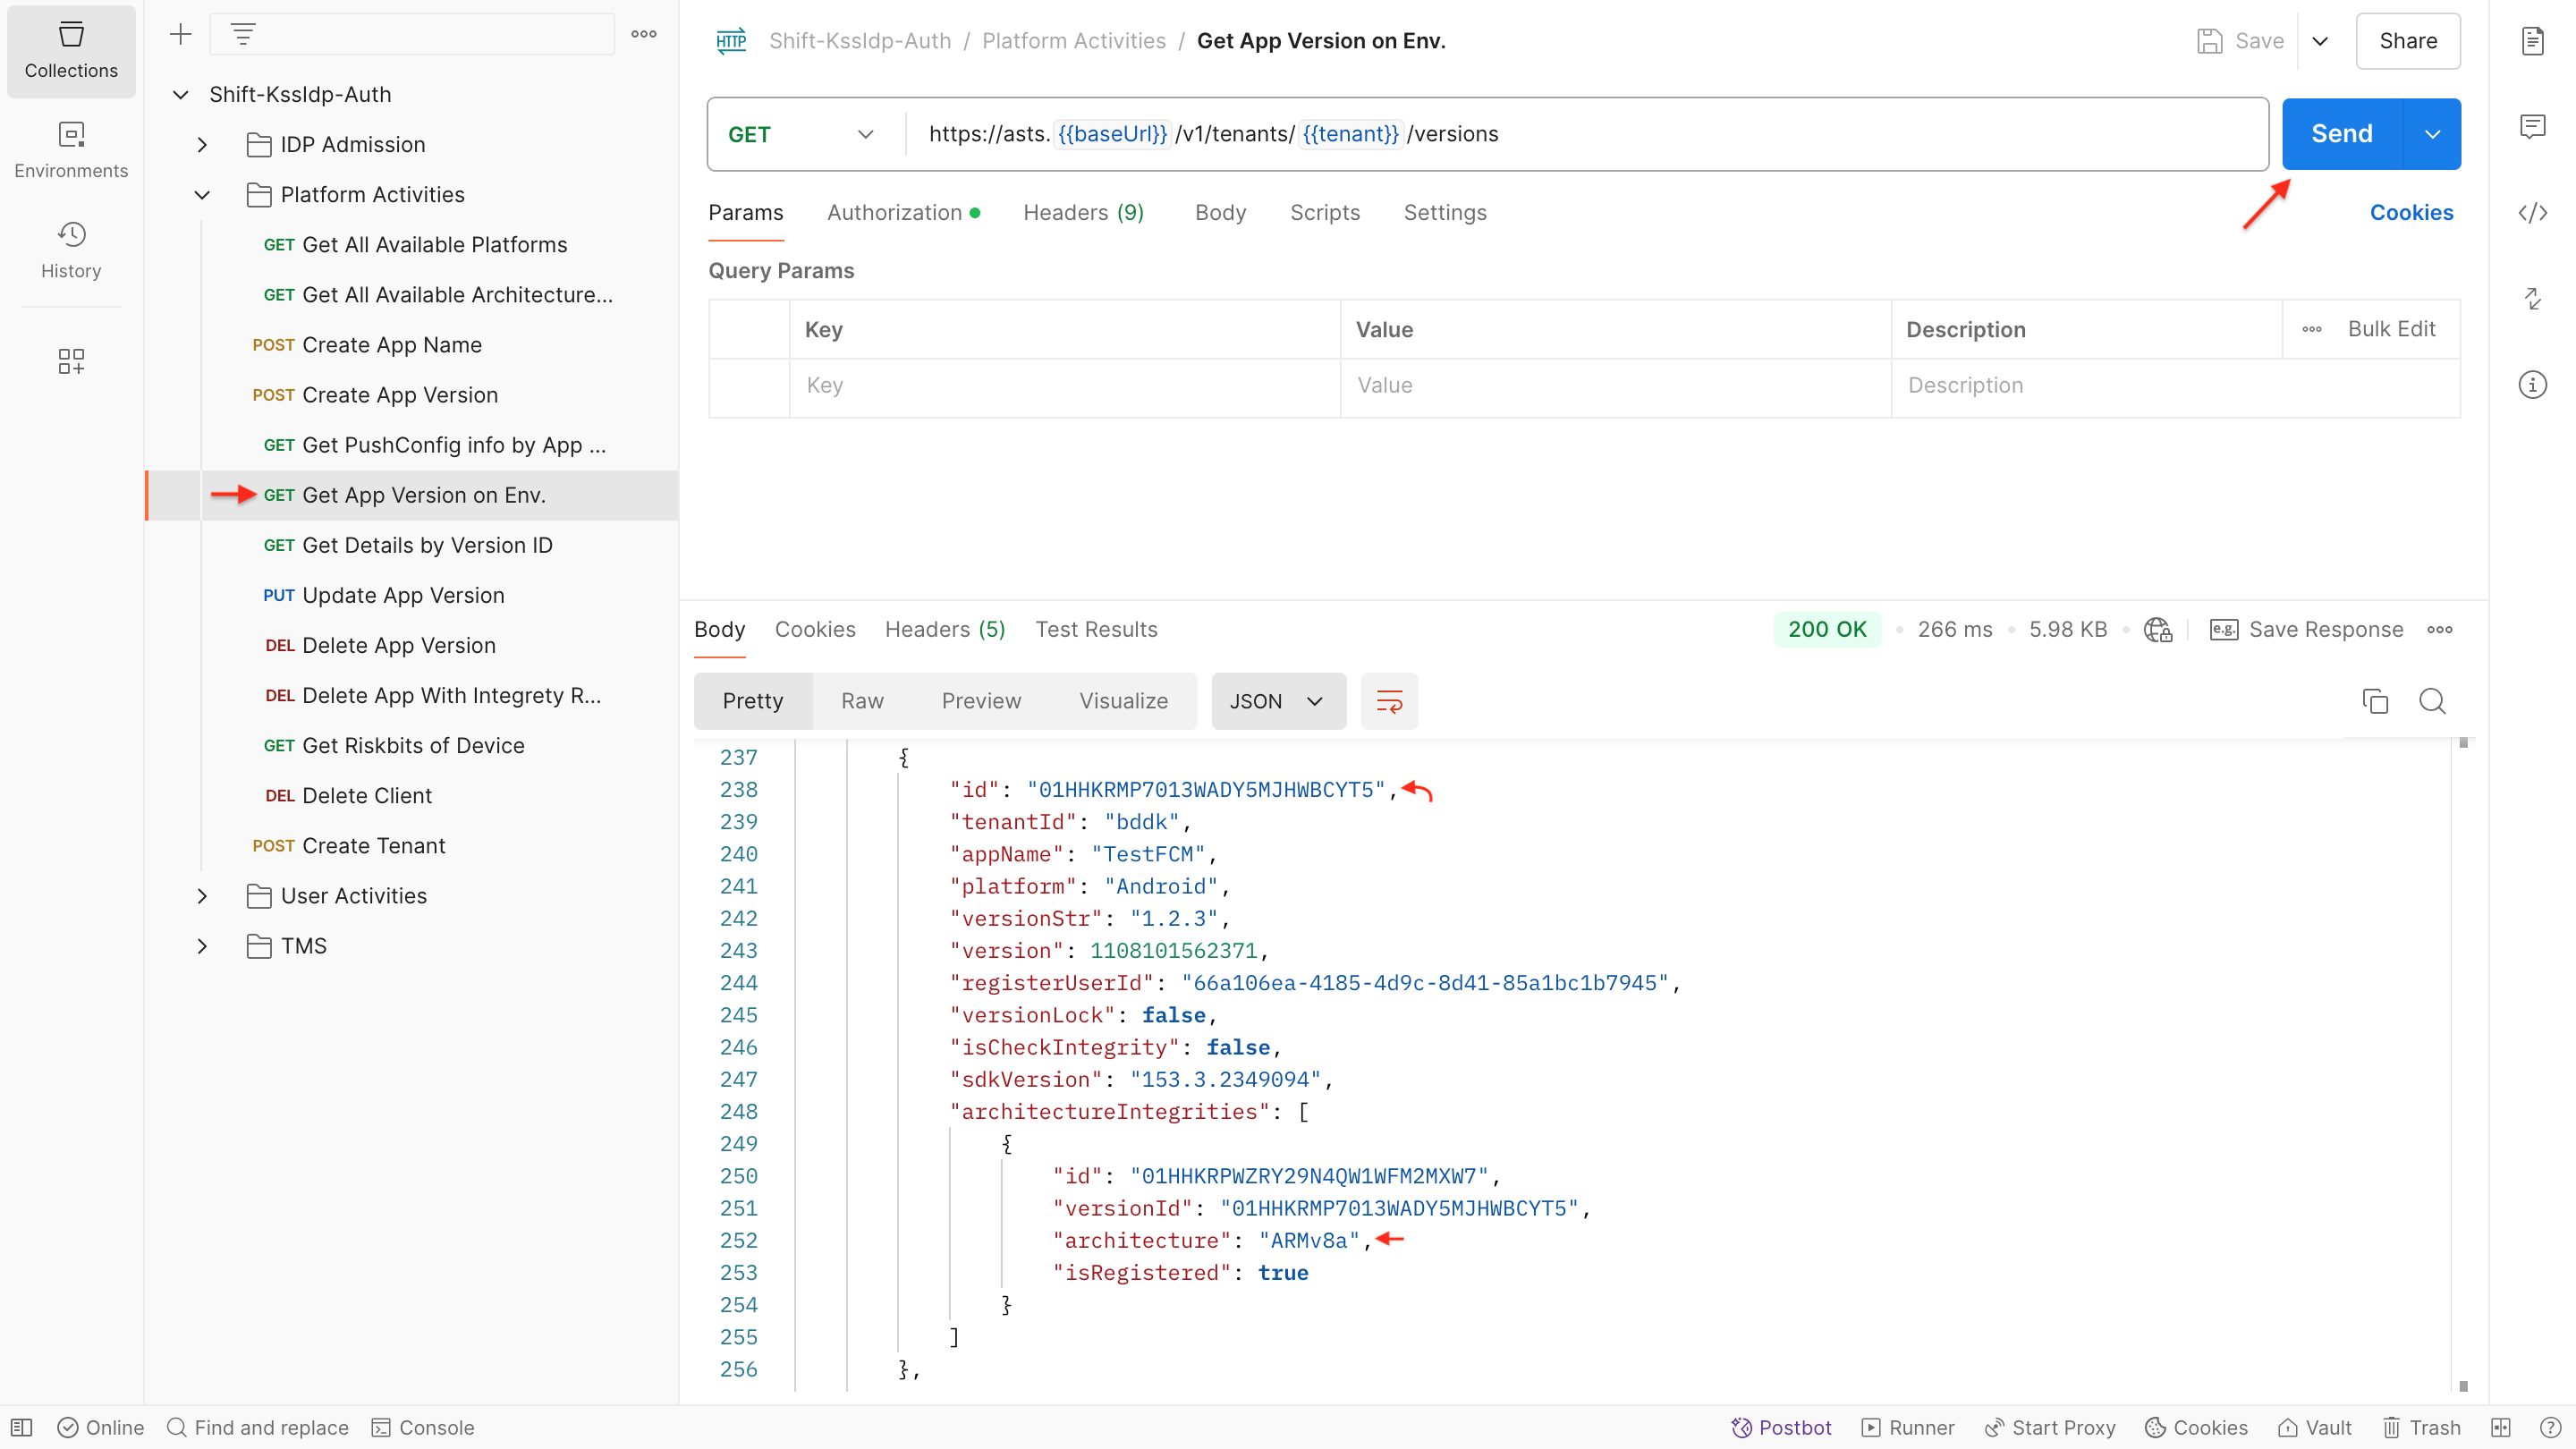
General Info:
- To delete integrity registered App Versions, it's necessary to receive architecture name.
Example of the Query Parameter setup.
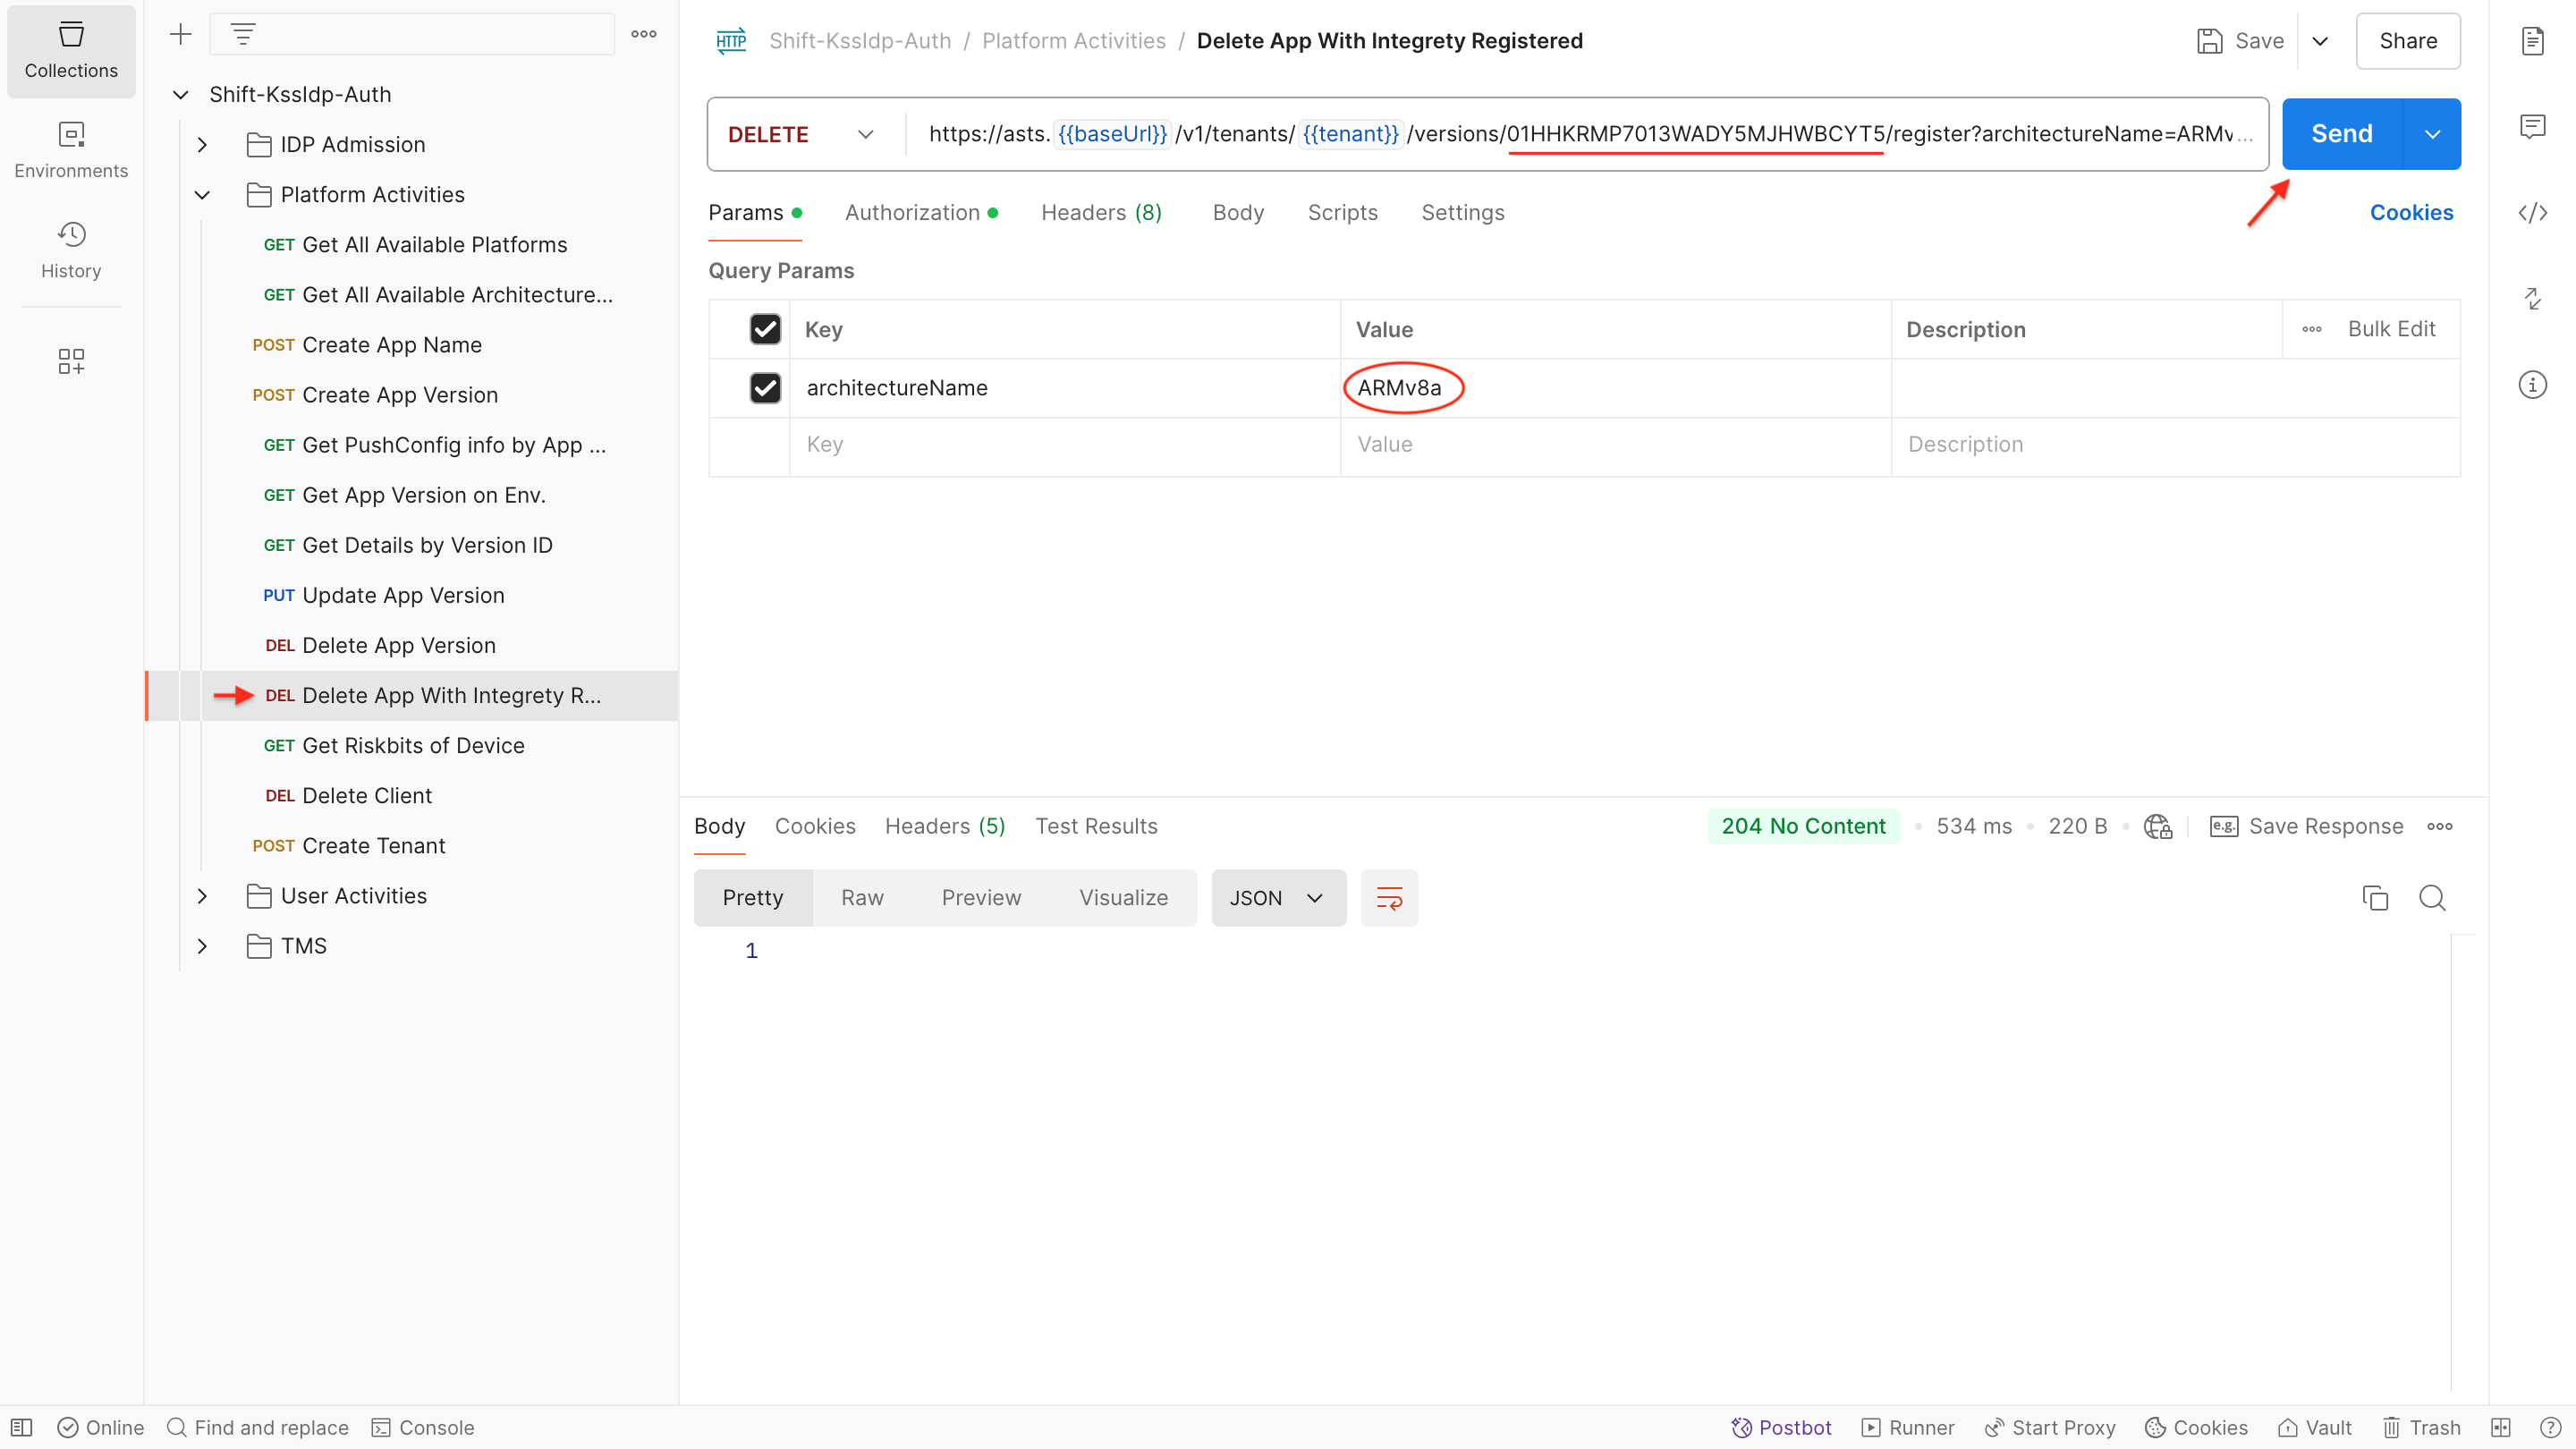
General Info:
- Remember that to delete an existing app version or to delete an integrity check value from the app, an ID of the version is required.
- Use the architecture name as a Query parameter of your API call.
- For more information about the request body configurations and responses, you could check the Delete App Registration method.
User Activities
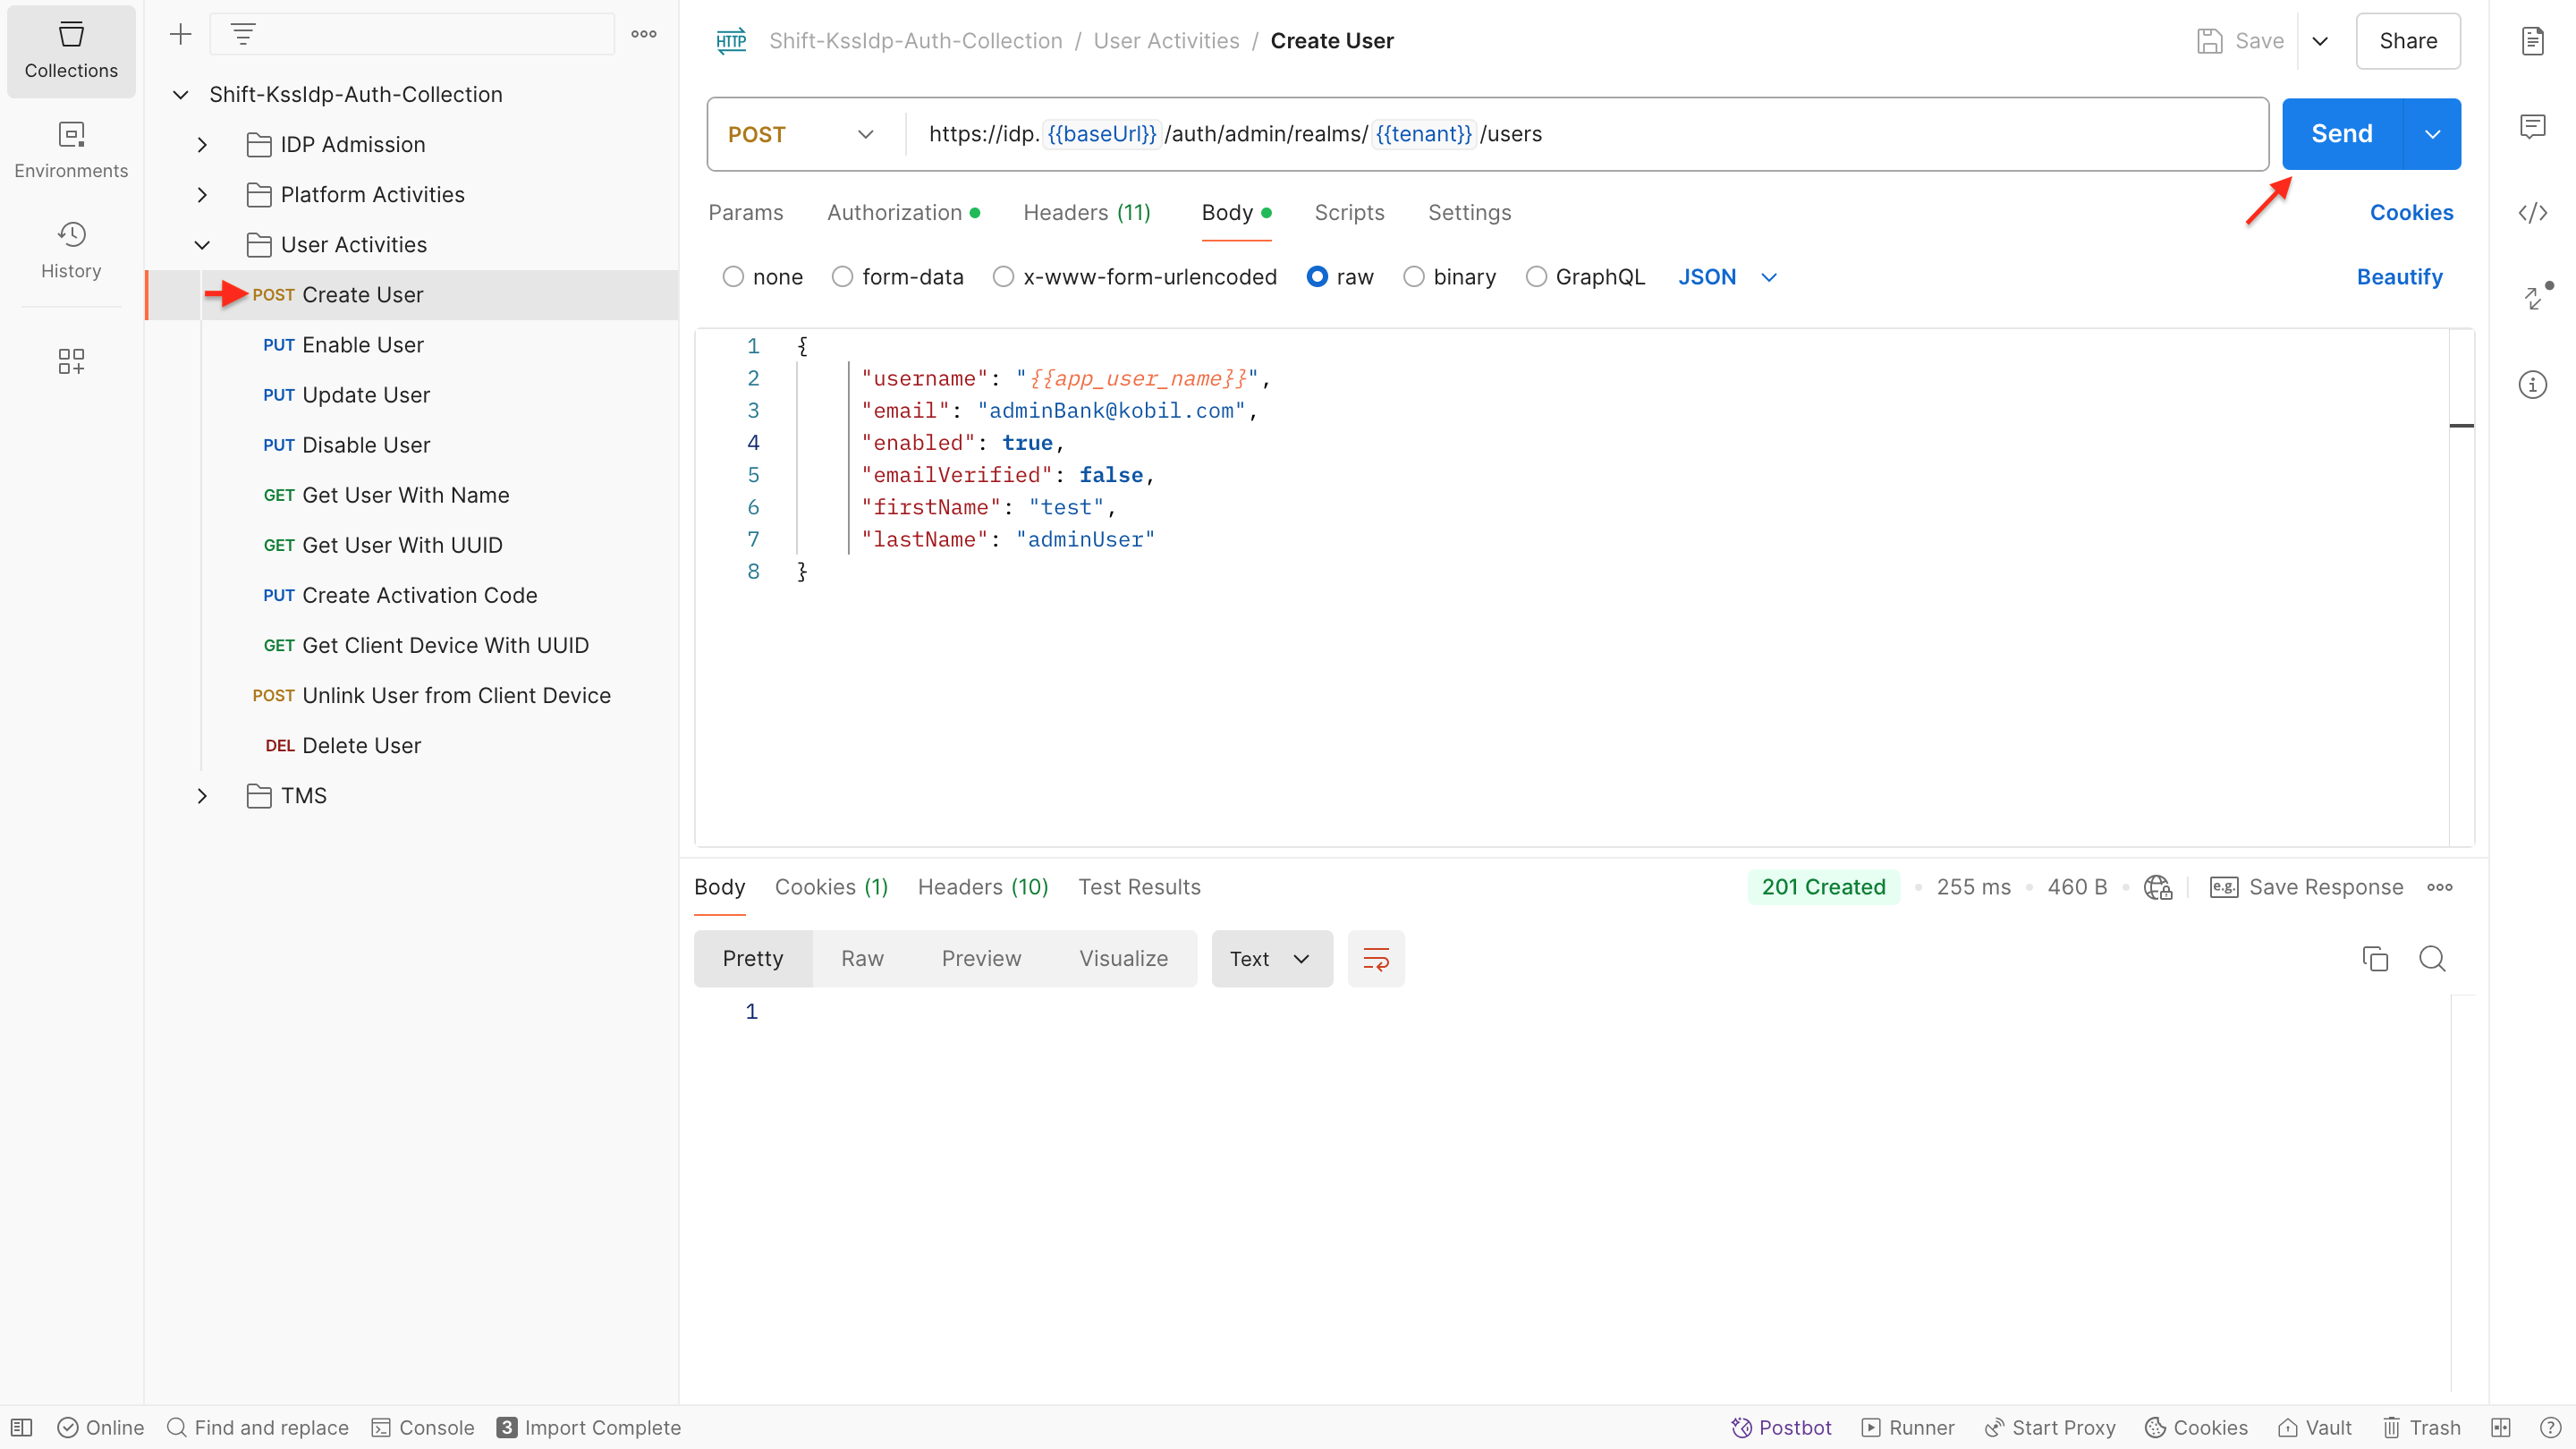
Create User
-
General Info:
- To create a new user, the username and email values should be unique and did not been used.
- The created users will be displayed on your IDP service in real-time, and can be configured as desired.
-
Performing the API Request and Response:
- To get more information about the request body configurations and responses, you could check the Create User API methods.
-
Sample of Request Body:
- Configure the request body parameters as outlined below and ensure that the specified parameters in the request body are set up according to the provided guidelines.
{
"username": "testUser",
"email": "adminBank@kobil.com",
"enabled": true,
"emailVerified": false,
"firstName": "test",
"lastName": "adminBank"
}
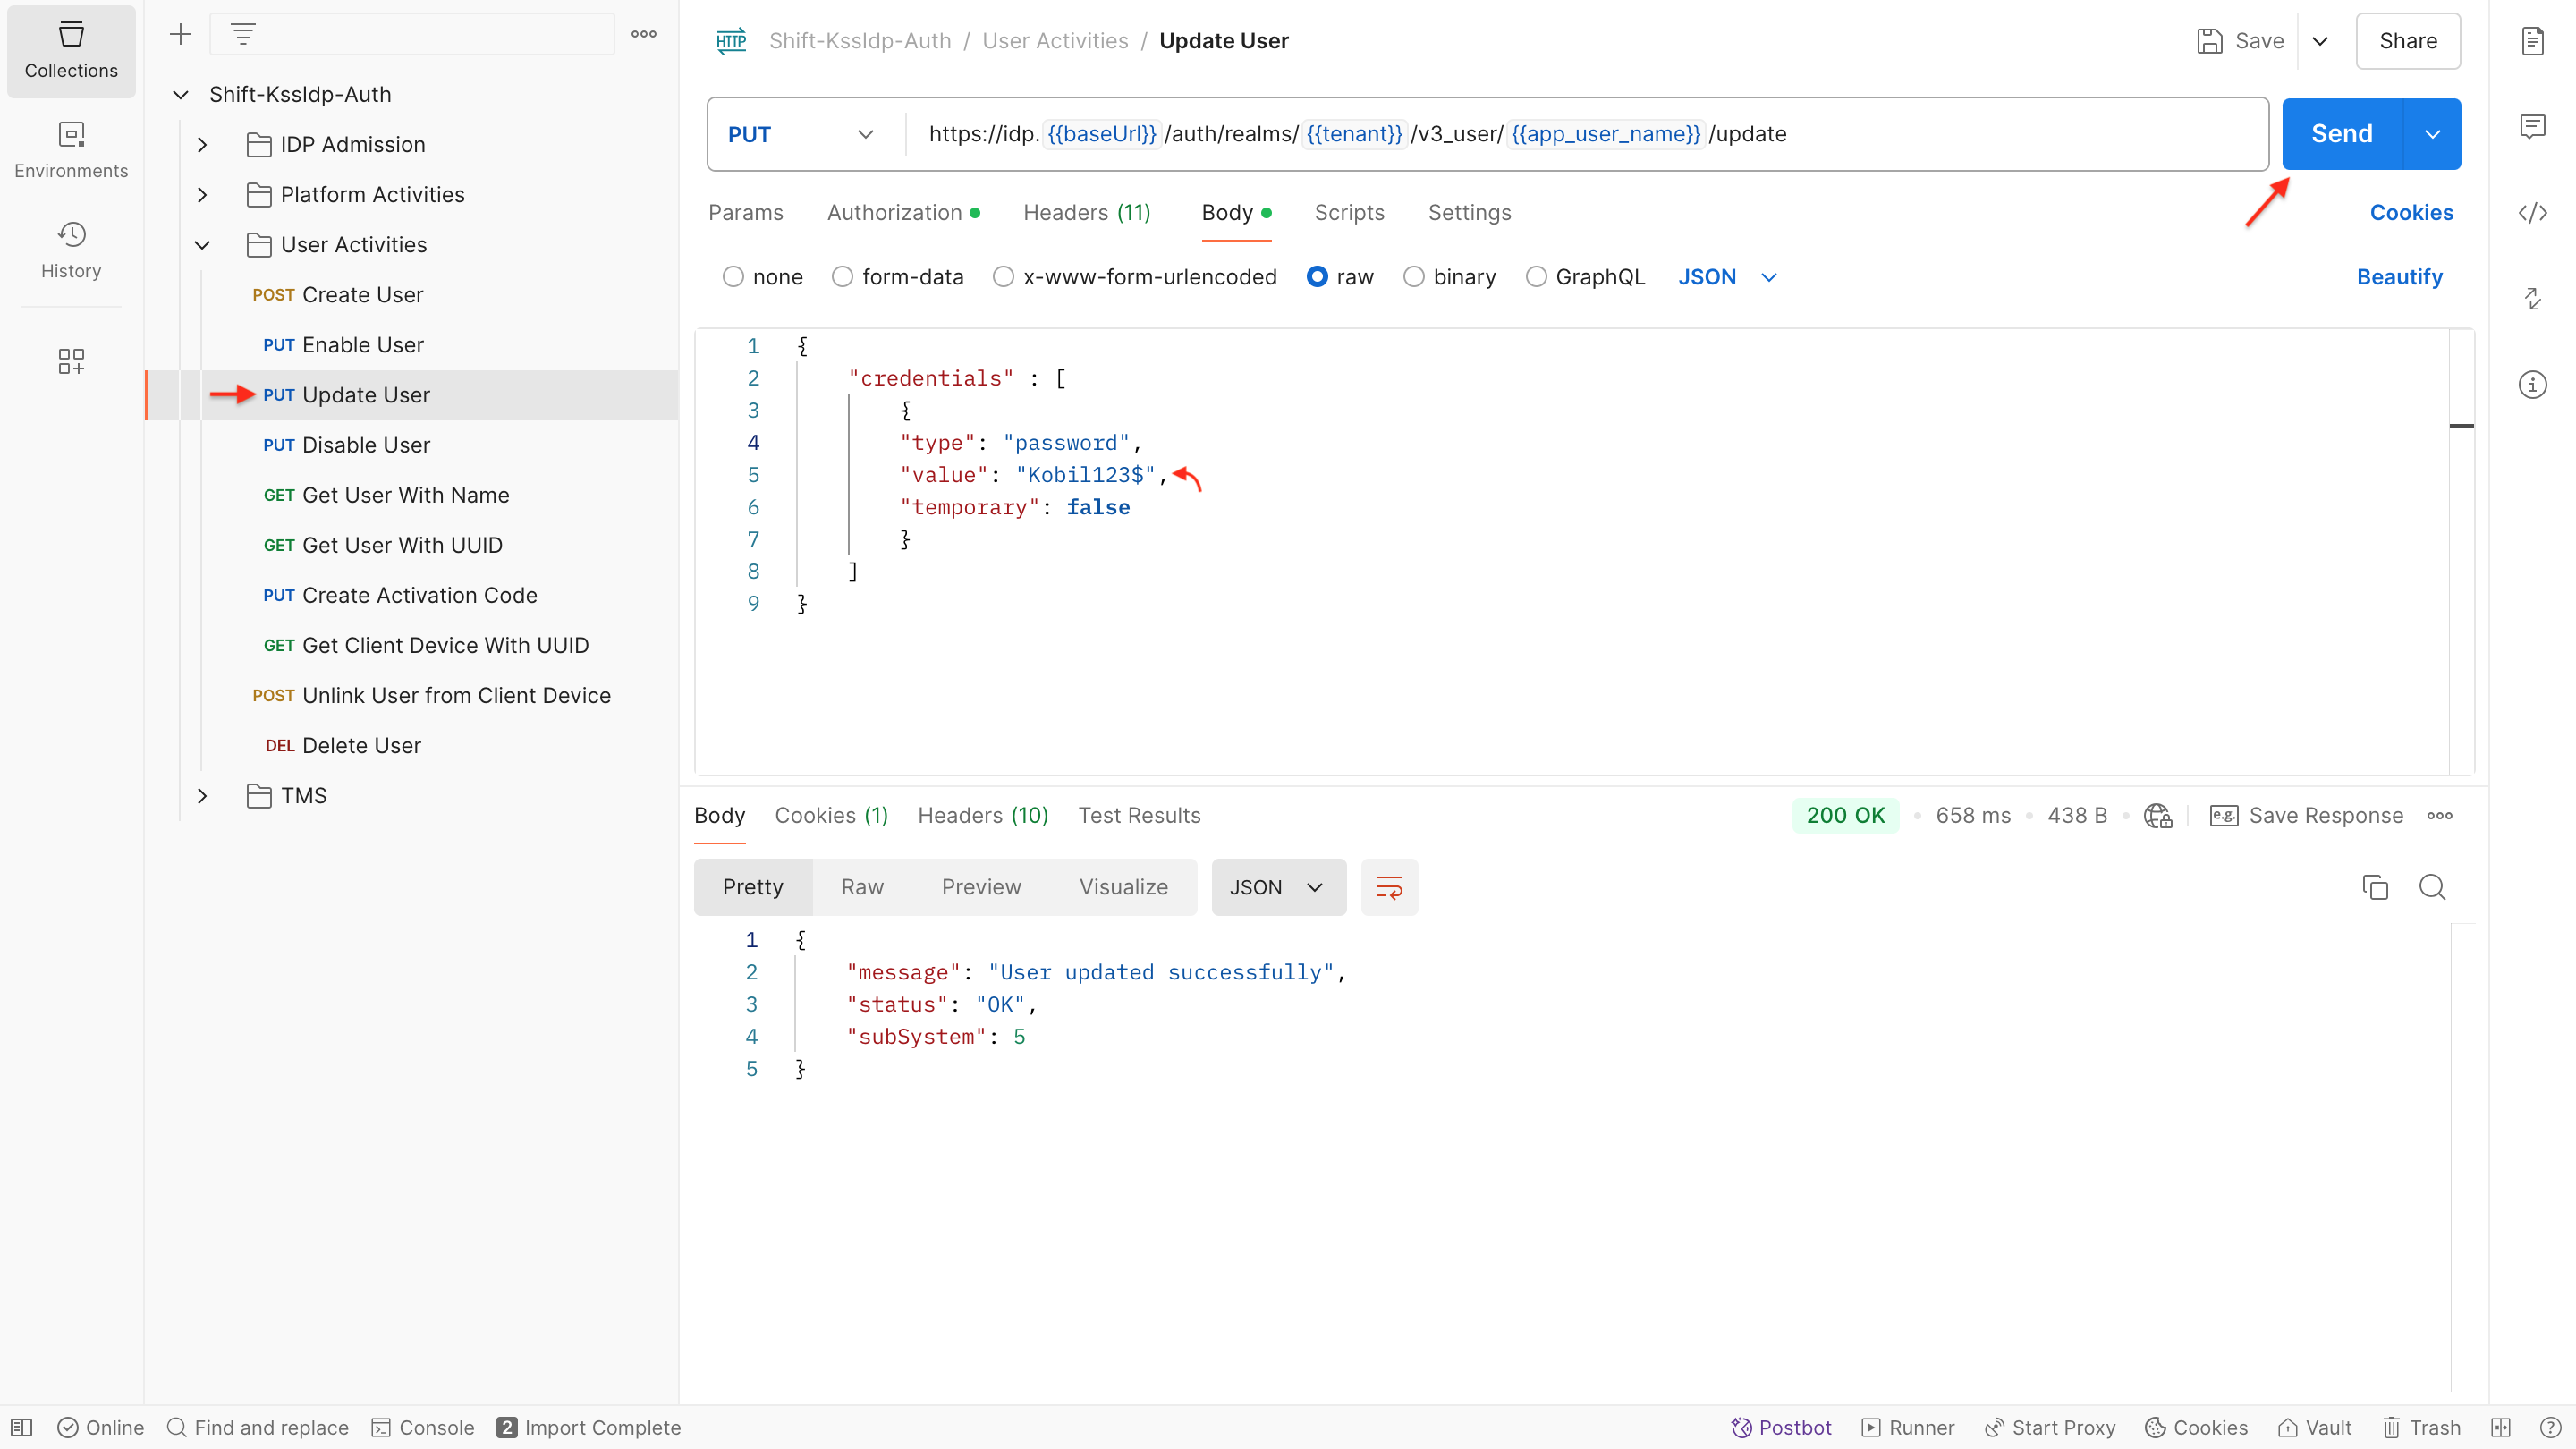
Update User
-
General Info:
- To change user's password and so on, the user name needs to be included in the request call.
- In Postman request body, you are able to configure the newly created password as desired with the value parameter.
-
Performing the API Request and Response:
- For more information about the request body configurations and responses, you could check the Update User API methods.
⚠️NOTE: Since the format of the created passwords will be clear-text. The method should not be used for users created under the BDDK regulations.
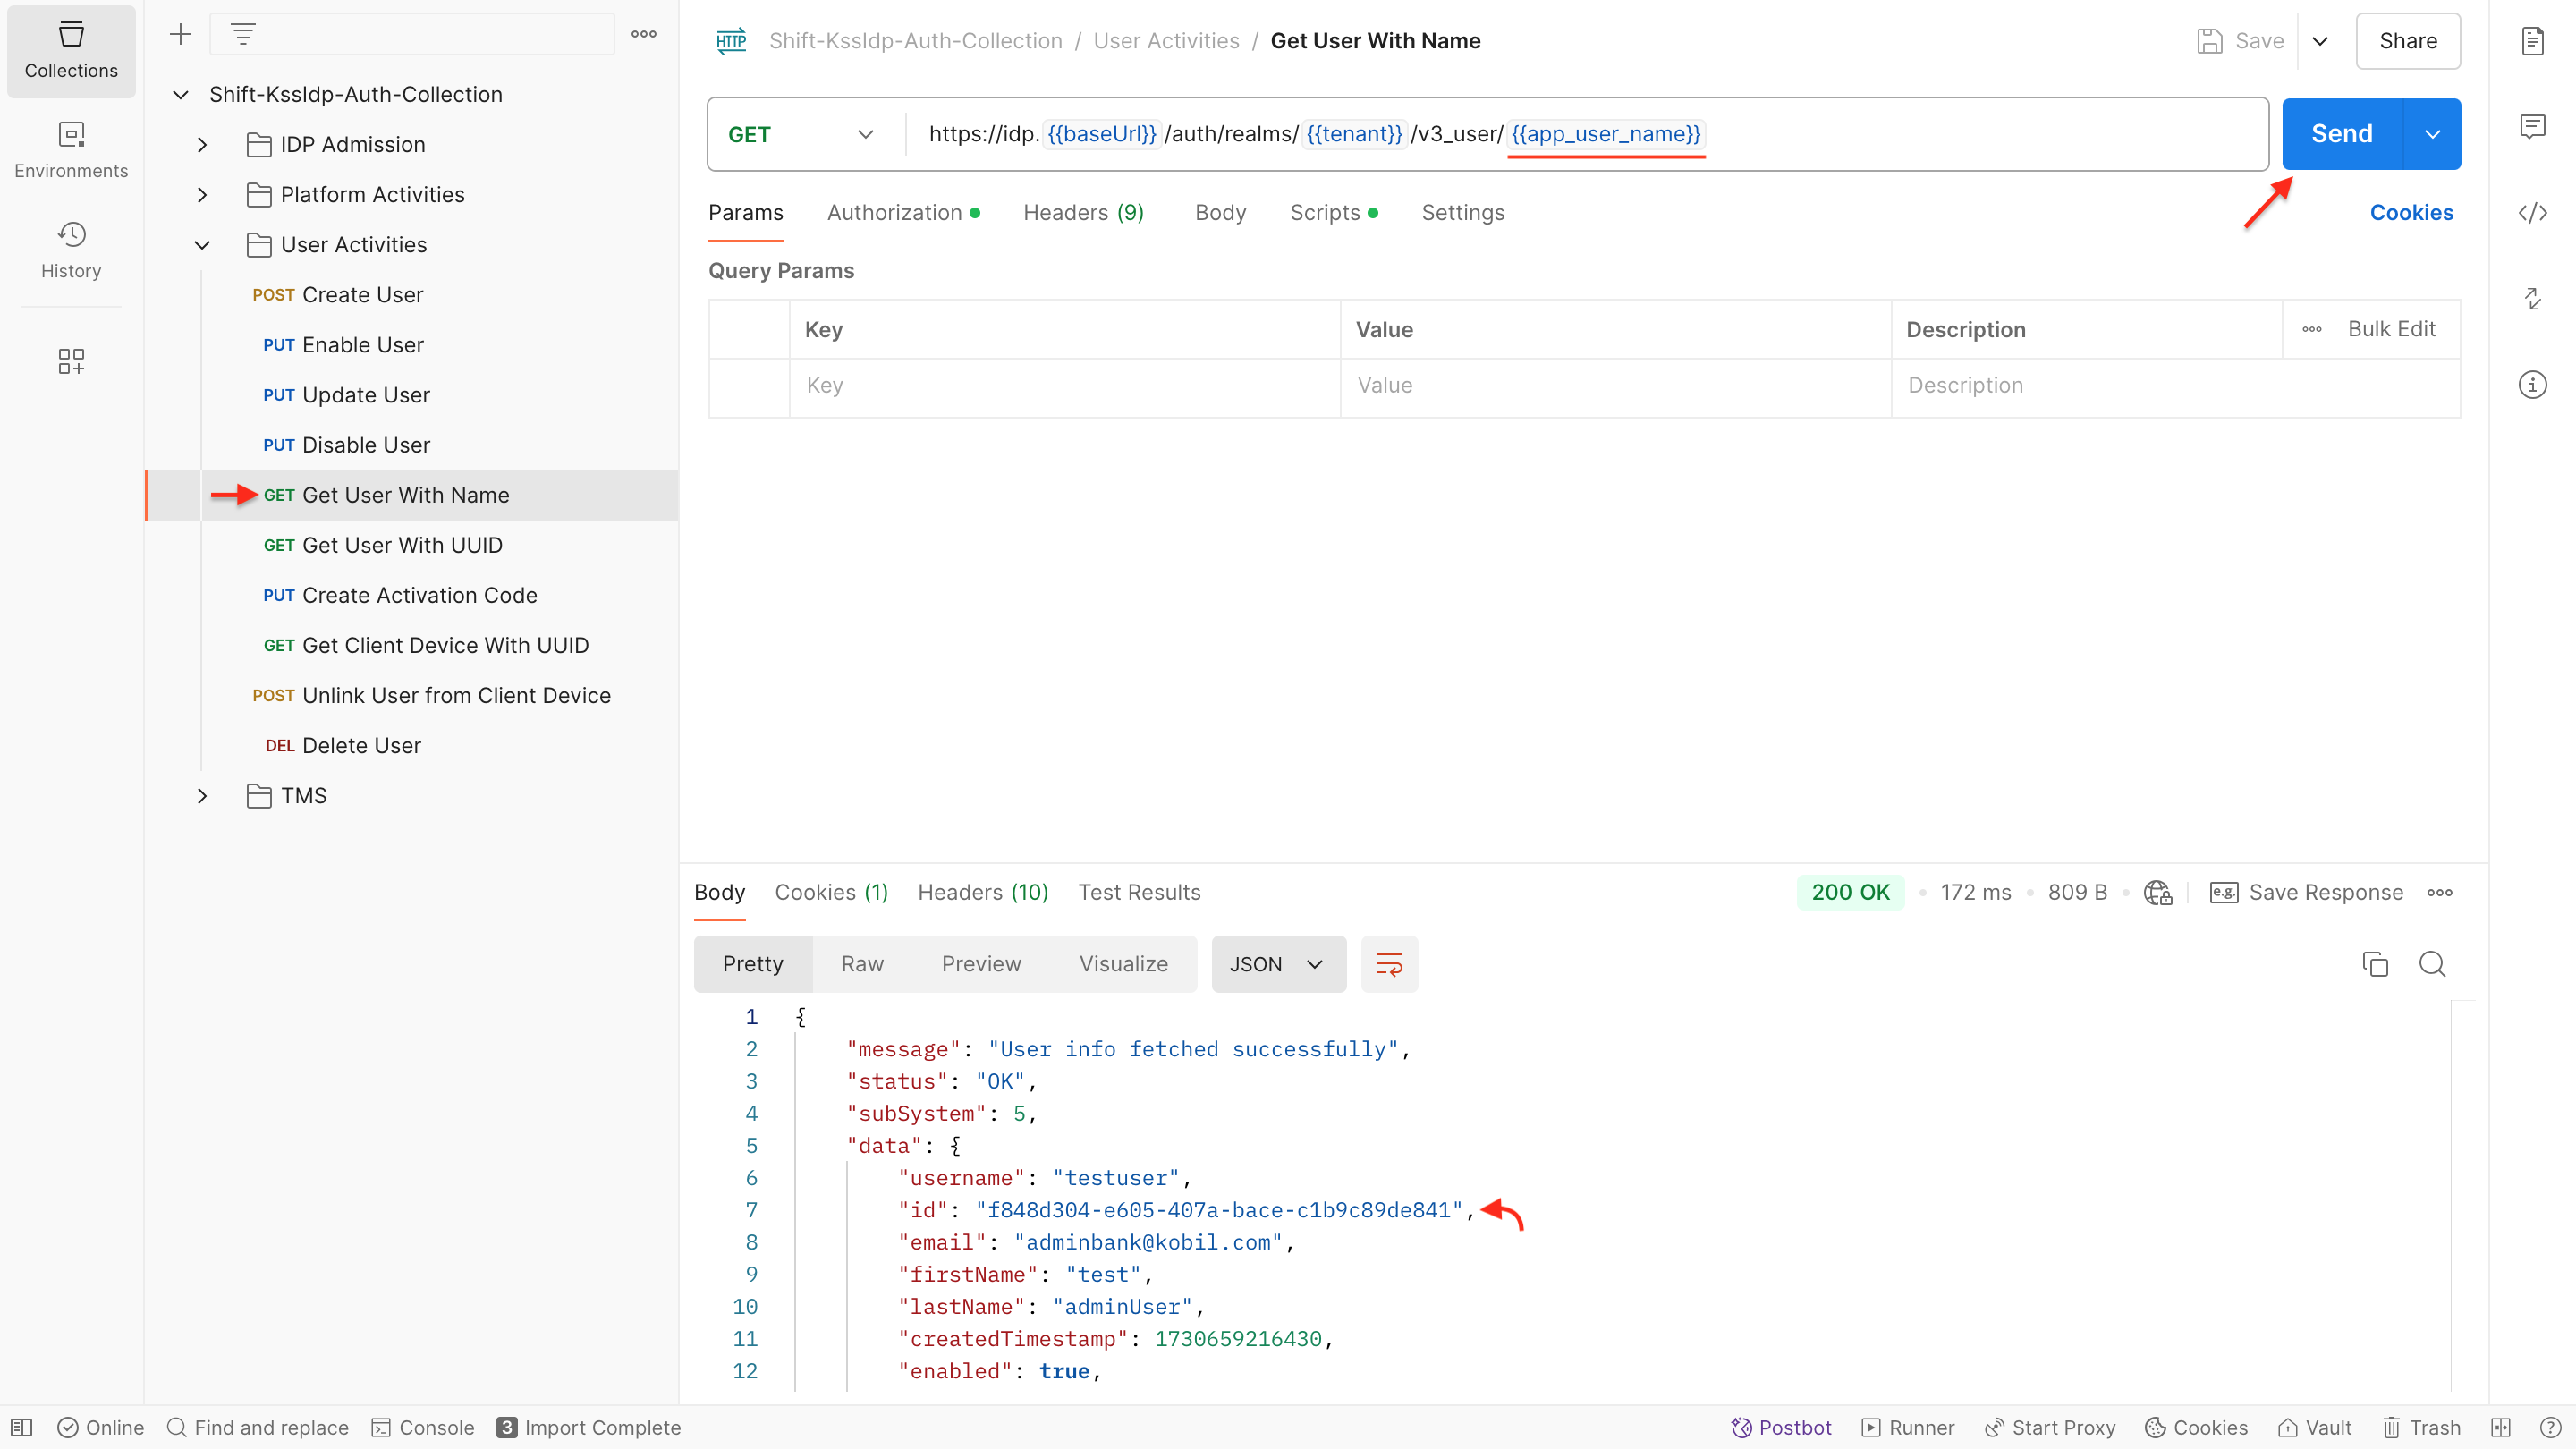
Get User by Name
-
General Info:
- The API call allows you to access real-time user data, providing flexibility for further configuration within your IDP service.
-
Performing the API Request and Response:
- To get more information about the request body configurations and responses, you could check the Get User by Name API methods.
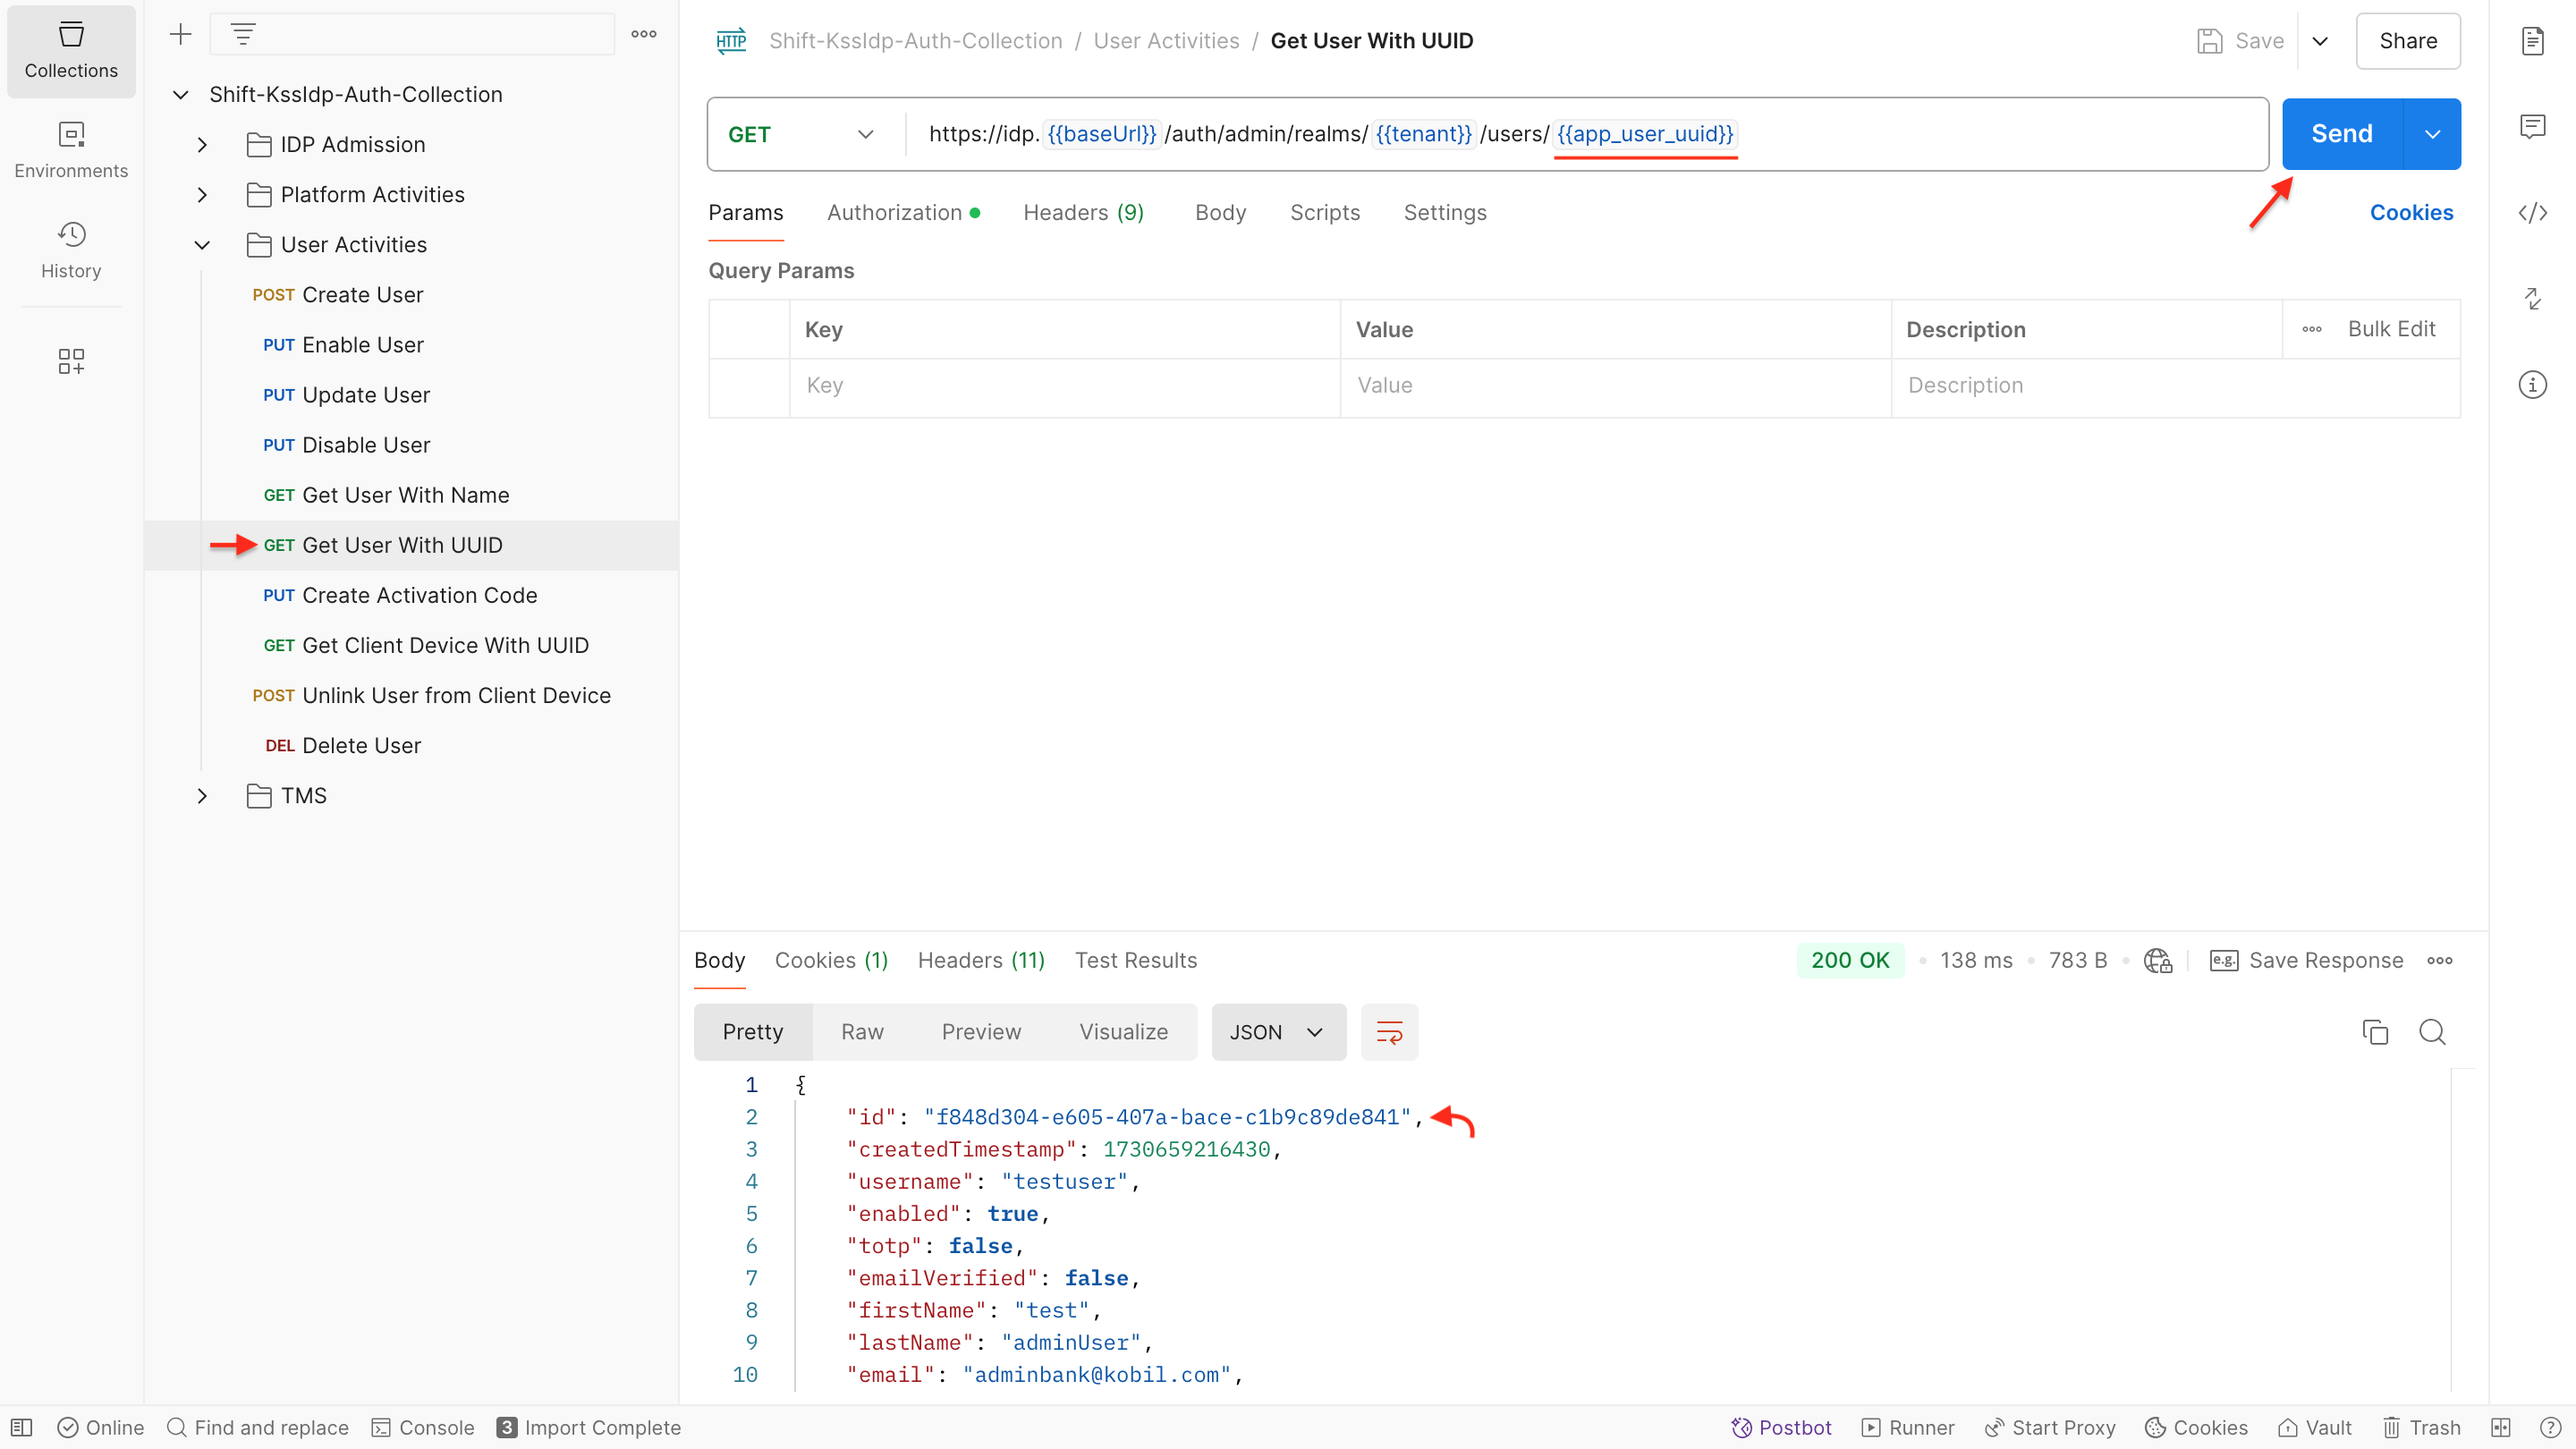
Get User by UUID
-
General Info:
- This API call facilitates the retrieval of user details based on their unique UUID, offering real-time insights for further configuration within your IDP service.
-
Performing the API Request and Response:
- For more information about the request body configurations and responses, please follow the Get User by UUID API methods.
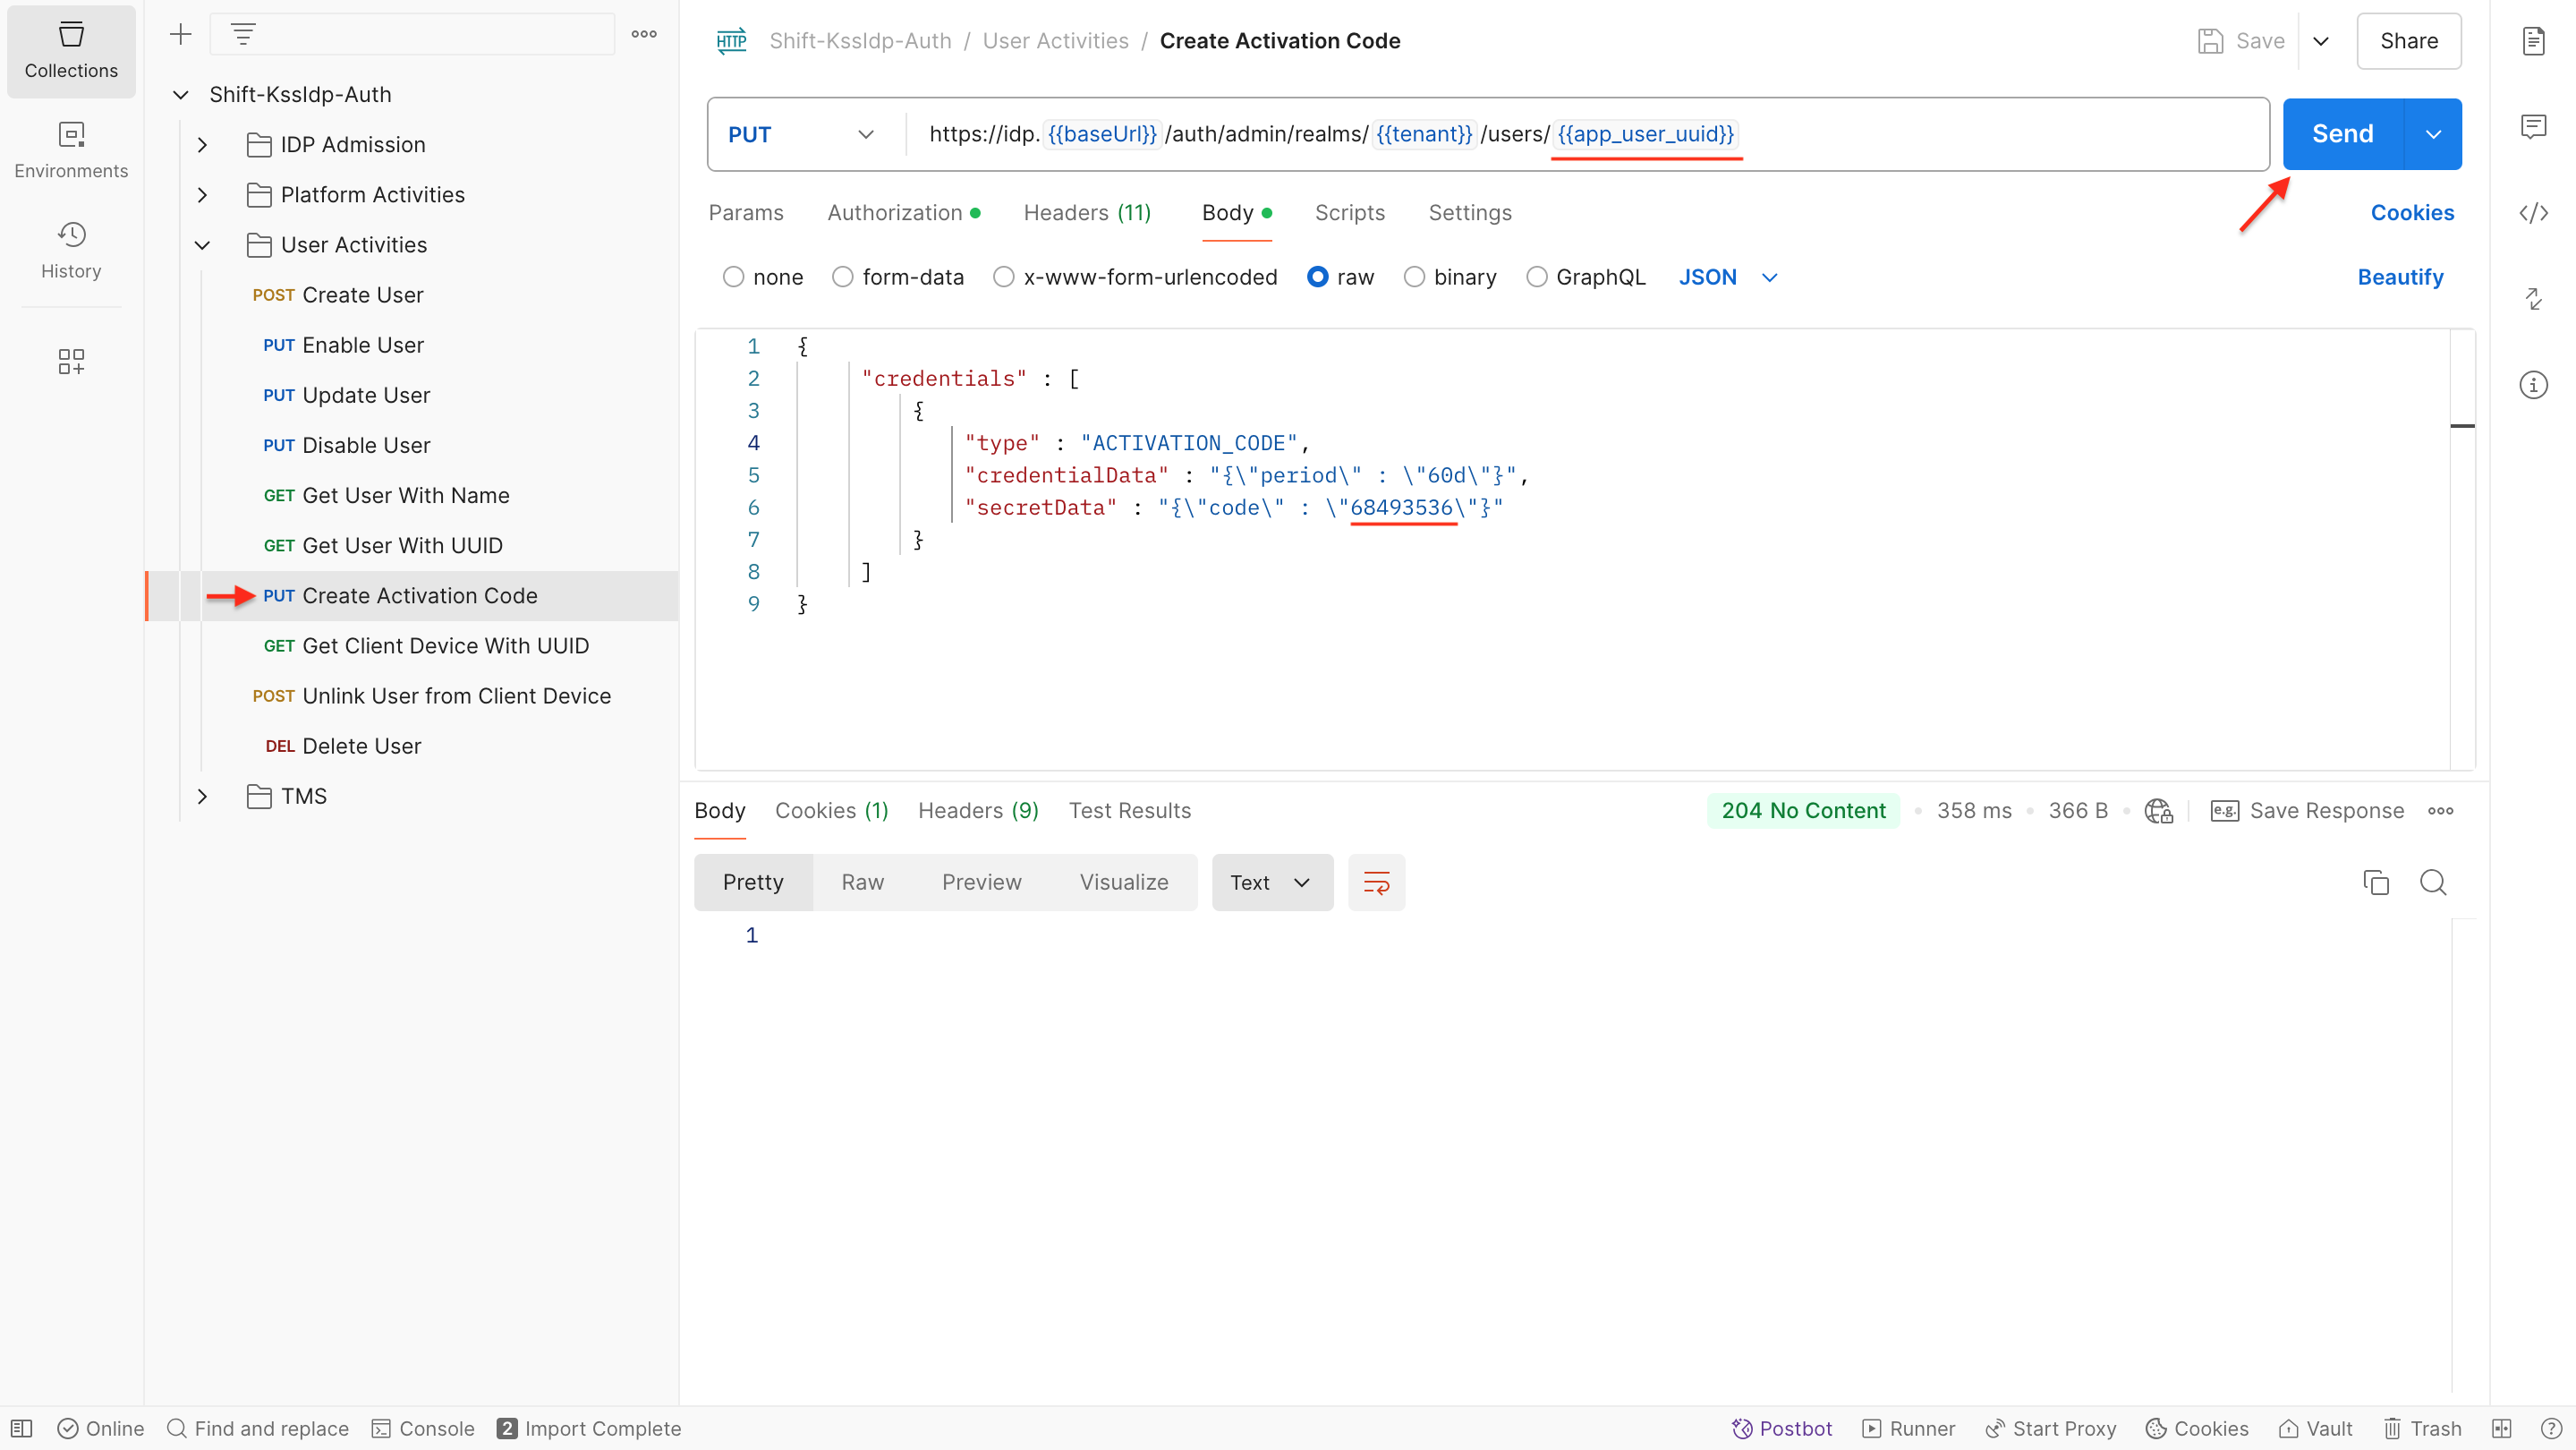
Create Activation Code
-
General Info:
- In Postman request call, you can configure the activation code values by using the secretData parameter.
- The validity period of the generated activation code is determined by credentialData. e.g. 60 days(60d), 60 minutes(60m), 60 seconds(60s).
-
Performing the Request:
- To create an activation code by utilizing the Activation Code API use following request:
PUT https://idp.{{baseUrl}}/auth/admin/realms/{{tenant}}/users/{{app_user_uuid}} -
Request Body:
- Configure the request body parameters as outlined below and ensure that the specified parameters in the request body are set up according to the provided guidelines.
{
   "credentials" : [
       {
           "type" : "ACTIVATION_CODE",
           "credentialData" : "{\"period\" : \"60d\"}",
           "secretData" : "{\"code\" : \"68493536\"}"
       }
   ]
} -
Sample Response:
- Familiarize yourself with the expected response structure by referring to the Sample Response Documentation.
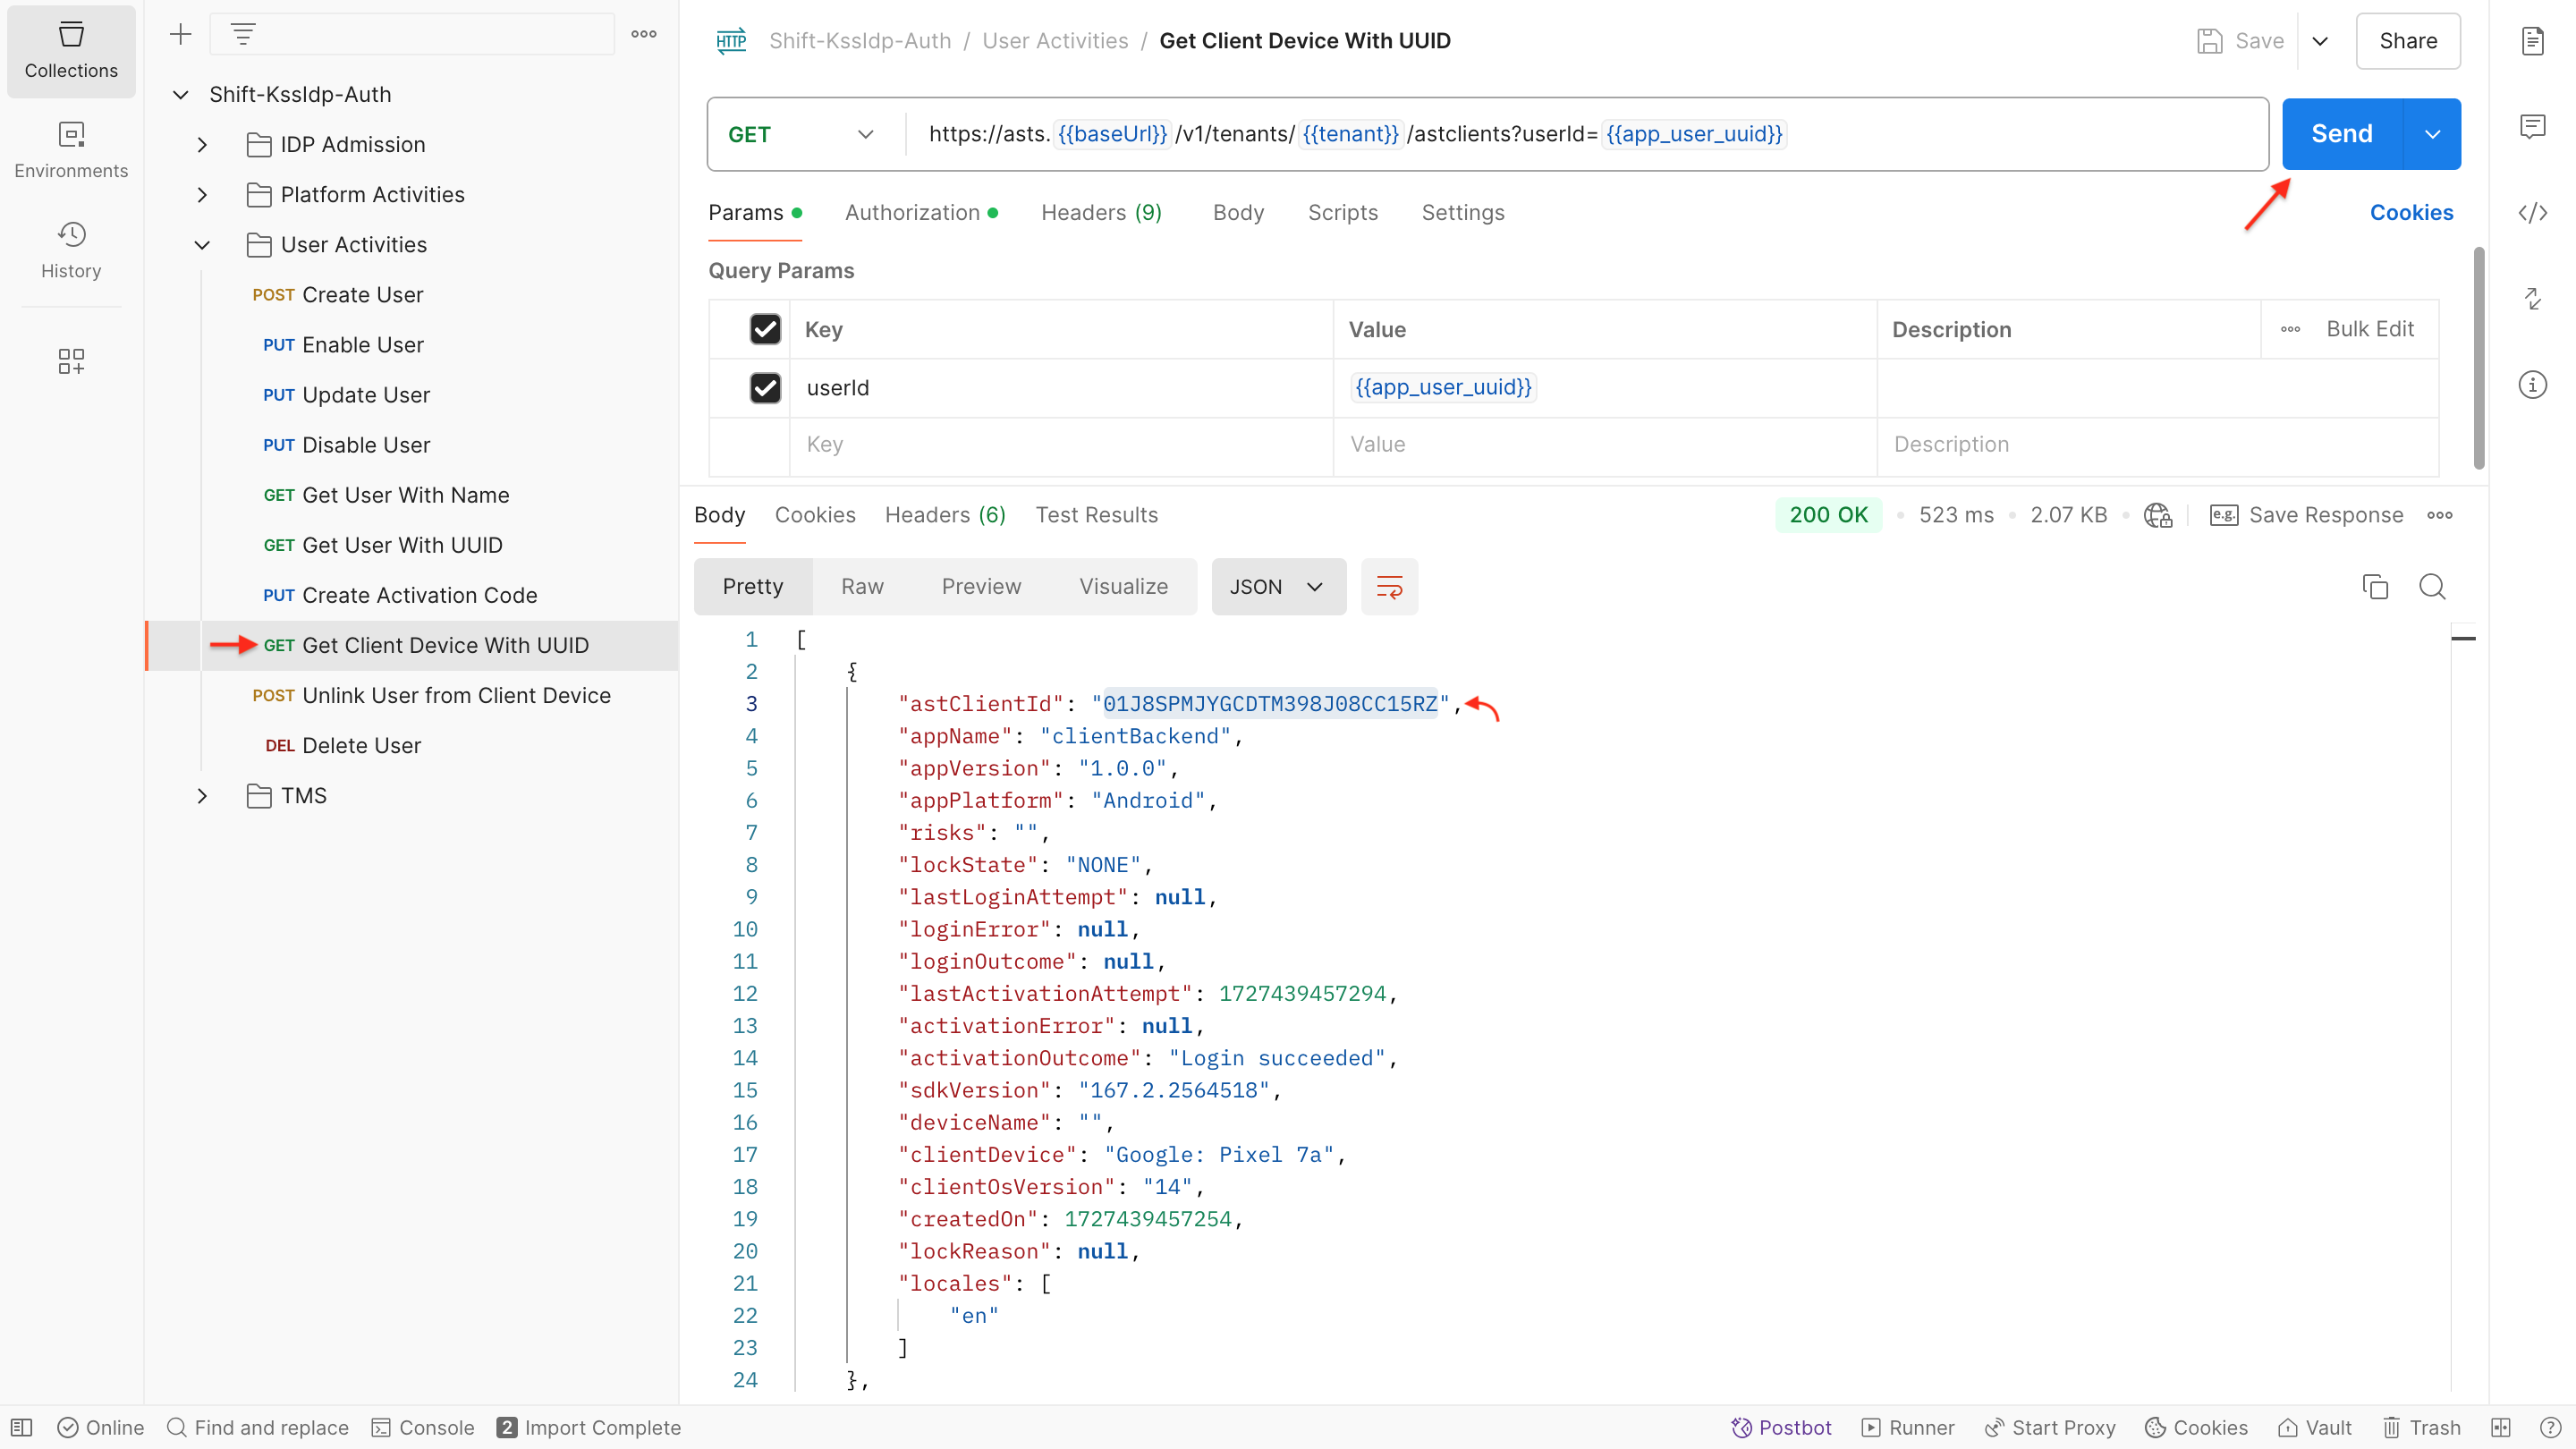
Get Client Device with UUID
-
General Info:
- To execute the request call, please filled in the app user IDs.
- The API call allows you to access real-time client device details, and it's unique ID.
-
Performing the API Request and Response:
- For more information about the request body configurations and responses, please follow the Get Linked Clients API methods.
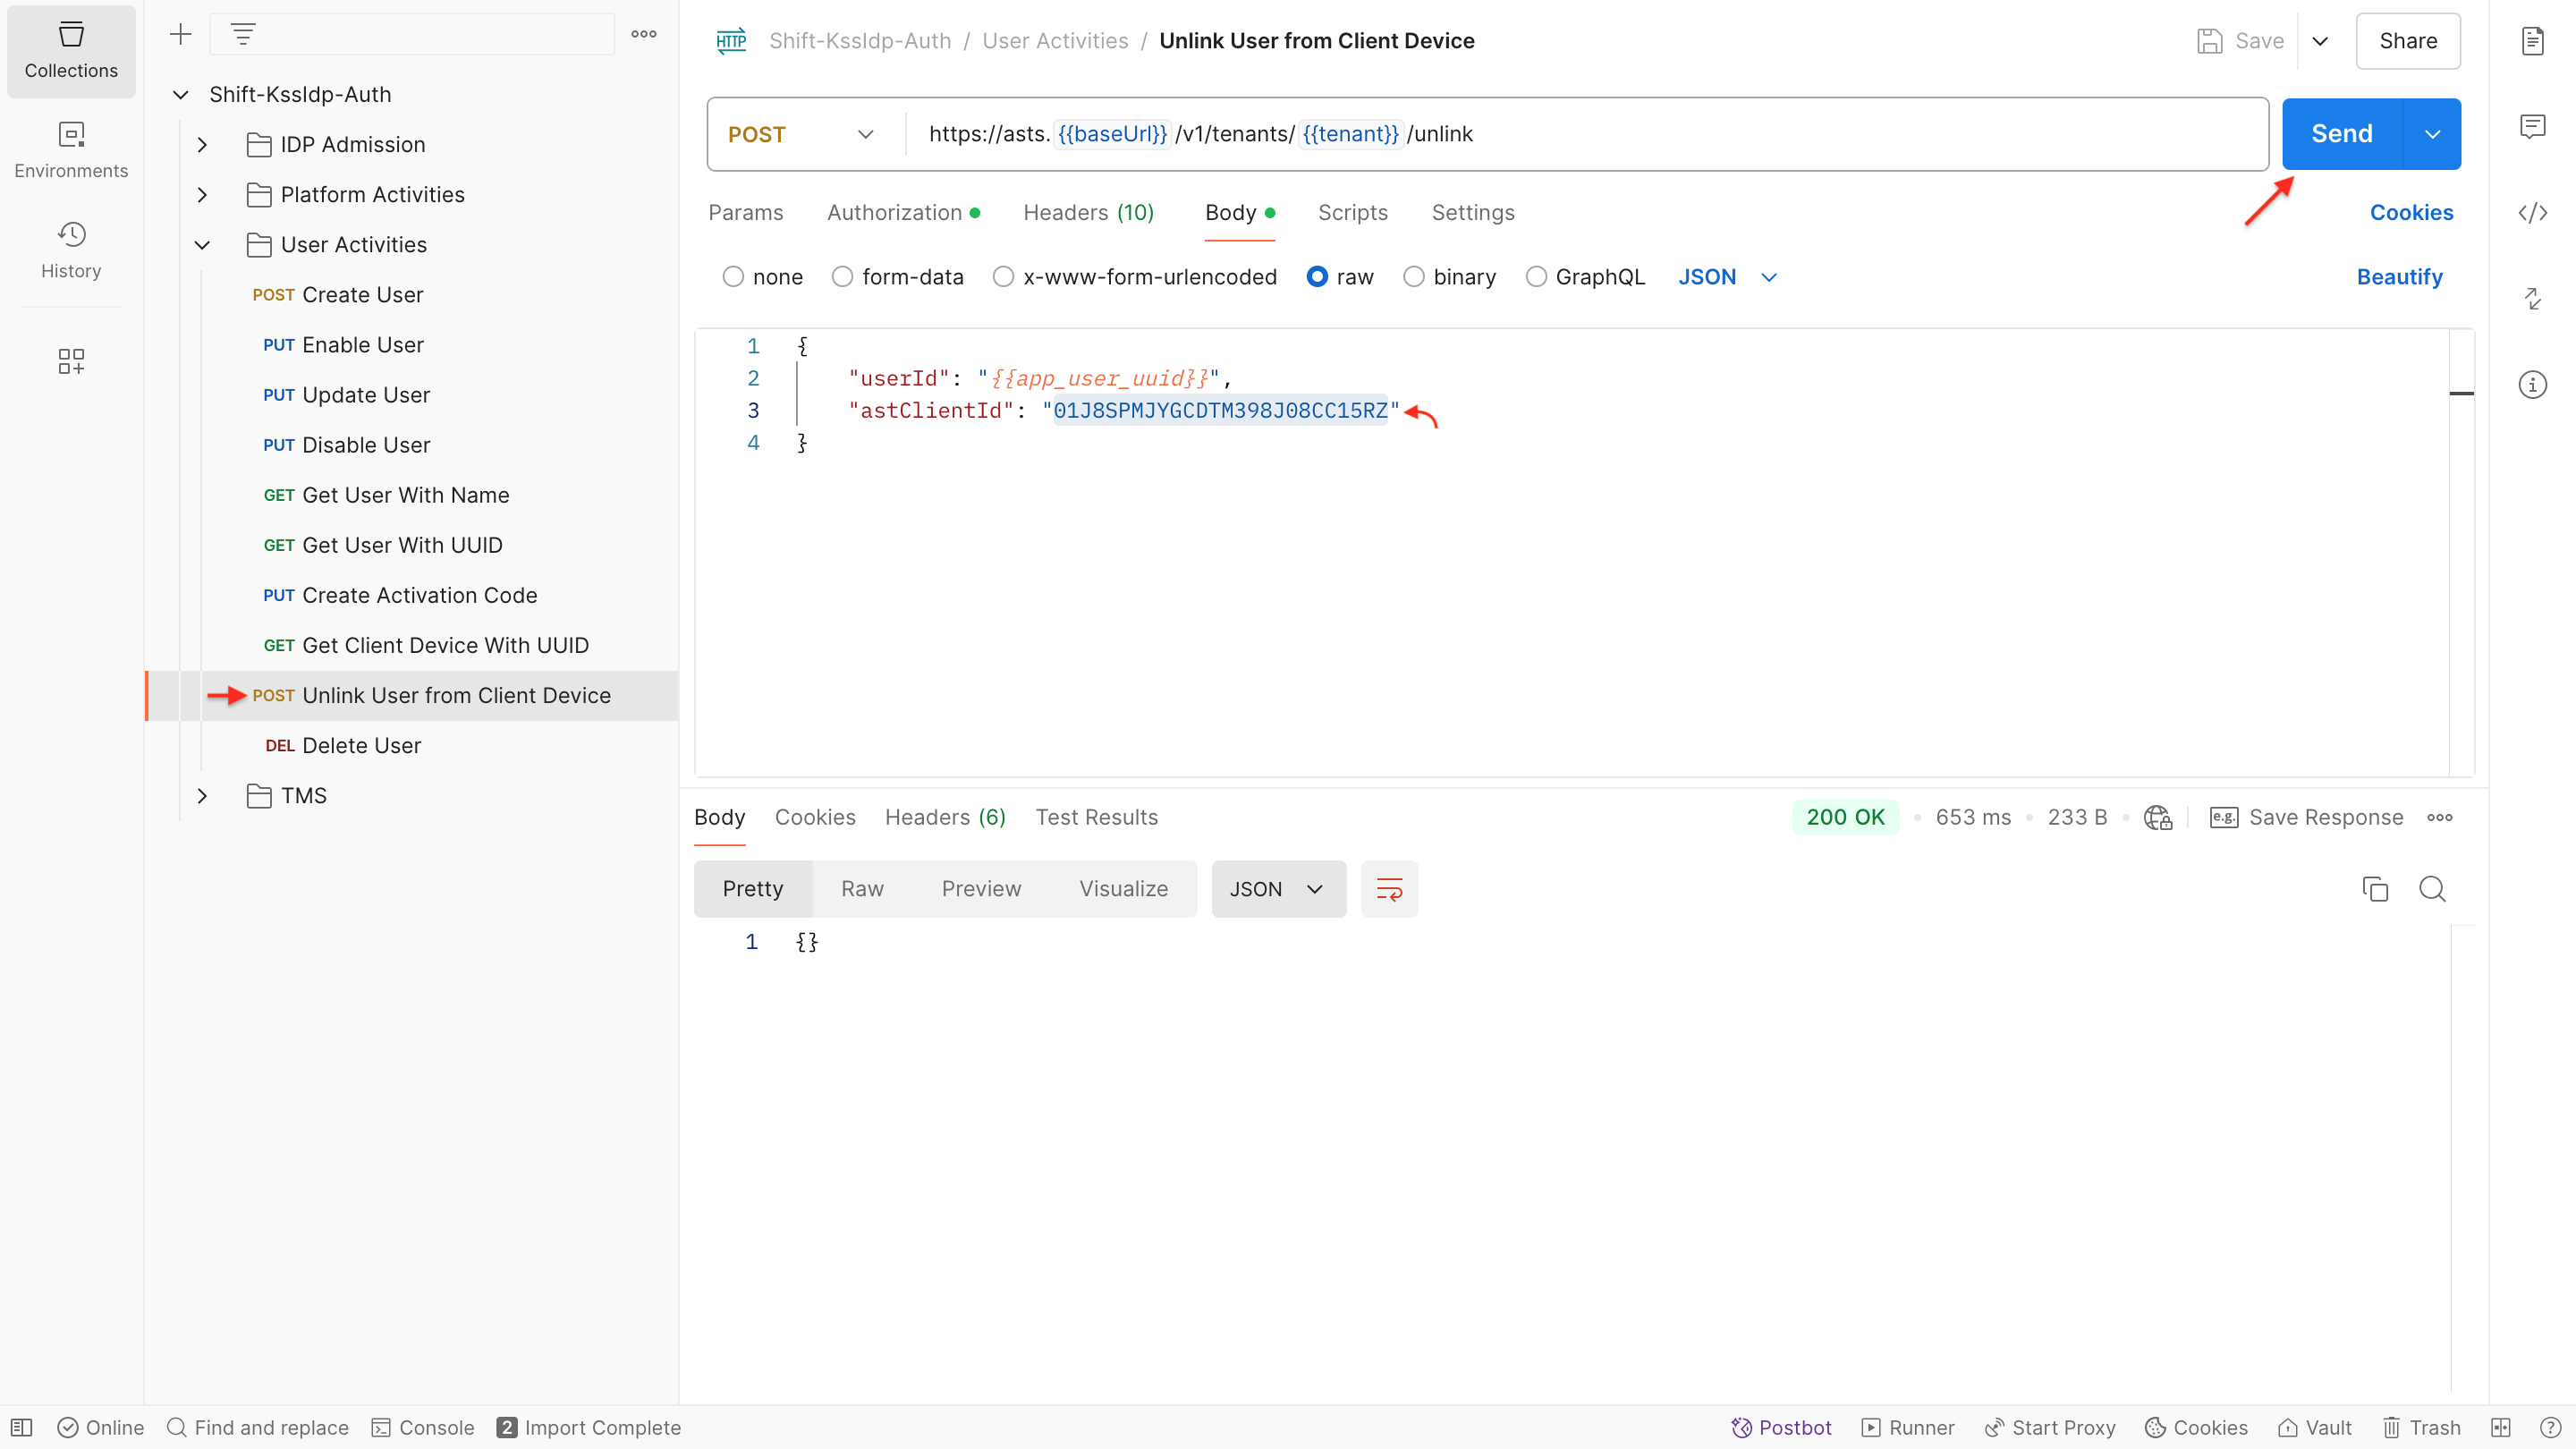
Unlink User from Client Device
-
General Info:
- The Client Device ID needs to be included in the request body, to unlink the specified users.
-
Performing the API Request and Response:
- To get more information about the request body configurations and responses, please follow the Unlink User API methods.
⚠️NOTE: Since the same user can perform activation on multiple devices, the ID of the app user and Client Device must be presented in the request body.
Delete User
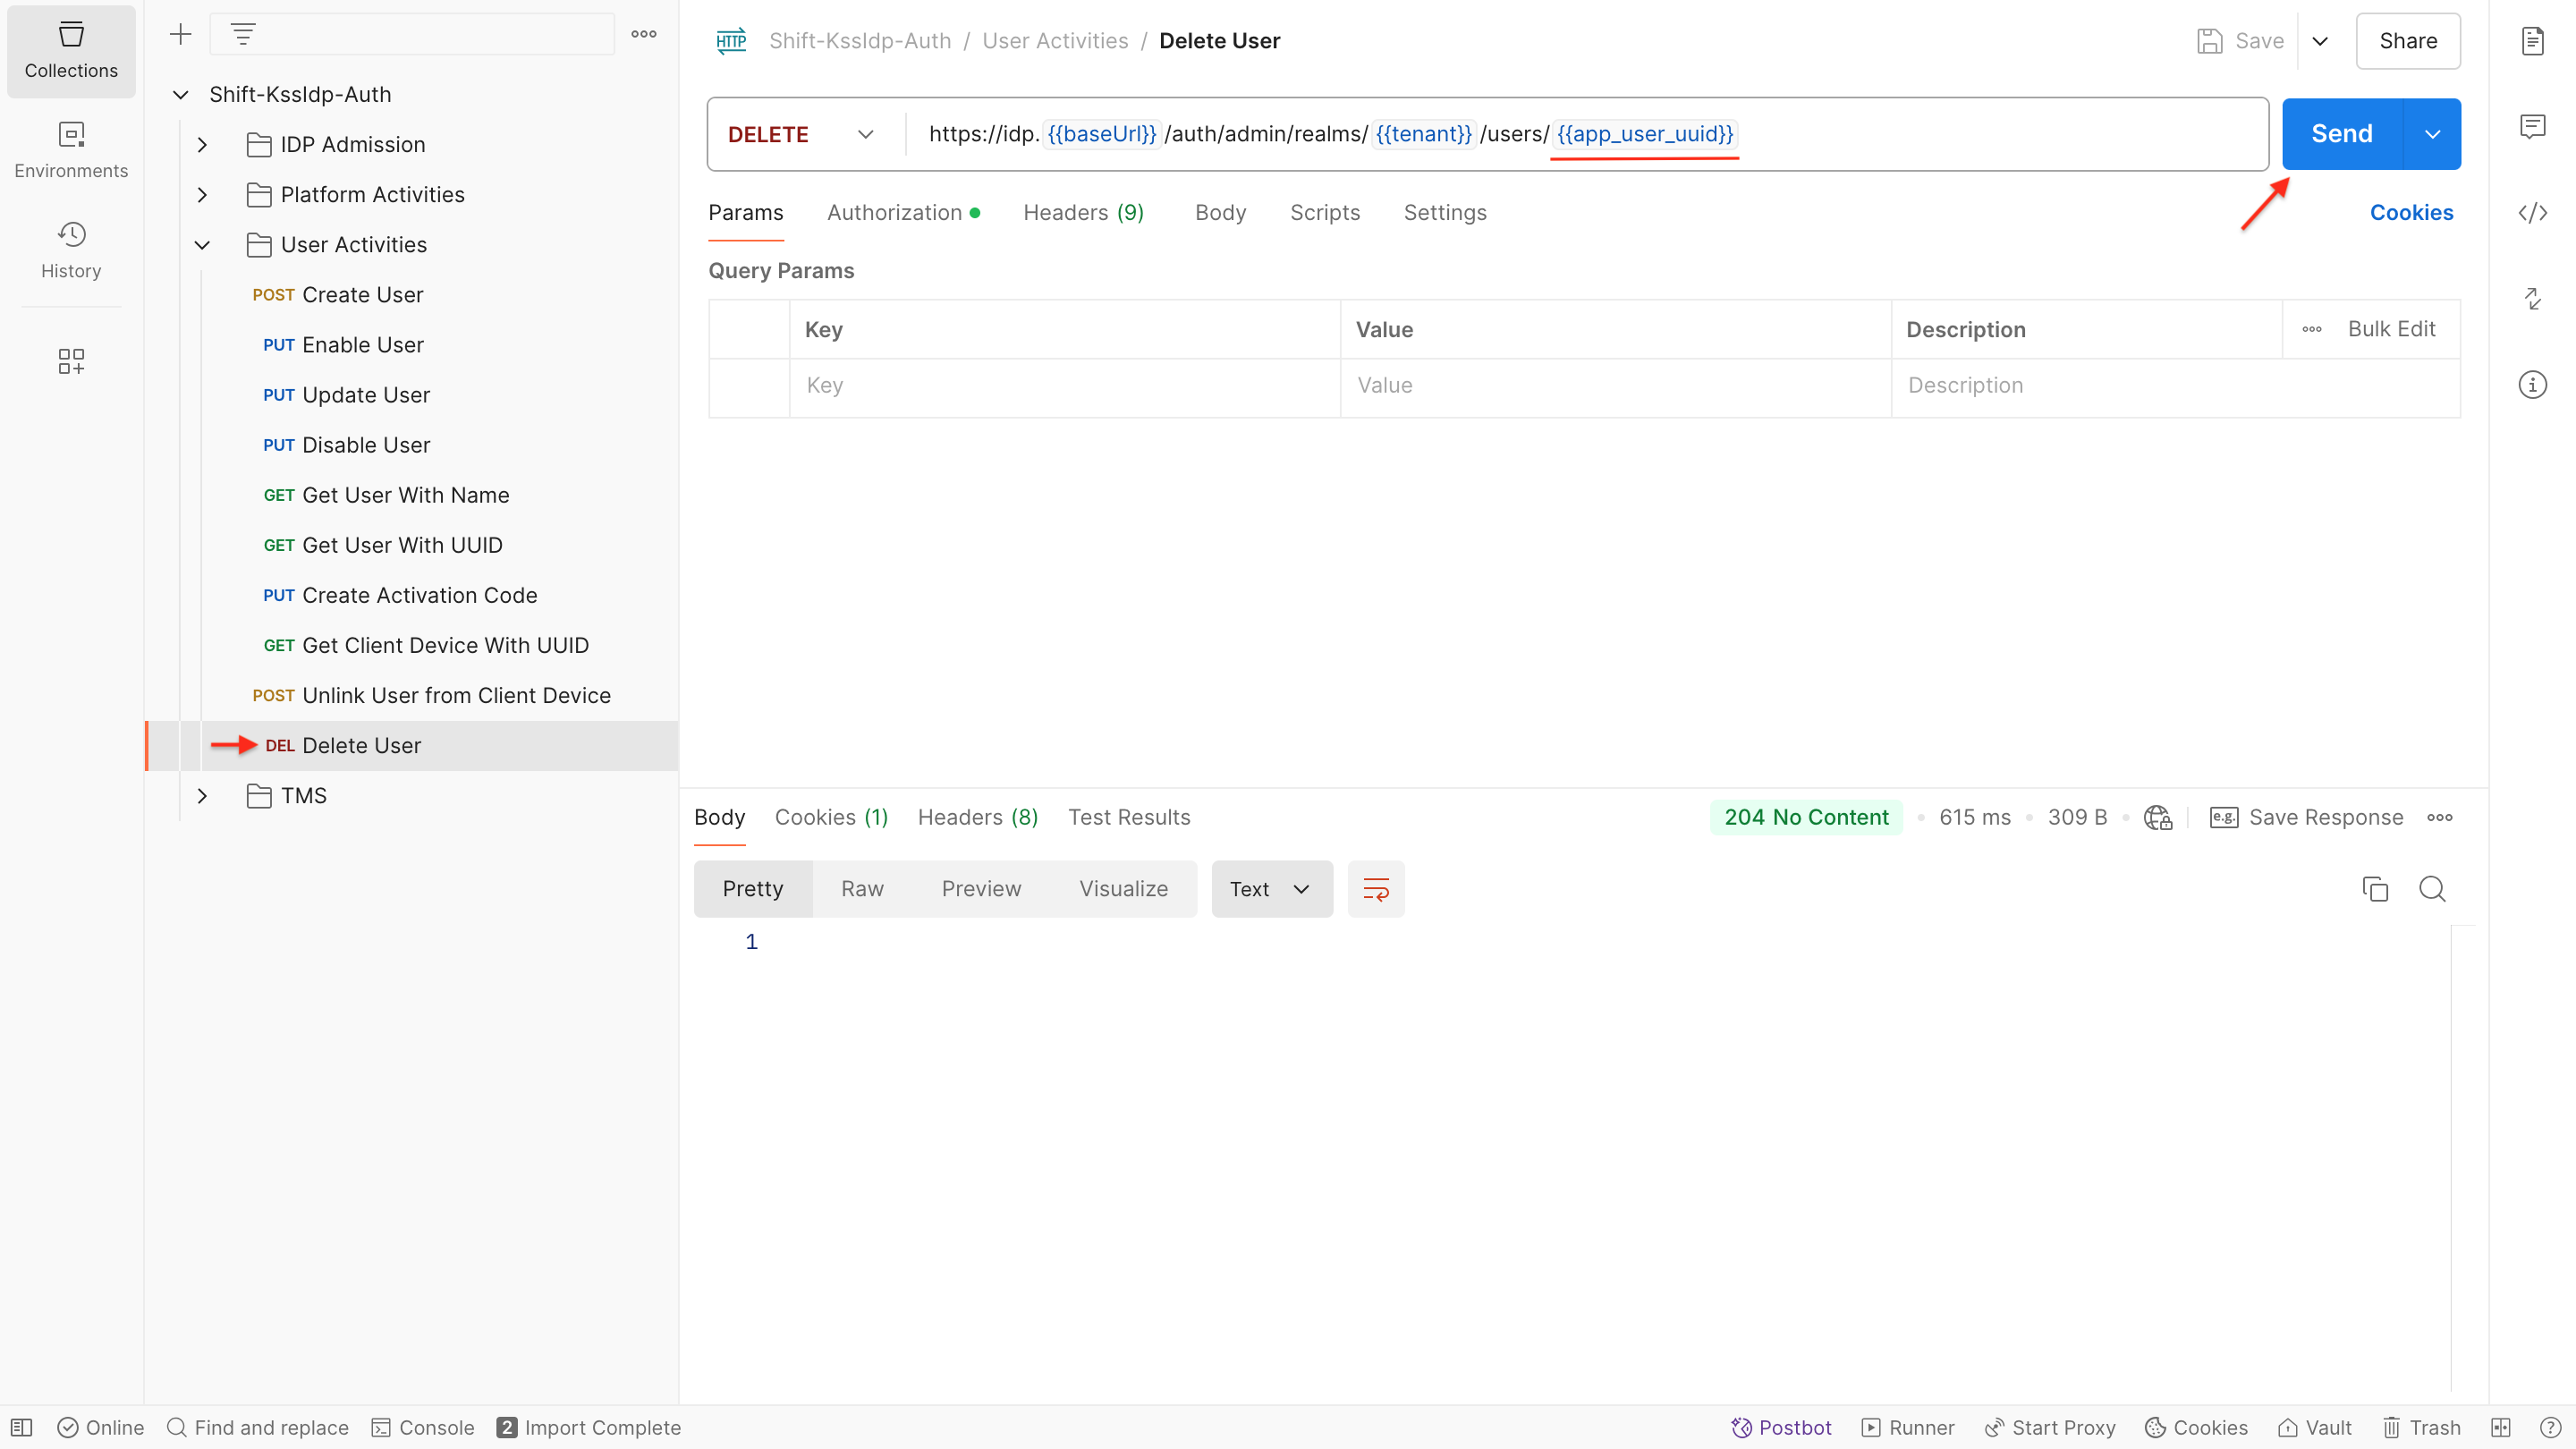
-
General Info:
- To delete an existing user, an UUID of the user is required.
- The deleted users will not be displayed on your IDP service anymore.
-
Performing the API Request and Response:
- For more information about the request body configurations and responses, please follow the Delete User API methods.
TMS
Display Message
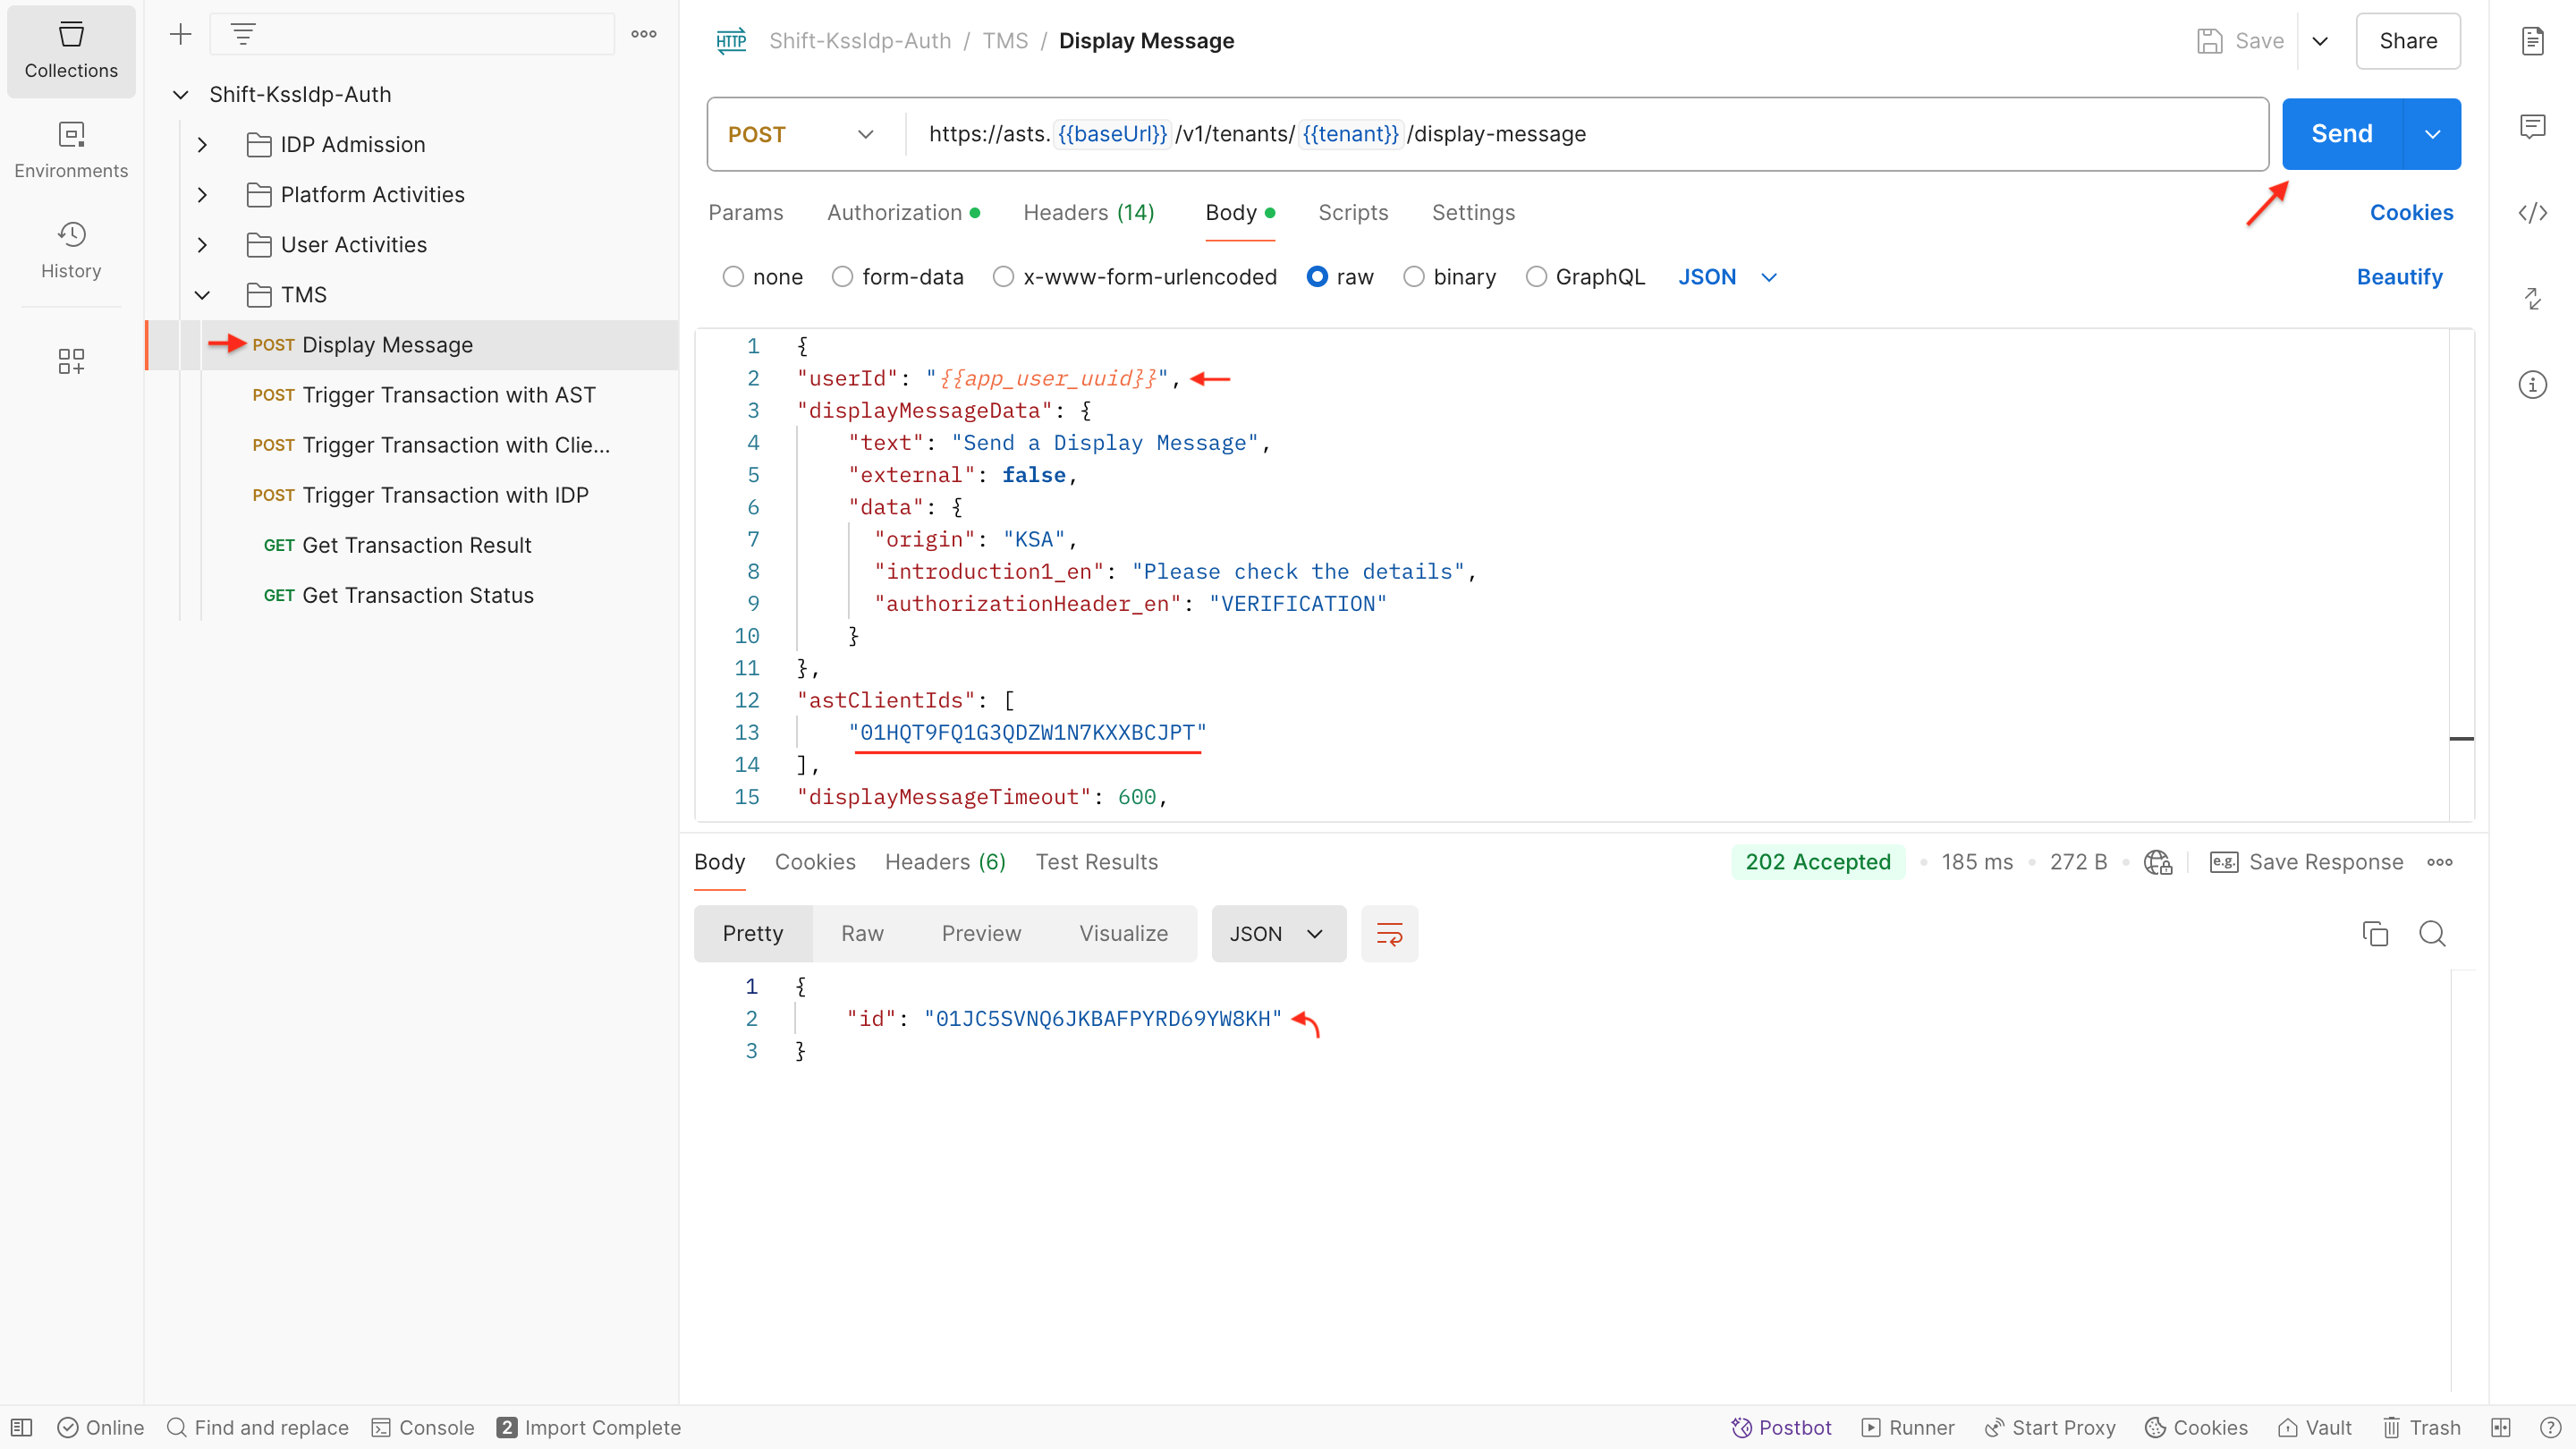
-
General Info:
- To send a Display Message to the specified users, the user ID or client ID needs to be included in the request body.
- After the request call is sent, the unique ID of the Display Message will be displayed in response for further tracking.
-
Performing the API Request and Response:
- For more information about the request body configurations and responses, please follow the Send a Display Message API methods.
Trigger Transaction
![]()
-
General Info:
- Specify the user's ID in the request call to trigger the transaction.
- The information presented to the user during the transaction is encapsulated in the tmsData parameter.
- Set the transaction's validity period using the retrievalTimeout and tmsTimeOut parameters.
- Upon sending the request call, obtain the unique transaction ID and its status for further tracking.
-
Performing the Transaction with Push Notification:
- Set the push notification provider API key, during the App Creation process.
- On the app side, trigger the SetPushTokenEvent via MCSDK.
- Add the "push" method from the Trigger Transaction API to your Postman request body.
To get more information about the request body configurations and responses, please follow the Trigger Transaction API methods.
Get Transaction Result
![]()
-
General Info:
- To retrieve the transaction result, the transaction ID needs to be included in the request call.
- The transaction result, such as ACCEPTED, REJECTED, and TIMEOUT, will be displayed in the response, if it is available. If no transaction result is known yet, you will get an error message.
-
Performing the API Request and Response:
- To get more information about the request body configurations and responses, you could check the Get Transaction Result API methods.
Cancel Transaction

- General Info:
- With an simple click, you can cancel an ongoing transaction in your workspace.
- To execute the request call, the unique ID of the transaction needs to be defined.
- Performing the API Request and Response:
- For more information about the request body configurations and responses, you could check the Cancel an Ongoing TMS API methods.