SecOVID Views
SecOVID Module views
The SecOVID view of the management graphical interface leads to the views and functions with which you can manage the single KOBIL SecOVID Tokens. The following are the submenus of the SecOVID view.
- SecOVID Token
- Users
- Groups
- Reporting
- Advanced-Settings (with Settings and Text Resources)
SecOVID Token view
In the SecOVID tokens view, you can manage the SecOVID tokens. Here, all registered tokens are listed in a table. For instructions on how to search and filter results, please refer to the administrator manual for the Kernel module (chapter “Search”).
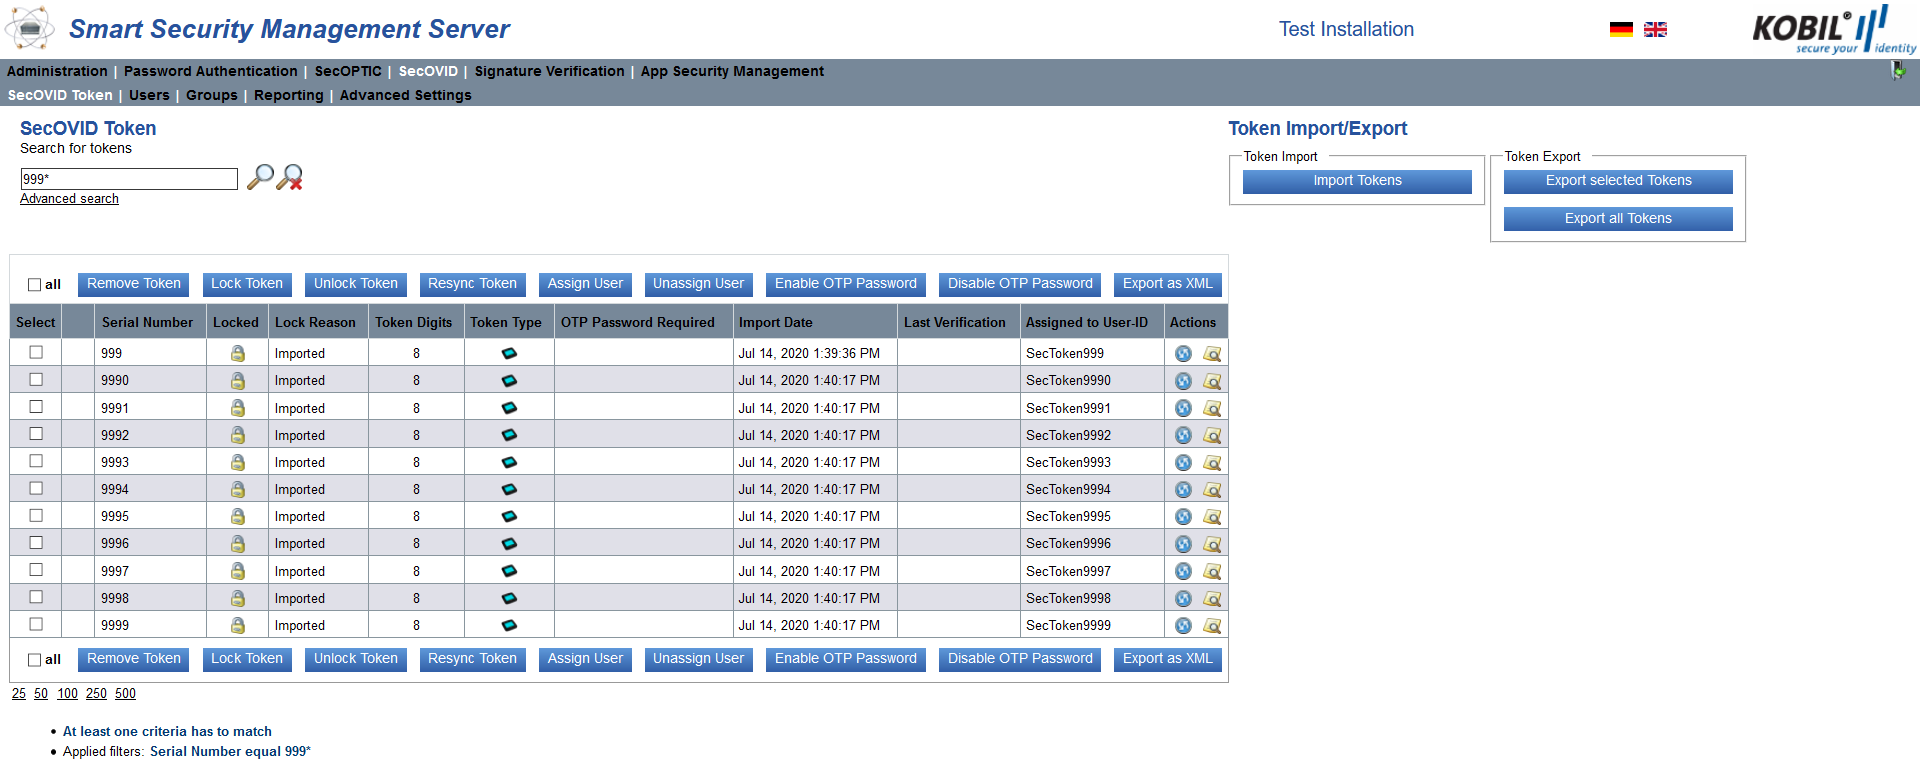
| Select | Checkbox for selection |
|---|---|
| Serial Number | Serial number of the SecOVID token |
| Locked | The lock status of the SecOVID token is represented by the picture of a lock. If the user assigned to that token is locked, the picture of a lock with a person on it is displayed next to the token lock |
| Lock Reason | The lock reason in case the token is locked |
| Token Digits | Number of digits of the generated one-time password (OTP): - 6 – digit OTP - 8 – digit OTP |
| Token Type | |
| OTP Password Required | |
| Import Date | Date on which the SecOVID token was registered on the KOBIL SSMS |
| Last Verification | Time when the SecOVID token was used the last time |
| Assigned to User-ID | User-ID to which the token was assigned |
| Actions |
Import SecOVID Tokens
You can import the SecOVID tokens from a file by means of the button “Import Tokens”. After clicking the button, a window pops up where you can select the file to import and enter your transport key password, which you set in the certificates view of the configuration utility. You can import xml files as well encrypted (3DES or RSA) or simple text files.

If the tokens were imported correctly, they are displayed in the SecOVID tokens view.
Export SecOVID Tokens
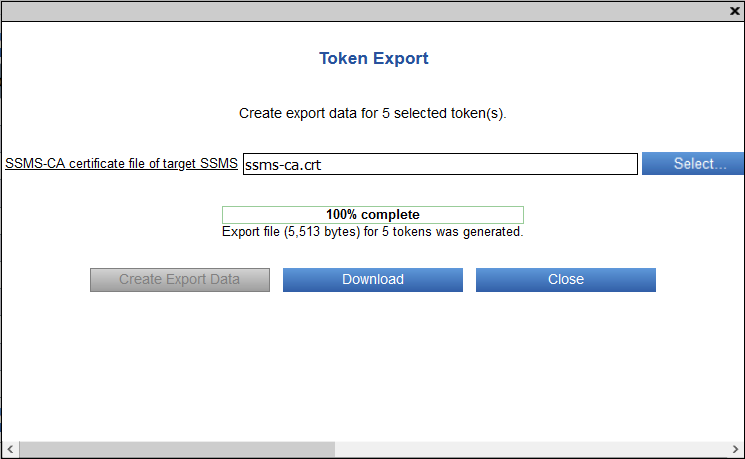
You can export tokens by selecting one or multiple tokens in the left-most column and by clicking the button “Export selected Tokens”, or you can export all tokens by clicking the button “Export all Tokens” without selecting any token.
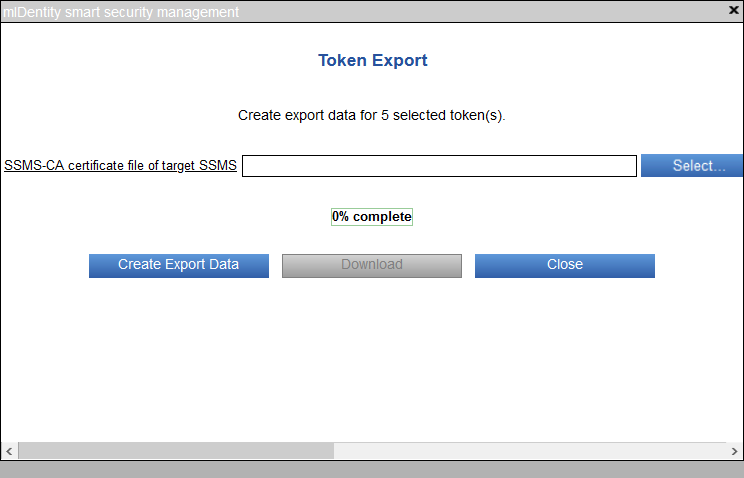
In the window that pops up, you have to select the SSMS-CA certificate of the target SSMS and to confirm the export by clicking “Create Export Data”. An xml file is generated, which you can download.
Remove Tokens
You can remove tokens by selecting one or more SecOVID tokens via the checkboxes on the left and clicking the corresponding button. Before removing the tokens you are asked to confirm your action.
Lock or unlock Tokens
In the view “SecOVID Token”, you can lock and unlock tokens. The list for the possible lock reasons for the tokens can be configured and can be retrieved via the SOAP-Method “getLockReason”. The reasons configured by now are:
- stolen
- lost
- defect
- unknown
- resync
Resync Tokens
You can lock tokens by selecting one or more SecOVID tokens via the checkboxes on the left and clicking the corresponding button. The lock reason will be set to Re-Synchronization
Assign User
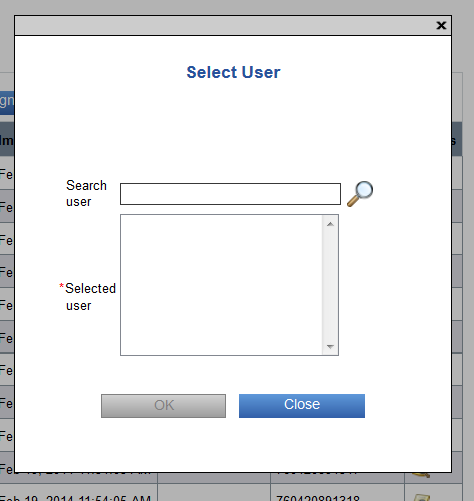
You assign one or multiple tokens to a user by selecting the token in the left-most column and by clicking “Assign User”. You can enter a user ID and search for it: the desired user ID appears in the field below. Select it and confirm your selection with “OK”.
Unassign User
You unassign a token from a user by selecting the token in the left-most column and by clicking “Unassign User”.
Enable OTP Password
The token-generated OTP can sometimes be used with a password (please find a detailed description on how to set a password in the Administrator Manual for the PAM module). In this view, you can configure the use of a password with the token-generated OTP selecting the token in the left-most column and clicking “Enable OTP Password”.
Disable OTP Password
The use of a password with the token generated OTP can also be deactivated. You achieve this by selecting the token in the left-most column and by clicking “Disable OTP Password”.
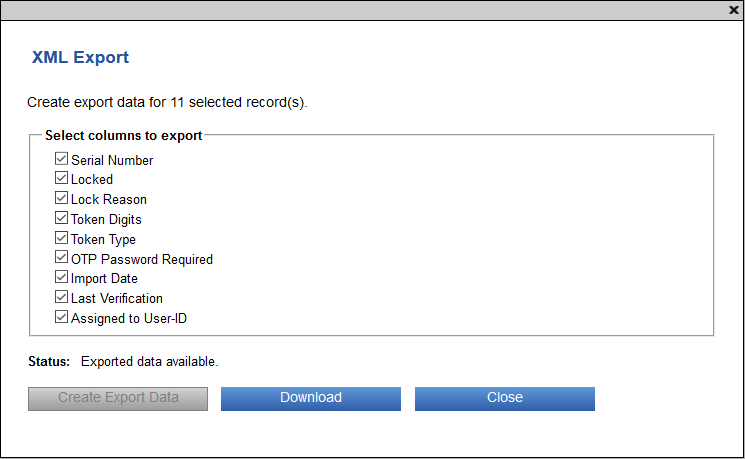
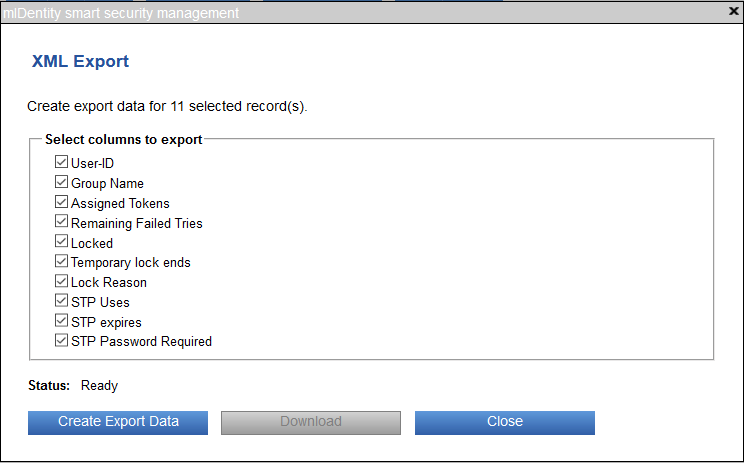
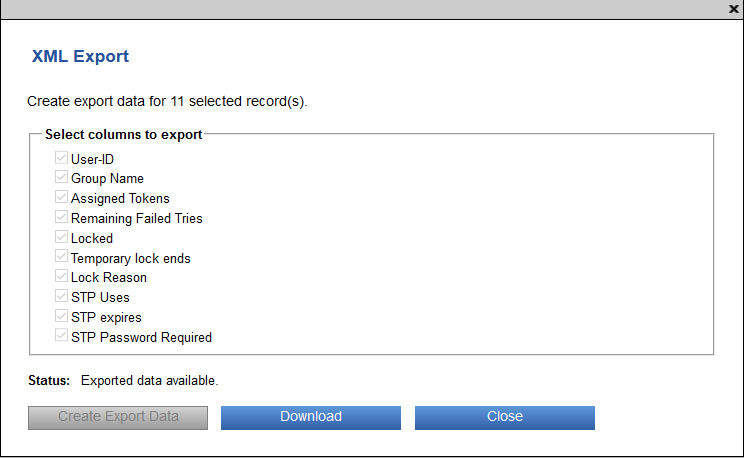
Export as XML
You can export and download (as xml file) all token data which are currently available (not only the visible) in token view. You can limit the data by applying the token filter.
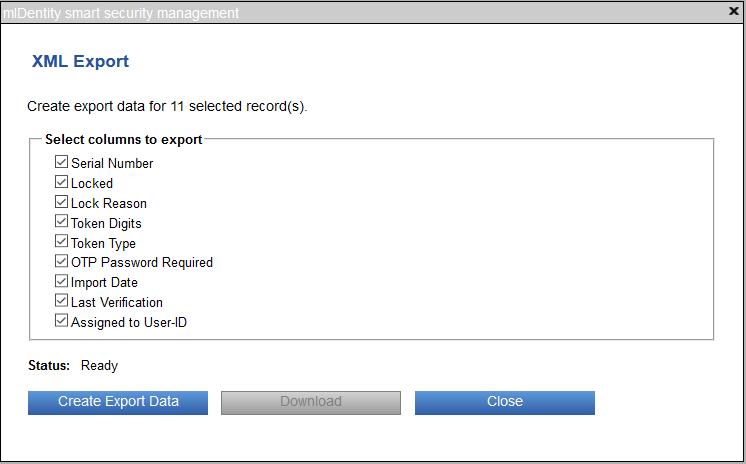
In the window that pops up, you can choose the required token attributes by enabling the regarding checkbox. Finally you have to confirm the export by clicking “Create Export Data”. An xml file is generated, which you can download.
Users view
In the “Users view”, you can register and manage the users assigned to tokens. In the users view, all users are listed in tabular form. The table contains all registered users of the SSMS (also users with no token) and their corresponding attributes. See next figure for details:
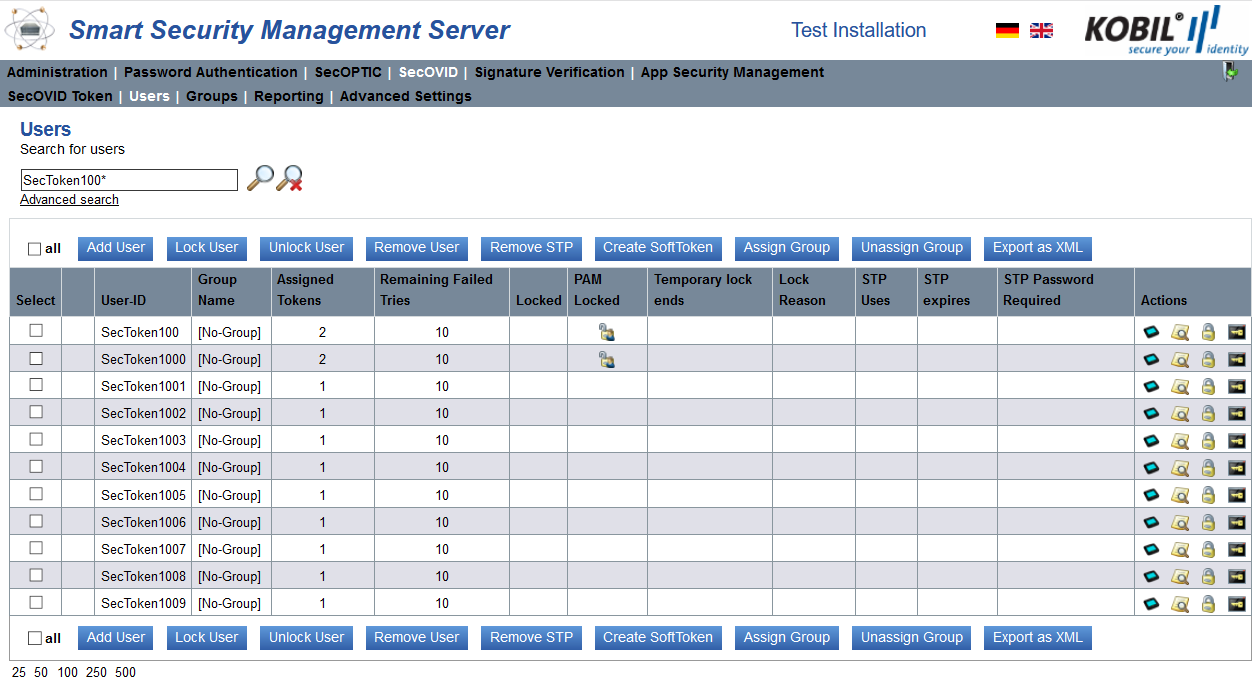
The list of this view informs you about the status of all registered users as well as their attributes as described in the following table:
| Select | Checkbox for selection |
|---|---|
| User-ID | String that defines the user ID |
| Group Name | The group assigned to the user |
| Assigned Tokens | Number of tokens assigned to the user |
| Remaining Failed Tries | The number of retries the user has to enter his OTP |
| Locked | The lock status of the user is represented by the picture of a lock |
| PAM Locked | Shows the lock state of the user if user has a password (is a PAM user) |
| Temporary lock ends | Timestamp when the temporary lock for the user ends |
| Lock Reason | A lock reason in case the token is locked |
| STP Uses | The number of times that the STP was used. The starting usage counter is decremented every time that the STP is successfully used |
| STP expires | Value in seconds of the period of validity of a STP |
| STP Password Required | Information about the use or non-use of a password for the token. The field is empty if no password is used, otherwise it contains a green checkmark |
| Actions |
Note: The KOBIL SSMS manages users in all the installed modules. This means, the users displayed in this view are also available in other modules or views, for example in the view for managing ASM devices.
Add User
Via the button “Add User”, single users can be added to the database. The user ID must be entered in form of a string, must be unique and must be added only once to the database. It is only possible to enter a user ID at a time.
Lock or unlock User
You can lock or unlock a user by selecting one or more users in the column “Select” and clicking the button “Lock User” or “Unlock User” or clicking directly on the action icon in the row of the corresponding user.
Remove User
Select the user to be deleted in the table in the column “Select” and click the button “Remove User”. You will then be prompted to confirm the deletion. Removing a user can also fail; the failure is indicated in the status column on the left of the user ID and a notification is shown above the table.
Create SoftToken
By means of this button, you can create a software token for one or multiple users that you selected beforehand in the left-most column. After clicking “Create SoftToken” a window pops up in which you can decide whether the software token requires a password or not. A csv file is then created, which contains for every user the software token serial number, the activation code and in case you requested one, a password for the token.

Assign Group
To assign an user to a group you can marking the entry and then pressing the "Assign Group" button.
Unassign Group
To unassign an user from the group, please markt he correspondeing entry and press „Unassign Group“
Add Static Time Password
Static Time Passwords (STPs) are used in case a customer has temporarily no access to his token and is therefore not able to generate a one-time password. For every Static Time Password you can set a specific expiration time and a maximum number of times that it can be used after which it is no longer valid. Please set the values in the SecOVID advanced settings, which you can then change individually for every single STP added.
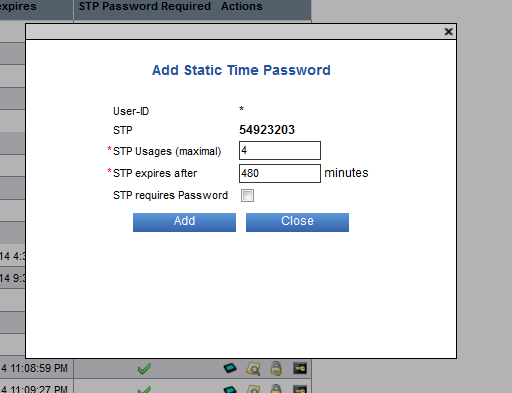
You can also assign to the user a password along with the STP by selecting the option “STP requires Password”. When you click “Add” a password is then shown in the window. In case the user already had a password, no new password is shown. The STP will be invalidated after having reached the number of usages available or after the user logs in with a real token.
Remove STP
By means of this button, you can remove the Static Time Password that you created beforehand with the corresponding action button (see Table 2). To remove a Static Time Password, select one or multiple users in the left-most column before clicking “Remove STP”.
Export as XML
You can export and download (as xml file) all user data which are currently available (not only the visible) in users view. You can limit the data by applying the user filter.
In the window that pops up, you can choose the required user attributes by enabling the regarding checkbox. Finally you have to confirm the export by clicking “Create Export Data”. An xml file is generated, which you can download.
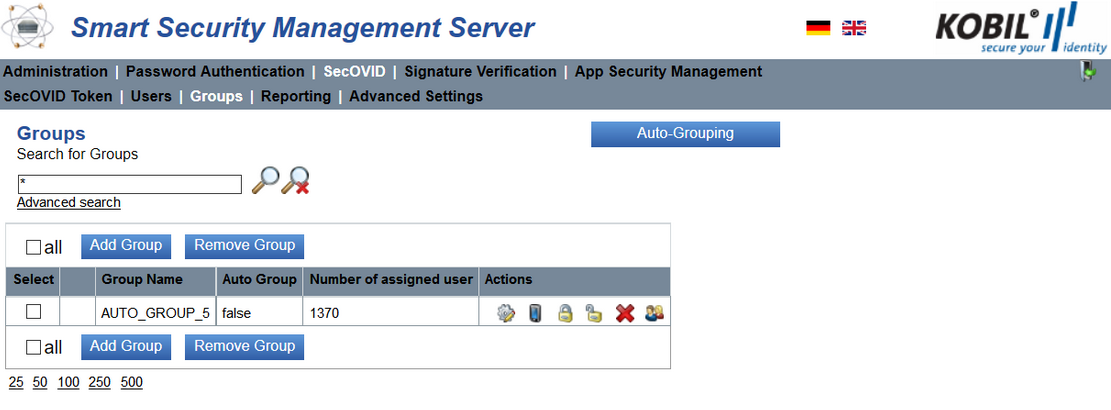
Groups
In this view you can manage created groups. New groups can be created by clicking the “Add Group” button. Delete groups by selecting entries and click the “Remove button”.
Reporting view
Via the reporting view, the operators of the SSMS can view past actions.
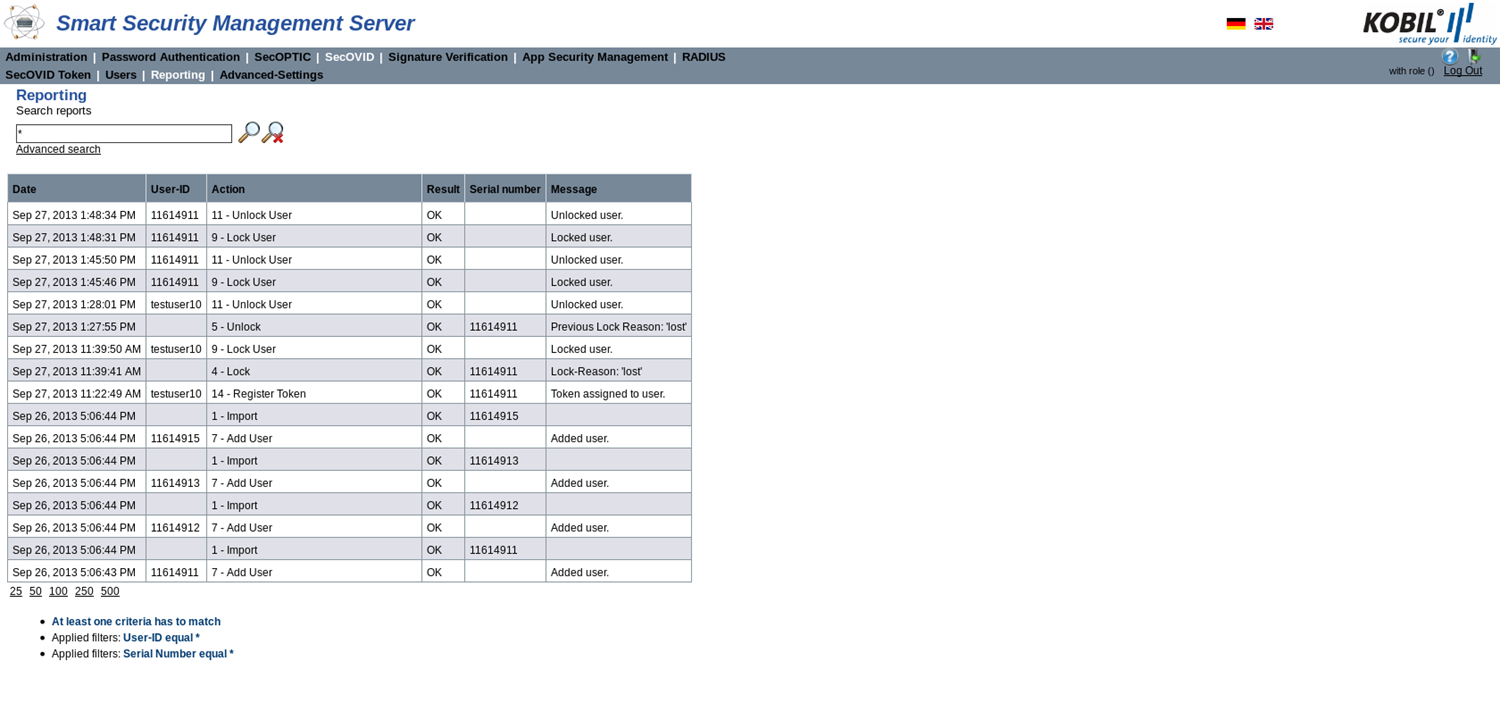
The list of this view informs you about the status of the tokens and the carried out actions as well as their attributes, as described in the table below:
| Date | Date and time when the action was carried out |
|---|---|
| User-ID | String that defines the user ID |
| Action | Action that was carried out (given by the system) |
| Result | Result of the action: - OK: the action was successfully carried out - FAILED: the action has failed |
| Serial number | The serial number of the SecOVID token |
| Message | Description of the result of the action |
Advanced Settings view
The Advanced-Settings view can be modified only by the Super Administrator and the Administrator. They are divided into Settings and Text Resources. This paragraph explains the advanced settings and the configuration options of the SecOVID module you can set in this view. The values in the illustration are default values.
Settings
In the Settings view, you can set general configurations of the module.
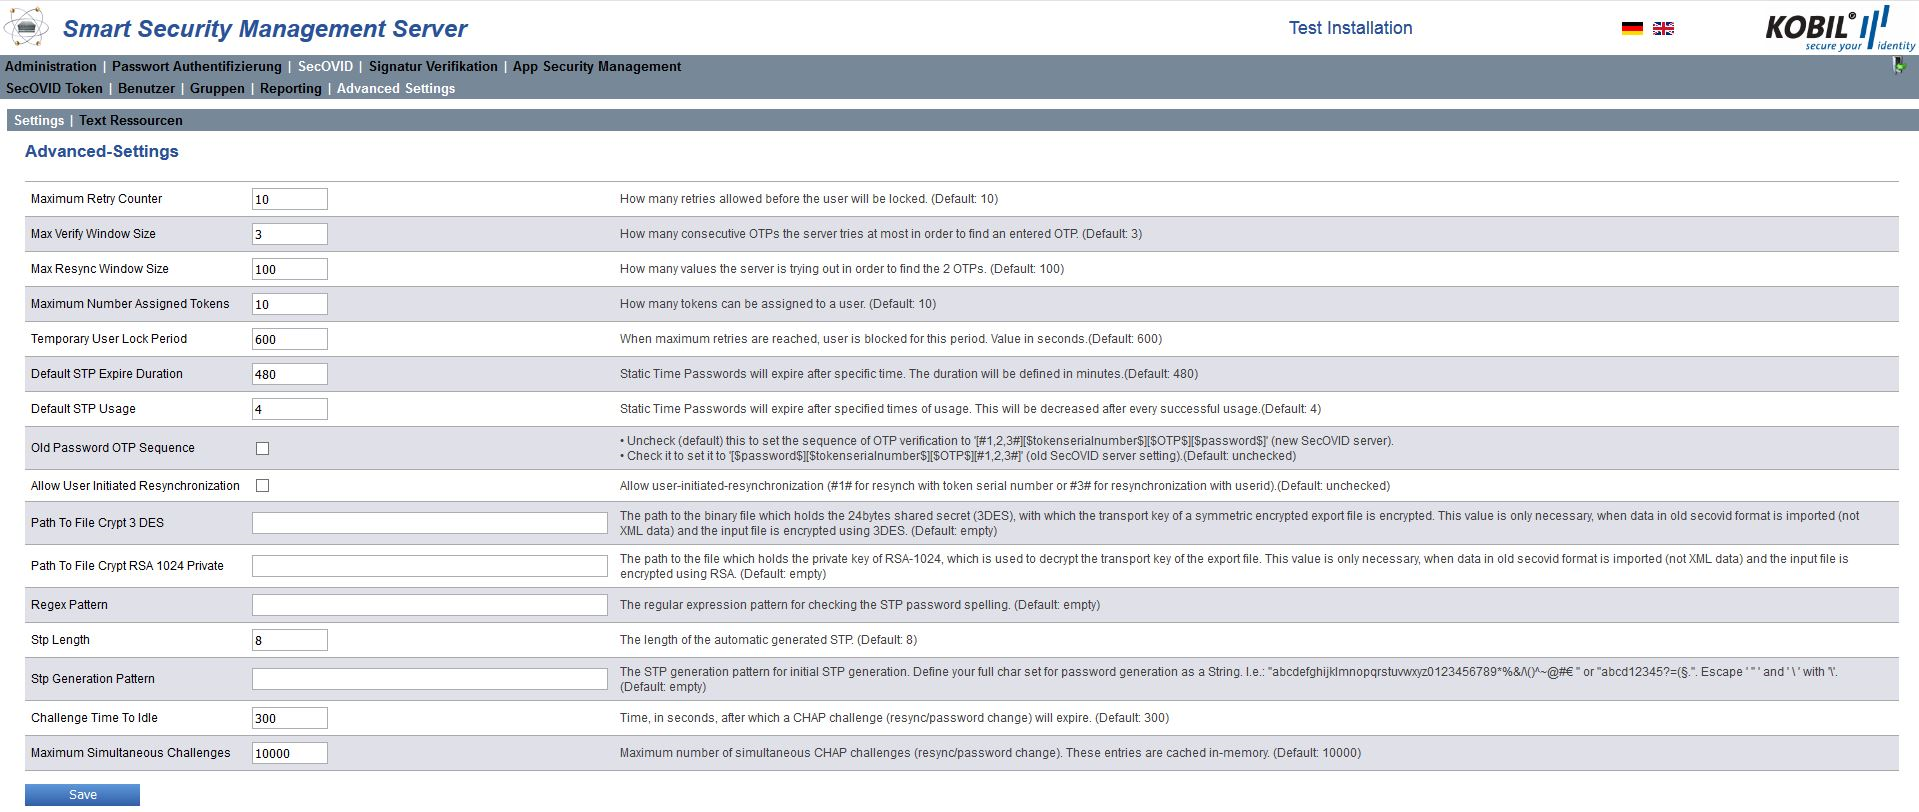
The following configuration parameters can be adjusted in the Advanced-Settings view:
| Maximum Retry Counter | The number of retries the user has to enter the right password. Default value is 10 retries. If the maximum number of retries is reached, the user of the token will be locked. |
|---|---|
| Max Verify Window Size | The maximum number of consecutive OTPs among which the server tries to find the entered OTP. Default value is 3 OTPs. |
| Max Resync Window Size | The maximum number of OTPs among which the server tries to find the 2 OTPs for the re-synchronization. Default value is 100 OTPs. |
| Maximum Number Assigned Tokens | How many tokens can be assigned to a user. Default value is 10 tokens. |
| Temporary User Lock Period | How long the user is locked after he reached the maximum number of retries. Default value is 600 seconds. |
| Default STP Expire Duration | Expiration time of the STP. |
| Default STP Usage | Times that the STP can be used until it expires. |
| Old Password OTP Sequence | Defines the input order for OTP verification. Uncheck (default) this to set the sequence to '[#1,2,3#][$OTP$][$password$]' (new SecOVID server). Check it to set it to '[$password$][$OTP$][#1,2,3#]' (old SecOVID server setting). |
| Allow User Initiated Resynchronization | Allows the user a manual resynchronization of the token. Entering the prefix #1# and the token serial number starts a re-synchronization request. Please find additional details about the resynchronization and the description of the prefixes in the administrator manual for the module RADIUS in chapters 4.2 and 4.3. |
| Path to File Crypt3 DES | Path to the binary file containing the 24bytes shared secret (3DES), with which the transport key of a symmetric encrypted export file is encrypted. This value is only necessary when data in old SecOVID format is imported (not XML data) and the input file is encrypted using 3DES. |
| Path to File Crypt RSA 1024 Private | Path to the file containing the private key of RSA-1024, which is used to decrypt the transport key of the export file. This value is only necessary, when data in old SecOVID format is imported (not XML data) and the input file is encrypted using RSA. |
| Regex Pattern | The regular expression pattern is intended primarily for checking the accuracy of STP password, if it entered manually. |
| Stp Length | Specifying the length of automatic generated STP. |
| Stp Generation Pattern | Specifying signs for automatic generation of STP. The STP shall use only the specific signs which be defined here. |
| challengeTimeToIdle | Time, in seconds, after which a CHAP challenge (resync/password change) will expire. |
| Maximum Simultaneous Challenges | Maximum number of simultaneous CHAP challenges (resync/password change). These entries are cached in-memory. |
Confirm your changes in the Advanced-Settings by clicking “Save”.
Settings for CHAP support
The following settings are only required, if you are using SecOVID module run RADIUS with CHAP authentication (using respective RADIUS connector). If a user's password is set to "MUST CHANGE" or the token is set to trigger token resynchronization, the user is prompted to provide the new password or an additional OTP for resynchronization, respectively, in a subsequent so called challenge. In such cases the cache configured here is used to hold intermediate verification results. Intermediate results need to be cached until user answered all challenges successfully. If an intermediate result is dropped, either because of exeeding maximum cache size or because of timeout, this is logged in WARN level and can be controlled in SSMS services log. Please note that the cache requires up to 300 bytes per entry which potentially is allocated in memory (times number of contained elements).
Text Resources
Please find a description of the Text Resources in the administrator manual for the Kernel module.