SVM Views
Signature Verification Module
The Signature Verification Module (SVM) manages certificates and helps you verify certificates, adding new certificates and updating them.
The Signature Verification Module (SVM) can be used only after installing the Kernel module. Please find detailed information on the installation of the Kernel module in the installation manual of the KOBIL Security Server:
Clicking the menu item Signature Verification brings you to the views and functions to manage the certificates individually. More precisely, find the following submenus:
- Issuer certificates
- User certificates
- Users
Managing the certificates occurs via the GUI and the SOAP interfaces and their functions. To control the SOAP management functions, you can use the optionally delivered command line tool. In addition, you can use the SOAP interface to integrate the server into your IT infrastructure. The following tool runs the methods of the management node:
Signature Verification Certificate Manager
You can import, export and manage certificates via this command line tool. Note that the certificates must be encoded in X509v3 format.
With the Certificate Manager you can:
- Import certificates
- Lock certificates (status locked) or unlock certificates (status unlocked)
- Remove certificates from the server
- Assign certificates to a user
- Manage user information
On the contrary, with the SOAP functions belonging to the services nodes, you can verify certificates. This functionality can be integrated for example into a web portal to verify issued server certificates.
Role management in the Signature Verification Module
A role must be assigned to each operator of the system. The division into different roles defines the authorizations of every single operator. Please find information on how to create roles and assign them permissions manual for the Kernel module. The services SOAP interface is secured via SSL server authentication and does not require any other authentication of the user.
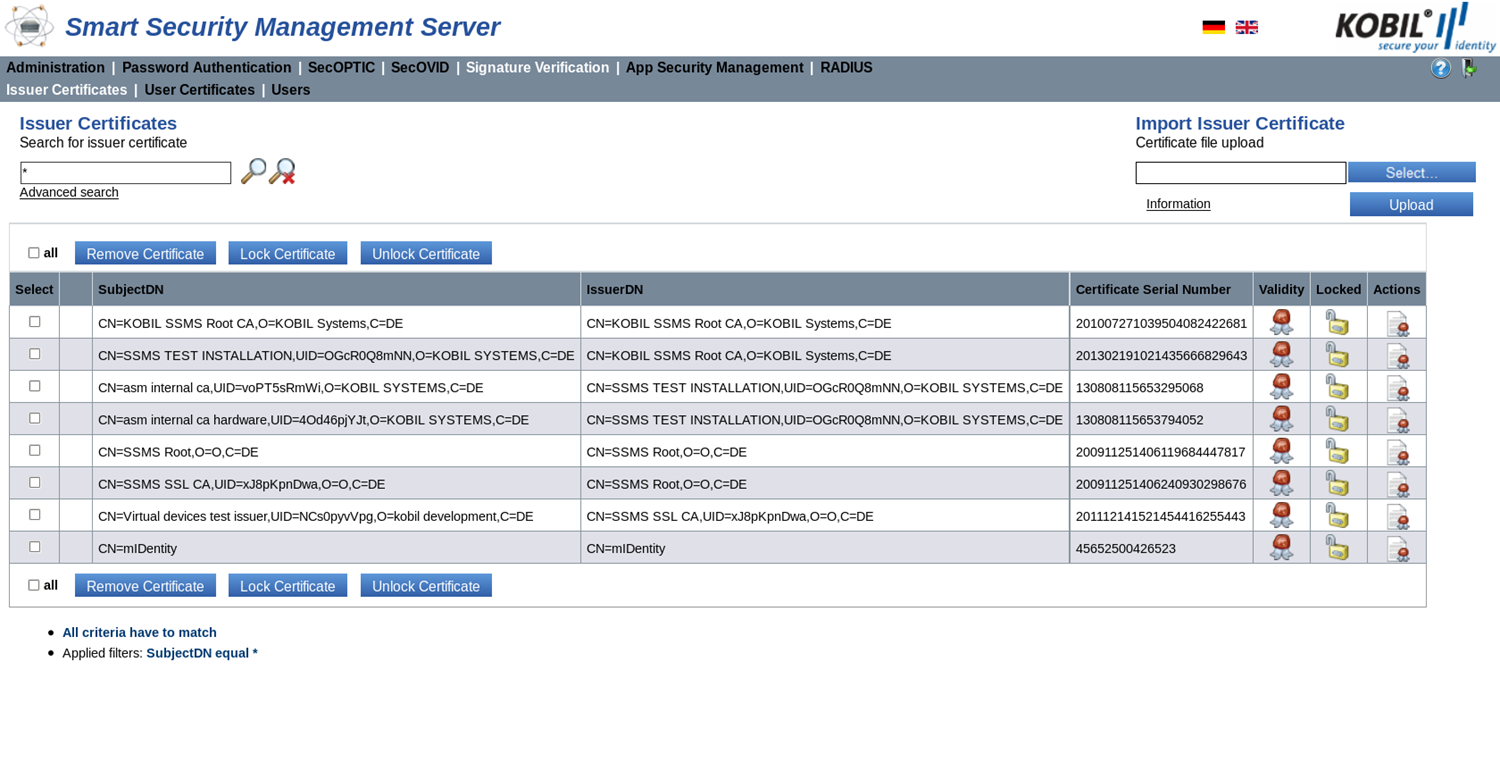
Issuer Certificates view
In the issuer certificates view, you can manage the issuer certificates; more precisely, you can add new issuer certificates, remove existing certificates as well as lock or unlock certificates.
Go to this view by clicking the menu item “Signature Verification” and then its submenu “Issuer Certificates”. Here, all registered issuer certificates are listed in tabular form.

In this view, you can find information about the status of all registered issuer certificates, as well as other attributes:
Select | Checkbox for selection |
|---|---|
SubjectDN | The certificate’s owner Distinguished Name |
IssuerDN | The certificate’s issuer Distinguished Name |
Certificate serial number | Serial number of the certificate |
| Validity |  Icon that shows the validity of the certificate. For precise information on the validity period, open the certificate detail information clicking the corresponding actions icon Icon that shows the validity of the certificate. For precise information on the validity period, open the certificate detail information clicking the corresponding actions icon |
| Locked |  “true” means: the certificate is locked “true” means: the certificate is locked  “false” means: the certificate is unlocked “false” means: the certificate is unlocked |
| Actions |  Opens the detail information of the certificate Opens the detail information of the certificate |
Import issuer certificate
You can import an issuer certificate via the upload field. Note that the certificate must be in X509v3 format.

With the button "Select", you can specify the path of the certificate to be imported. With the button "Upload", the certificate is added to the database.
⚠️ Note that the certificate chain must be respected; this means that you must import a CA certificate after the corresponding root certificate
Lock or Unlock an Issuer Certificate
In this view, you can lock or unlock the issuer certificates. To do this, select one, multiple or all the certificates via the checkboxes and click the button for the action you want to carry out.
Lock issuer certificate
You lock a certificate by checking the box on its left and clicking the button "Lock certificate". A certificate must first be unlocked to be able to verify signed information of the user whose user certificate depends on this issuer certificate.
Unlock issuer certificate
Unlocking a certificate by checking the box on its left and clicking the button activates the authorization of the certificate again and allows the verification of the user’s signed information with this issuer certificate.
Remove Issuer Certificate
You can remove an issuer certificate from the system, by selecting a certificate and clicking the button "Remove certificate".
If you try to remove a certificate, which additional issuer certificates are connected to, you receive an error message with the information that the certificate could not be removed, because other issuer certificates in the database depend on it.
You also may not remove an issuer certificate which additional user certificates are connected to. Also for this action, you receive an error message explaining the problem.
The solution to this is to first remove all issuer or user certificate depending on this issuer certificate to remove it.
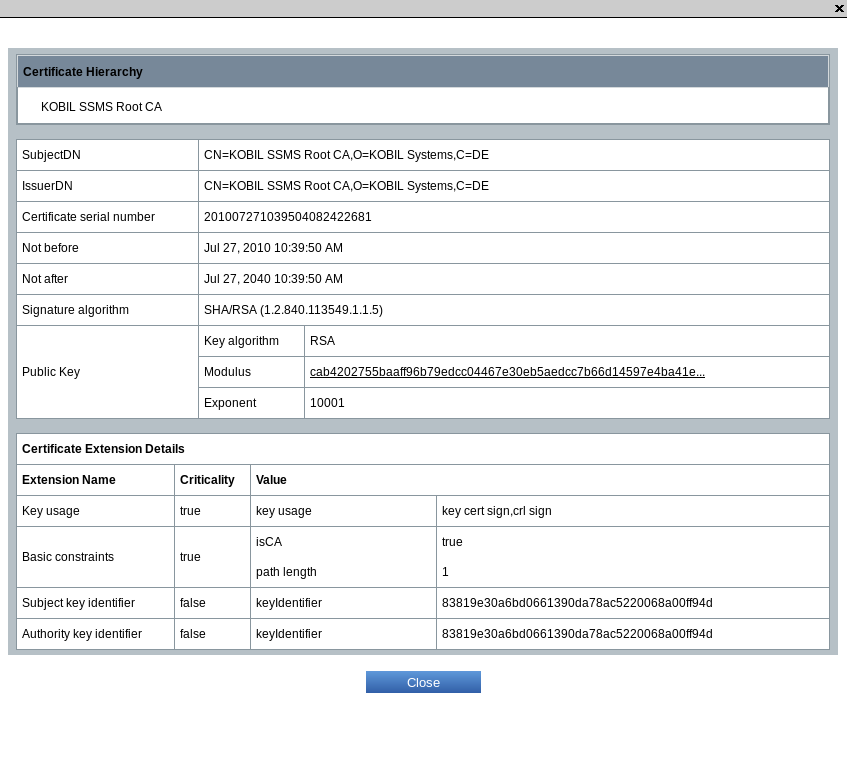
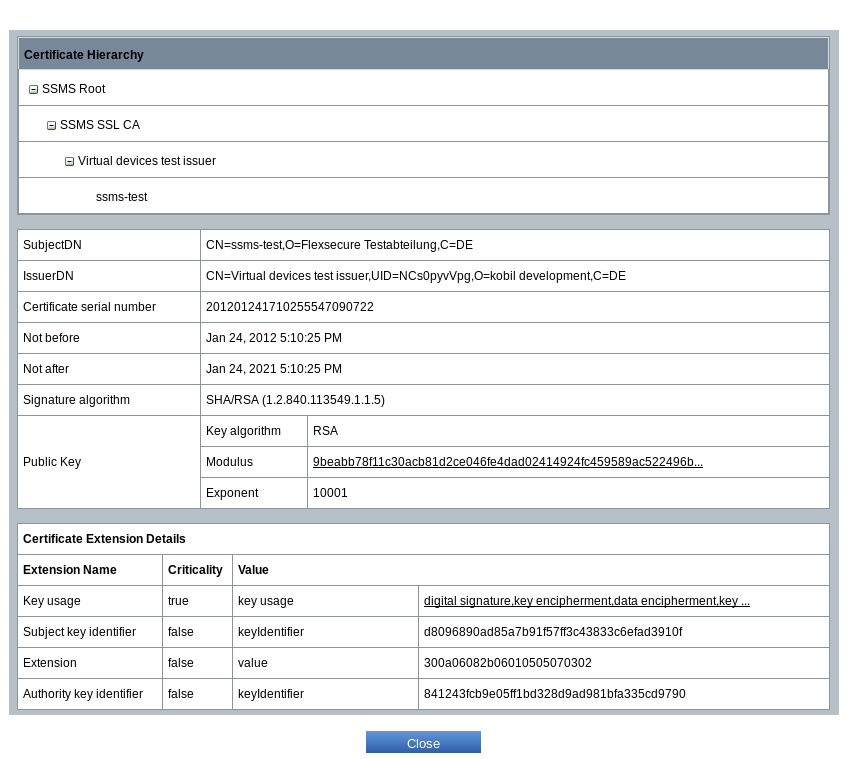
Detail information of the issuer certificates
In the detail view, you can see the certificate information; in particular the validity period, the signature algorithm and the public key.
To access this view, click the icon ![]()
User certificates view
In this view, you can lock or unlock user certificates, remove them or also control their assignment to a user. Check one or more certificates boxes in the Select column and click the appropriate button.
Go to this view by clicking the menu item "Signature Verification"" and then its submenu "User Certificates". Here, all registered user certificates are listed in tabular form. For instructions on search and filter options, refer to the administrator manual for the Kernel module.
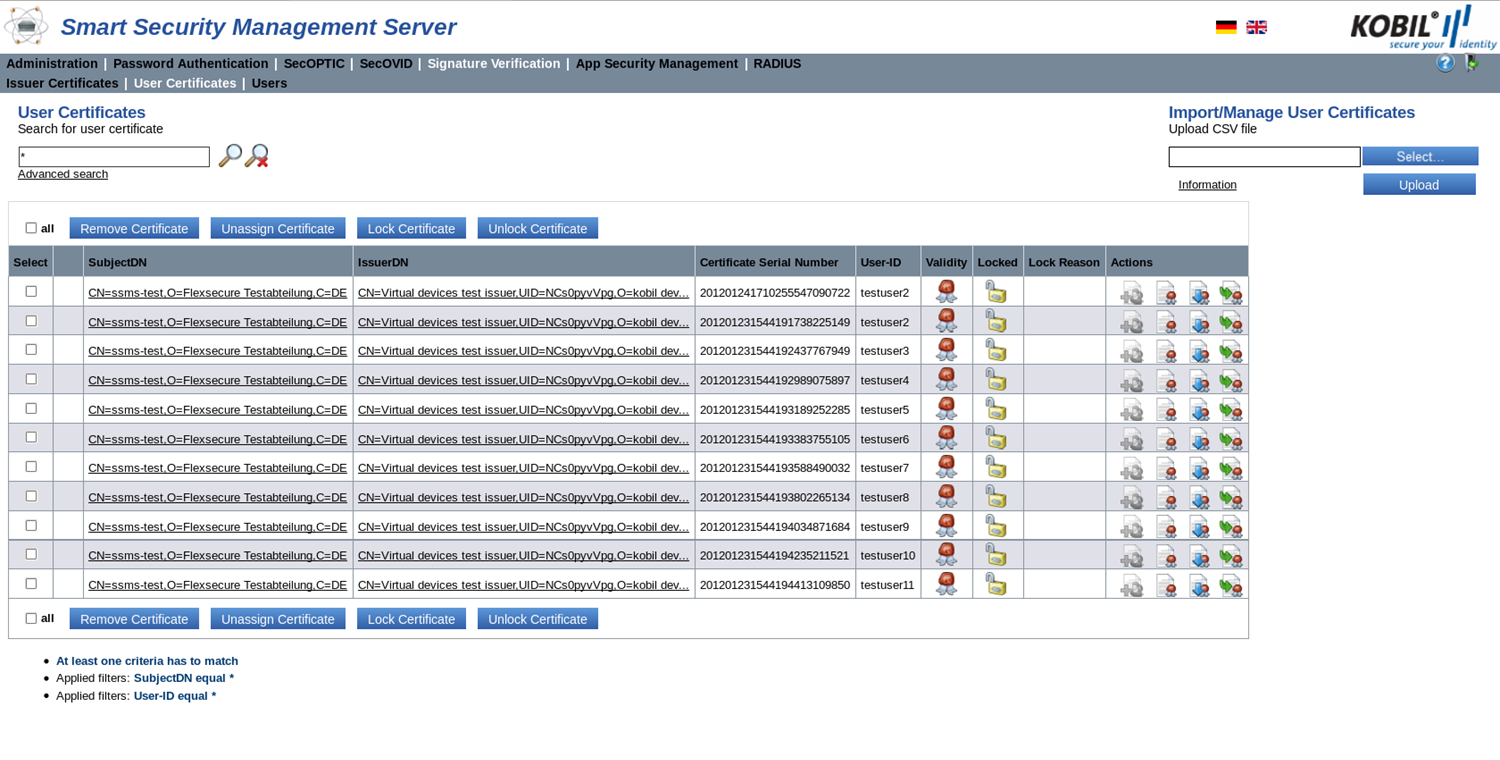
In this view, find information about the status of all registered user certificates, as well as other attributes:
Select | Checkbox for selection |
|---|---|
SubjectDN | The certificate’s owner Distinguished Name |
IssuerDN | The certificate’s issuer Distinguished Name |
Certificate serial number | Serial number of the certificate |
User ID | The user name whom the certificate is assigned to |
| Validity | Icon that shows the validity of the certificate. For precise information on the validity period, open the certificate detail information clicking the corresponding actions icon. |
| Locked | “true” means: the certificate is locked. “false” means: the certificate is unlocked. |
| Lock reason | The reason for blocking the certificate. The administrator can select the lock reason from a list. |
| Actions |  Assign a certificate to the user. Display the certificate’s detail information Assign a certificate to the user. Display the certificate’s detail information  Download user’s certificate Download user’s certificate  View the issuer certificate for this user certificate View the issuer certificate for this user certificate |
Import and Manage User Certificates
You can import the user certificates as CSV file via the upload field and manage them. Note during the import of the user certificates that these are encoded in base64 format. In order to manage already existing certificates, you only need to write the issuer distinguished name (issuerDN) and the certificate serial number.

By clicking “Select”, you give the path to the CSV file with the required data to be inserted. Clicking “Upload”, the information in the selected CSV file is added to the database.
⚠️ Note that the certificate chain must be respected; this means, import a user certificate after an already existing CA certificate or root certificate
CSV import and user certificate management
As mentioned above, you import the user certificates or manage already imported certificates via a CSV file (comma separated value). This file contains a table with all the user certificates with ID and their attributes. The information of the CSV formatted file can be given in the table regardless of the order.
The content of the file can for example be formatted as follows:
certificate, issuerDN, certificateSerialNumber, locked, user
Certificate | base64 encoded certificate (mandatory when the certificates are imported, optional when they are managed). |
|---|---|
issuerDN | DN of the issuer certificate. This value must be set in quotation marks, as it includes commas. (optional if the certificate is available, otherwise mandatory). |
certificateSerialNumber | Certificate serial number. |
locked | Integer that indicates the status of the certificate (1 is for locked, 0 for unlocked). Default value for imported certificates is unlocked. |
user | Name of the user whom the certificate is assigned to. The string is empty when the certificate is unassigned (optional, for imported certificates default value is empty) |
NOTE: Do not write any comments in the file, but only information for the import.
⚠️ For the CSV import, the file must be UTF-8 encoded without BOM, because this could lead to display problems. Alternatively, use the ANSI character set on Windows
Lock or Unlock User Certificates
In this view, you can lock or unlock a certificate. To do this, select one, multiple or all the certificates via the checkboxes on the left and click the buttons above.

Lock user certificate
You lock a certificate by selecting the certificate and clicking the button “Lock certificate”.
Until you unlock the certificate, signed data of the user cannot be verified and authenticated actions for that user cannot be carried out by the SSMS.
Unlock user certificate
You unlock a user certificate and activate the authorization of the certificate again by selecting the certificate and clicking the button “Unlock certificate”. The SSMS can now authenticate the signed data of the user with that certificate.
Remove user certificate
You remove a user certificate from the system by selecting the certificate and by clicking the button “Remove certificate”. After that, you may not use the certificate anymore.
Unassign user certificate
You unassign a certificate from a user by selecting the certificate and by clicking the button "Unassign certificate”. The user and the certificate continue to exist.
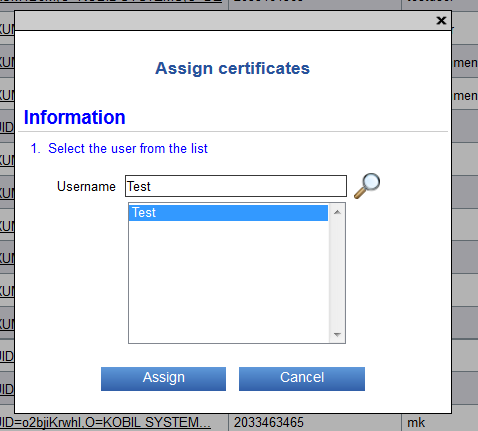
Assign certificate to user
You also can assign a certificate to a user with no assigned certificate yet by clicking the symbol . A window pops up where you can enter a user name, search for it and confirm it by clicking the name in the name list that appears. Confirm your choice by clicking “Assign”.
Certificate detail information
The detail view informs you about detailed certificate information, in particular the validity time, the signature algorithm and the public key.
Click on the icon ![]() to reach this view.
to reach this view.
Users view
In the user view, you can manage the users and their assignment to certificates.
Go to this view by clicking the menu item “Signature Verification Module” and then its submenu “Users”. Here, all registered user certificates are listed in tabular form. For instructions on search and filter options, refer to the administrator manual for the Kernel module.
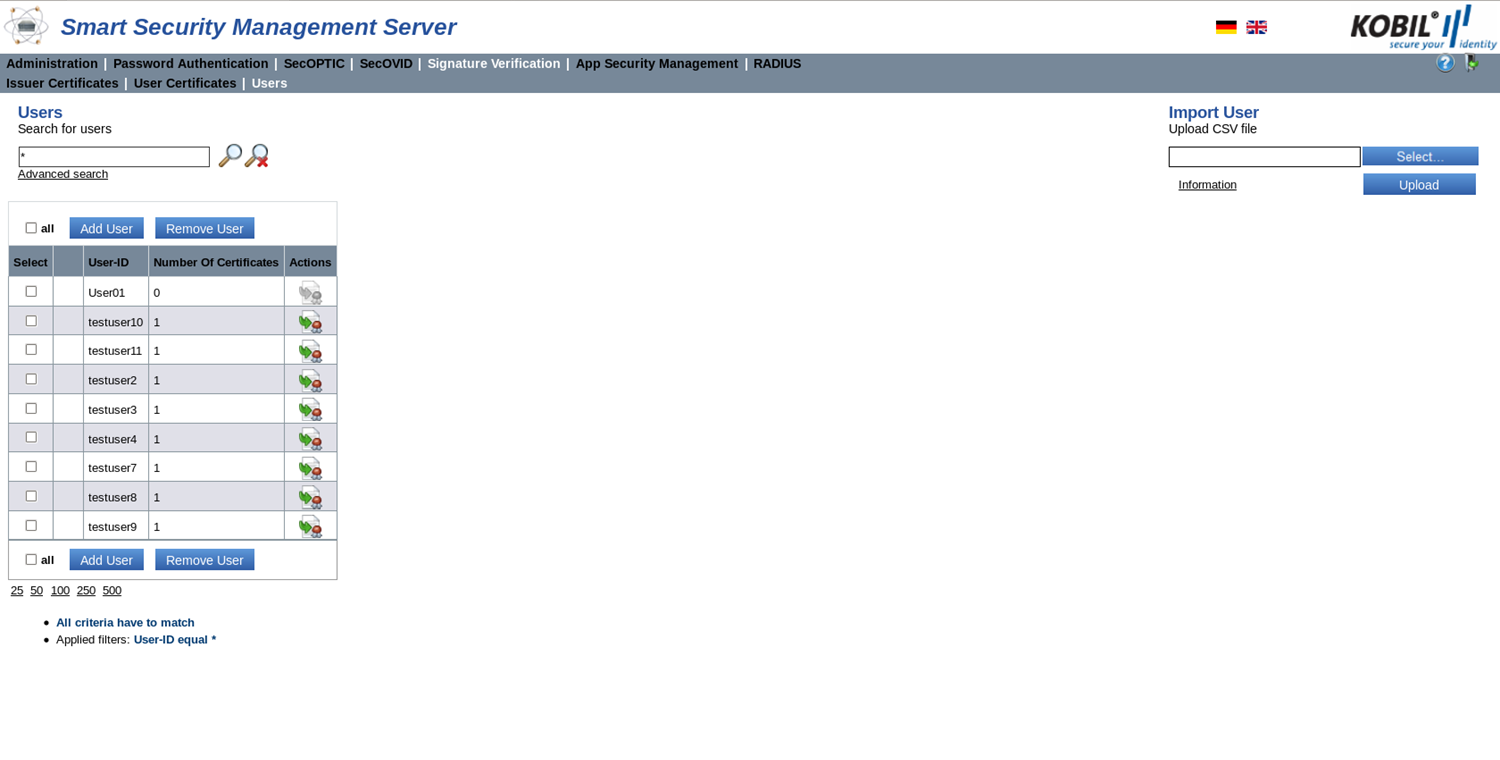
The list of this view informs you about the status of all registered users as well as the number of certificates assigned to them. Clicking “Actions”, you see the assigned certificates to the user. The table of this view contains the following attributes:
| Select | Checkbox for selection. |
|---|---|
| User ID | User name. |
| Number of certificates | Number of certificates assigned to the user. |
| Actions | Display the corresponding user certificate. |
Add user
A user added into this module exists also in all other SSMS modules. To add a user into the module and consequently into the database, choose between one of the following methods:
Add user via the button
You add a user into the database by clicking the button “Add user”. Here, enter the user ID as a string. This user ID may not already exist in the database.
The additional user attributes like the assignment of the user to a certificate must be defined manually.
Import user via CSV file
You can also import multiple users at a time. To do this, you need a table in the form of a CSV formatted file where all users with ID are contained.
The content of the file is formatted as follows:
User-ID
| User ID | String to define the user ID (may not be empty) |
|---|
Note: Do not write any header or comments in the file. Enter only information that must be imported.
If you have access to a CSV file to import the user certificates, you can give its path via the button “Select” and import it with the button “Upload”. Errors during the import are displayed in an error message.
Note that you may not upload the same information twice. You receive the error message that for example the users already exist.
⚠️ For the CSV import, the file must be UTF-8 encoded without BOM, because this could lead to display problems. Alternatively, use the ANSI character set on Windows
Each CSV file should contain at most 5.000 data sets, otherwise, problems and an interruption of the upload can occur.
Remove user
You can remove one or more users from the list by selecting one or more users and by clicking the button “Remove User”. A dialog box opens up to confirm the action of removing the user or the users.
Note that the certificates assigned to the user are not deleted. Removing a user can also fail. The failure is suggested in the status column on the left of the user ID. In addition, an error message appears above the table.