Realm Management
Introduction
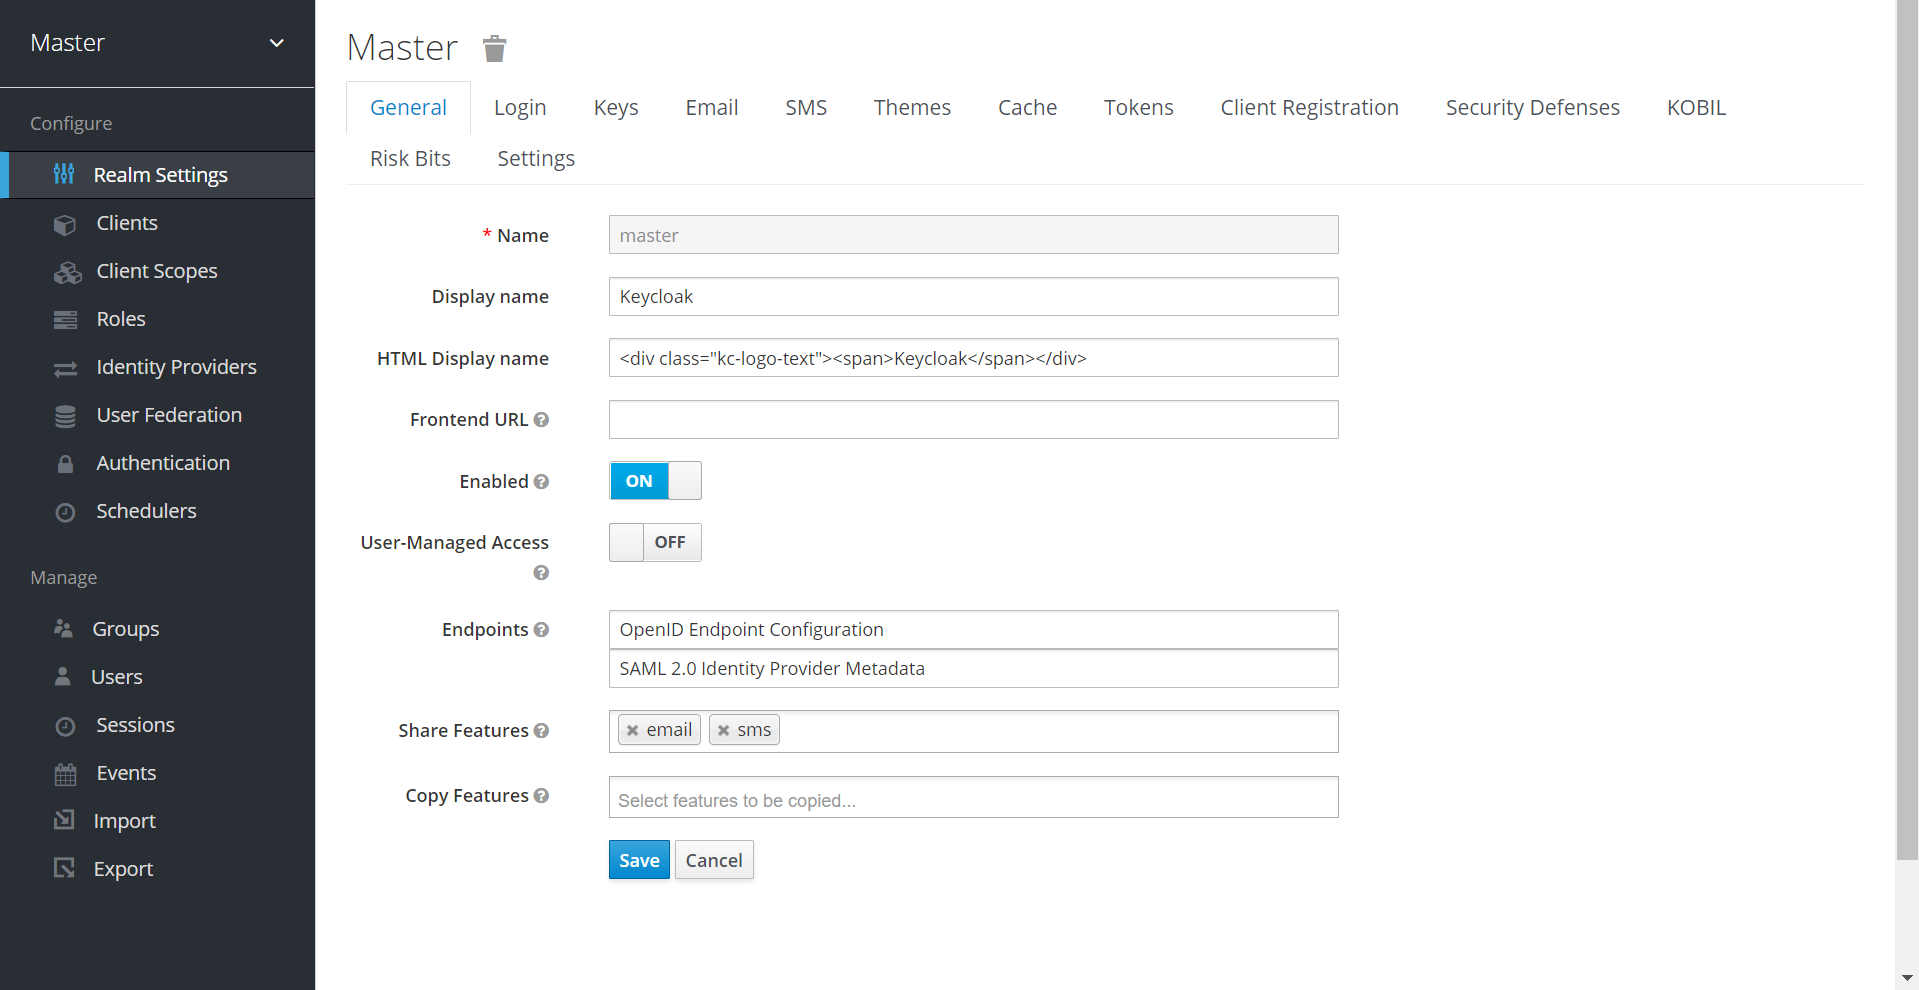
A realm acts as a container for a set of users, applications and clients. It manages the creation, configuration and deletion of the realm entities. mID has a default master realm through which new realms can be created and managed. Each realm is isolated from the other and holds entities specific to the individual realm.
Realm Creation
- Login to IAM Administration Console
- Select Add Realm
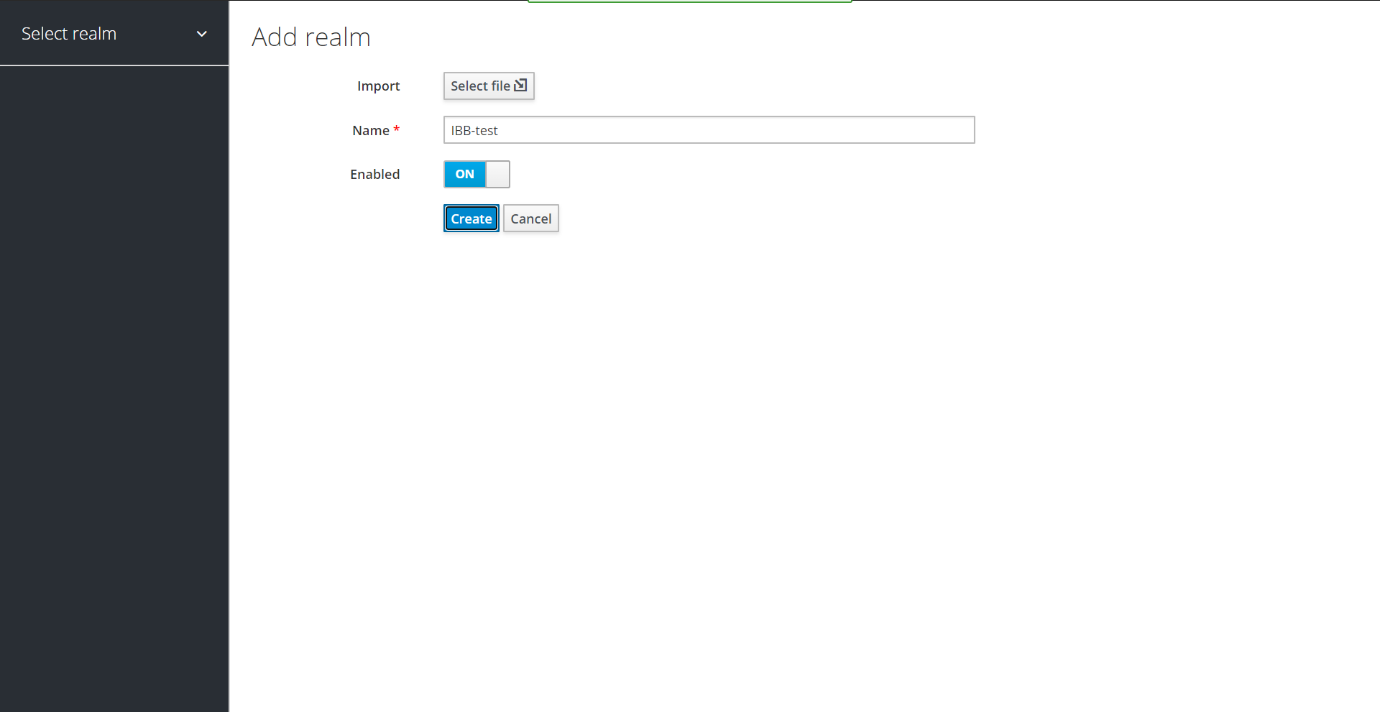
- Provide realm name and set Enabled to ON
- Click Create
- Your Realm is created.
Email Settings
Inorder to send out emails to a user from mID, your SMTP server settings must be configured here.
In case a newly created realm does not have Email settings of its own configured, then the Email settings of the Master realm can be inherited, provided email is added to the Share Features of the Master realm.
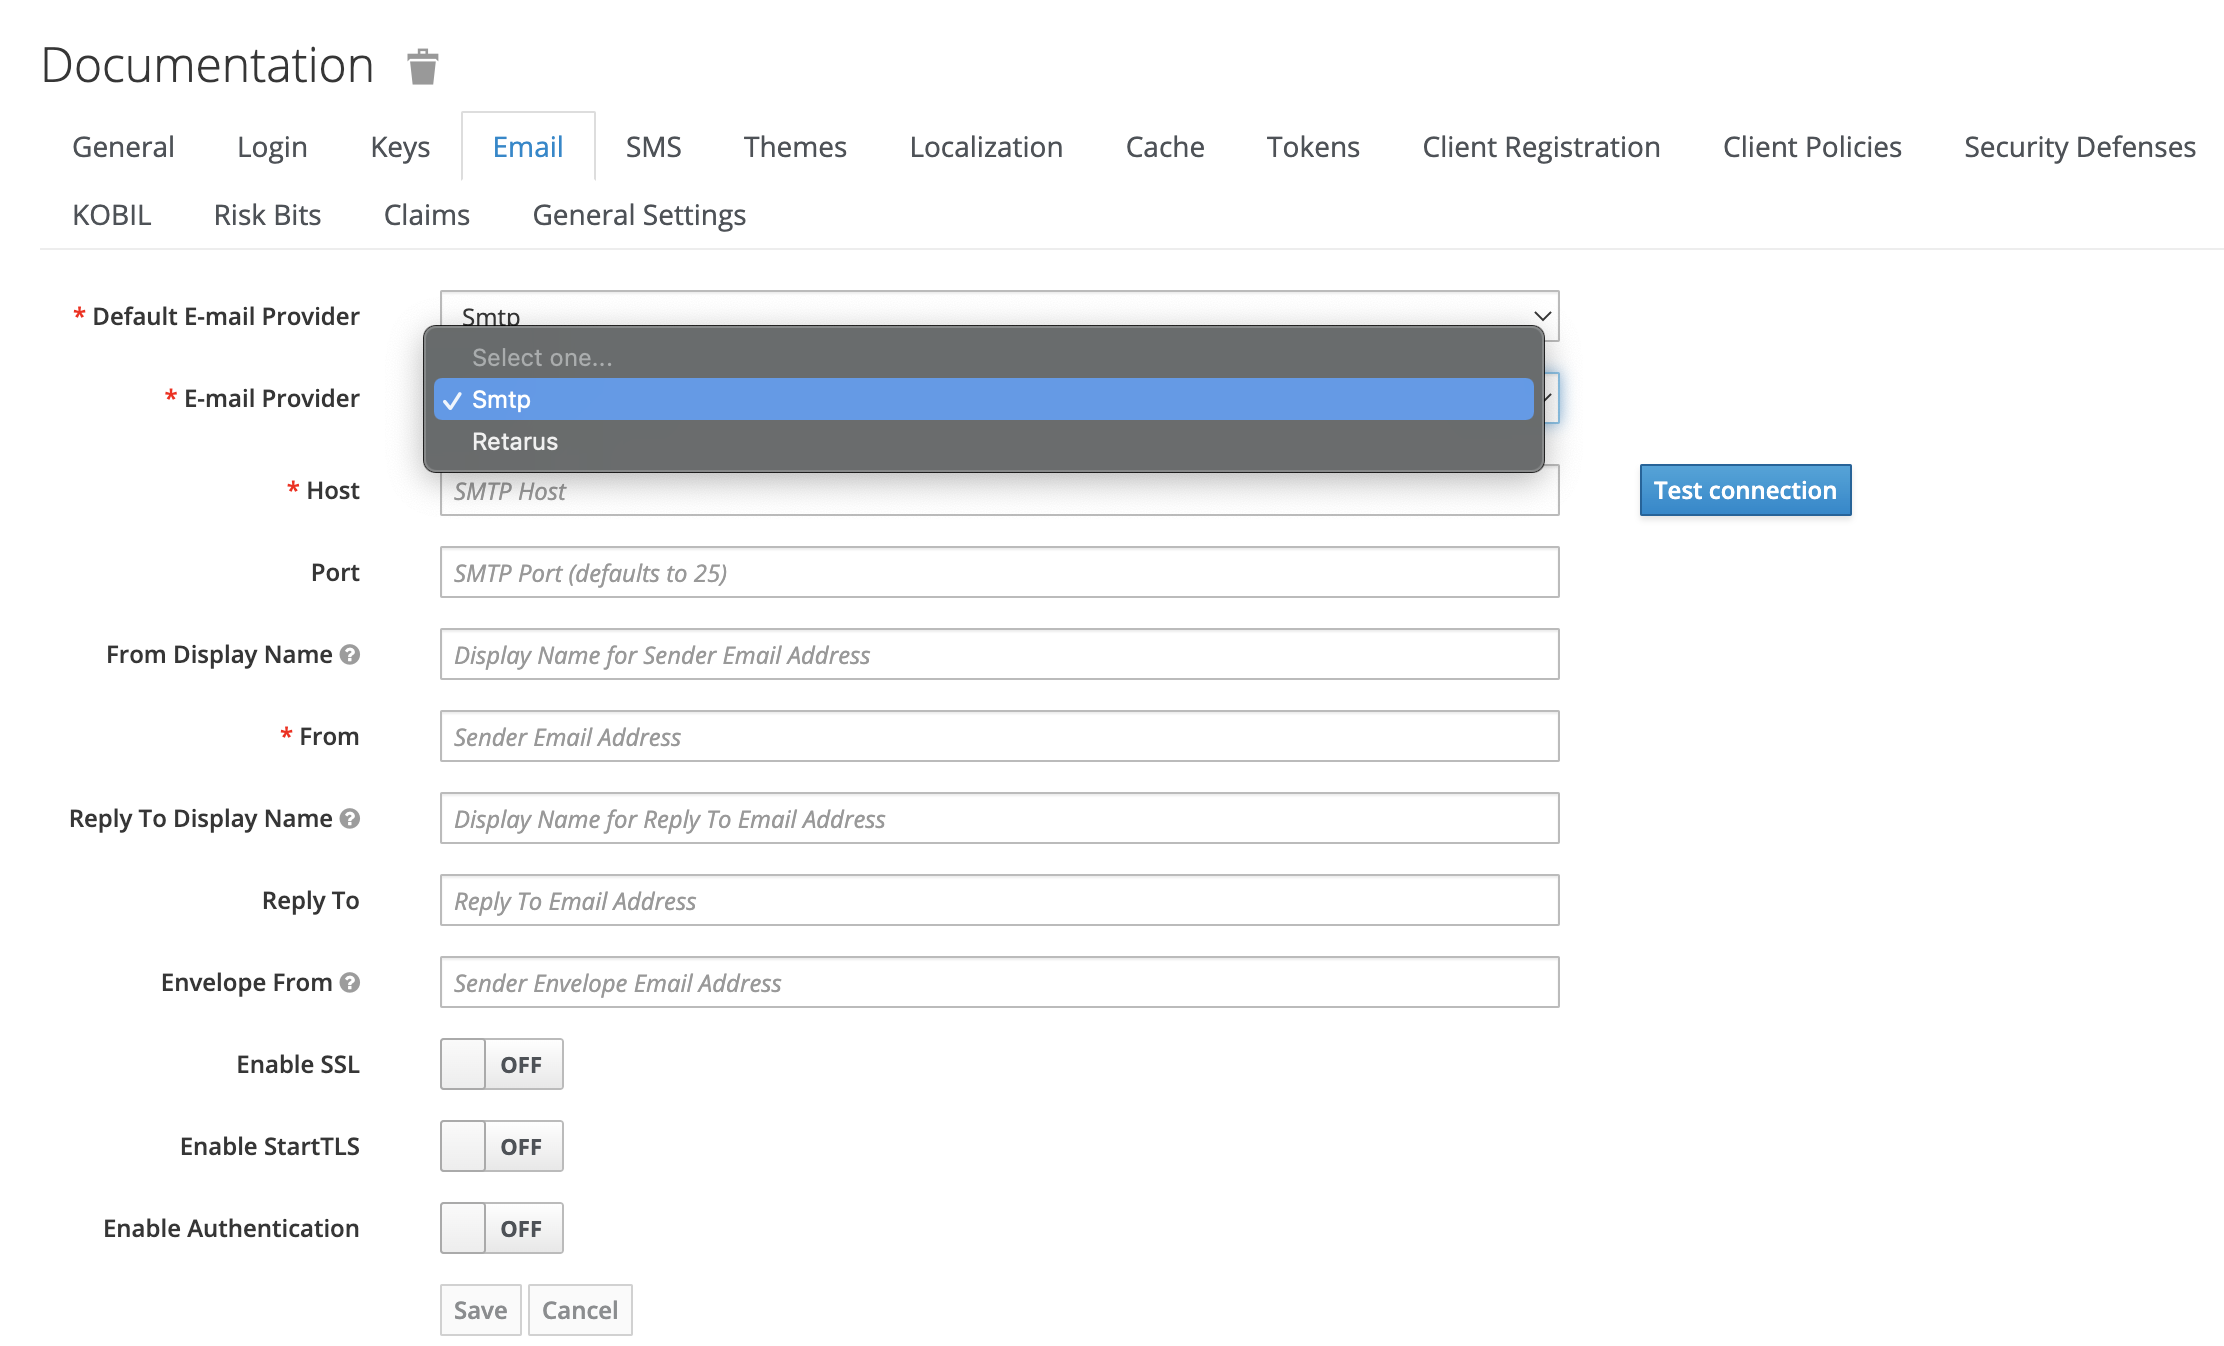
Note: Share Features are applicable only for newly created realms post sharing, does not apply to the already existing realms.
You can select from the already configured list of providers.
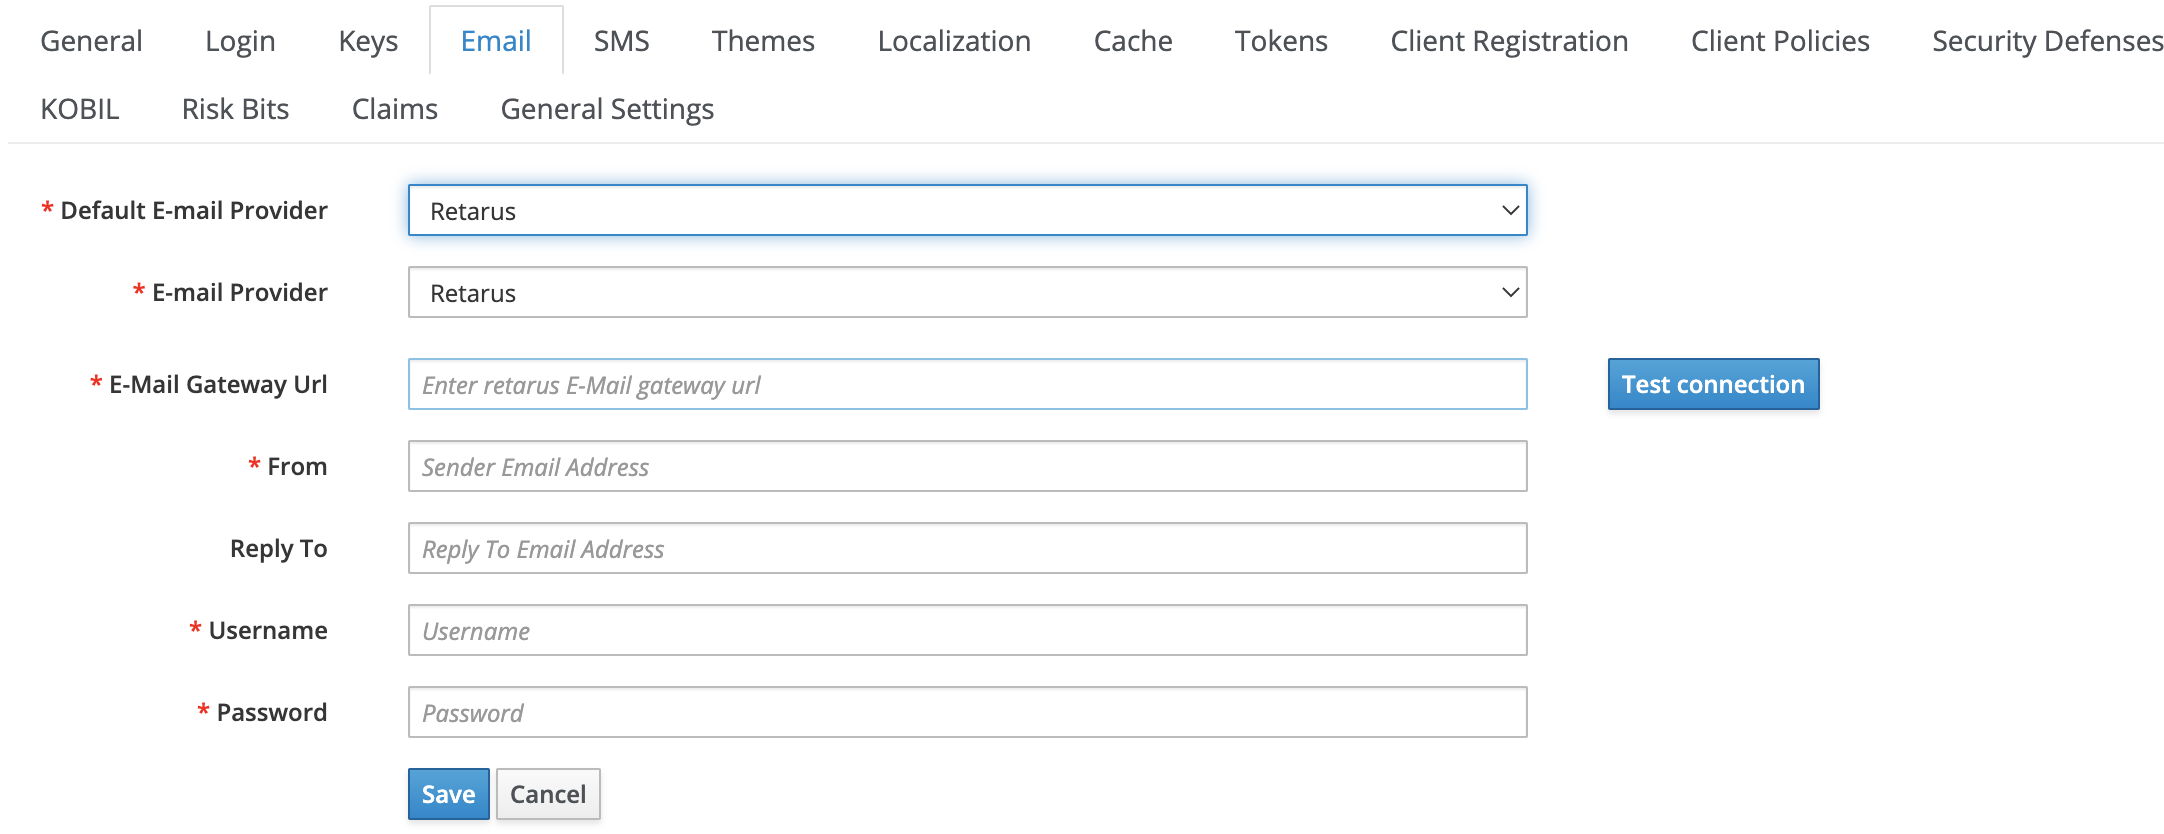
Parameters involved in configuring Retarus
| Parameter | Description |
|---|---|
| Default E-mail Provider | Select the default email provider. |
| E-mail Provider | Select the email provider. |
| E-Mail Gateway Url | Configure the connection URL to connect with Retarus. |
| From | Configure the sender email address. |
| Reply To | Configure the receiver email address. |
| Username | Configure the Retarus admin username. |
| Password | Configure the Retarus admin password. |
Email Logo Configuration
The Email logo can be configured through the emailLogo attribute in Realm settings -> General -> Settings.
![]()
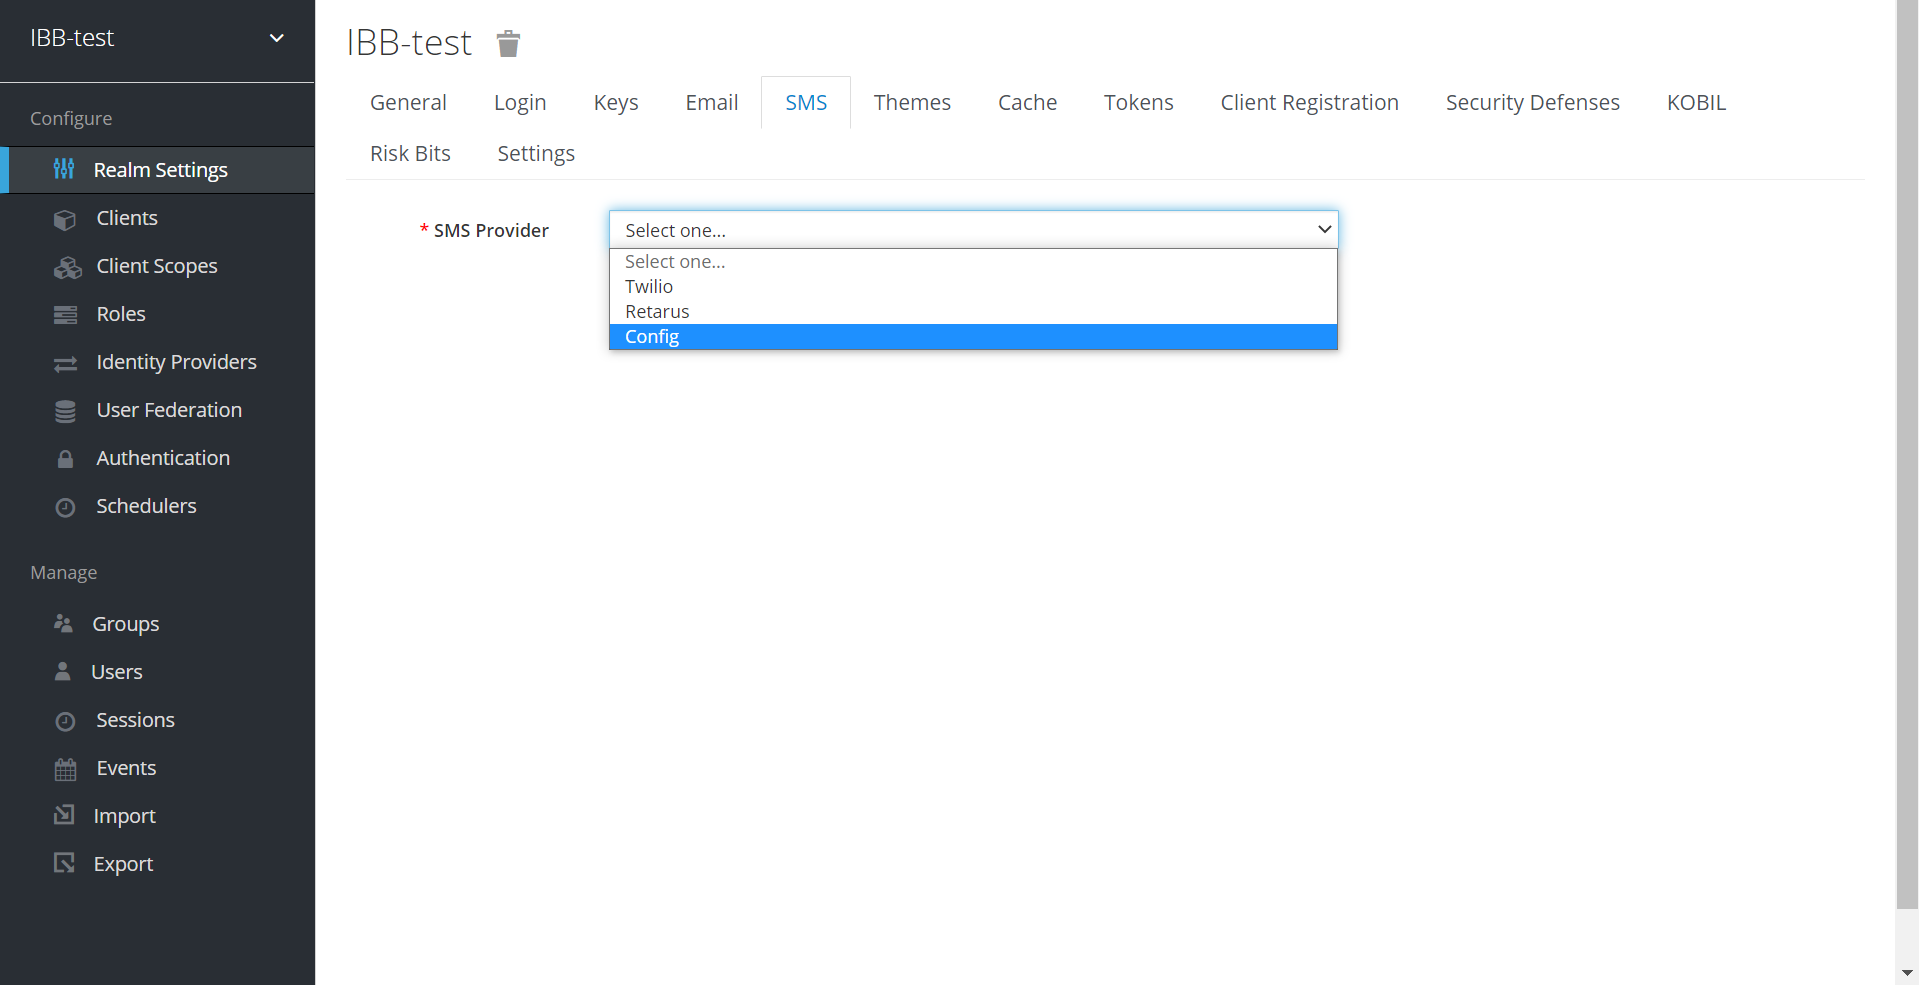
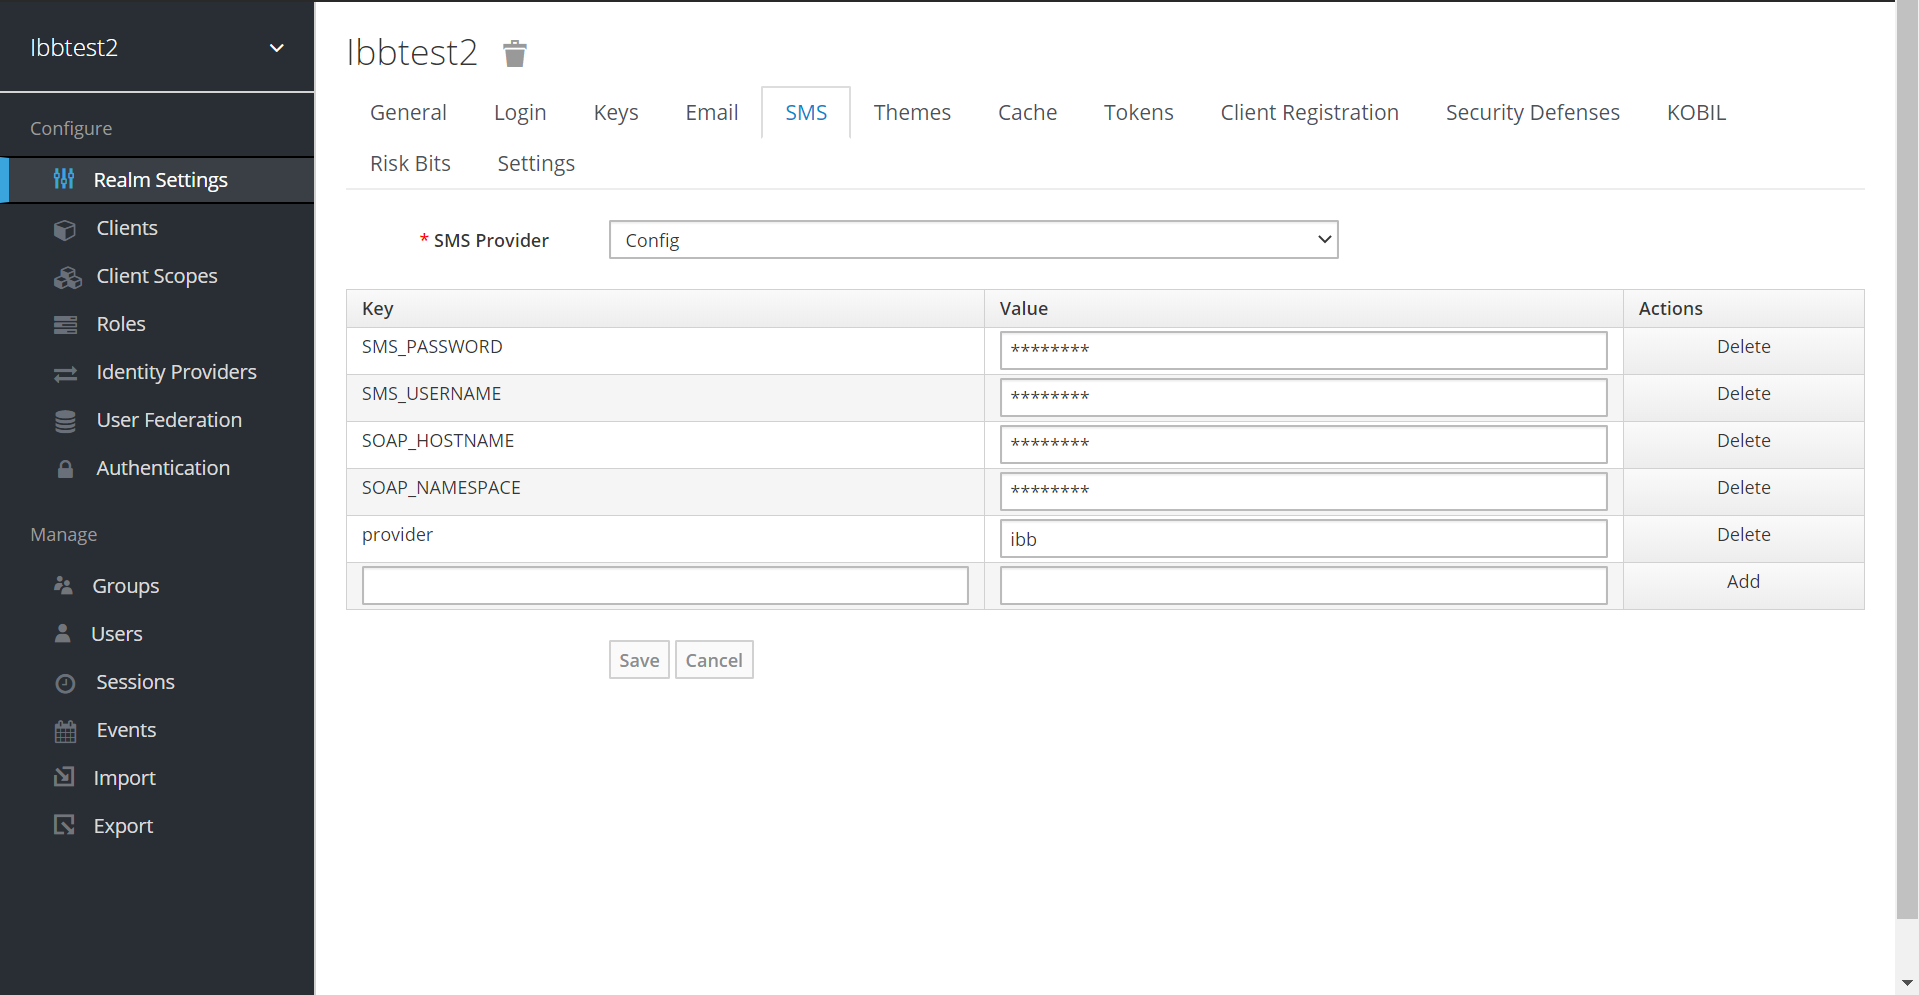
SMS Settings
Certain mID authenticators send OTP to the user as a 2FA procedure. The SMS provider details must be configured here for such instances. In case a realm does not have SMS settings of its own configured, then the SMS settings of the Master realm can be inherited, provided sms is added to the Share Features of the Master realm.
Note: Share Features are applicable only for newly created realms post sharing, does not apply to the already existing realms.
You can select from the already configured list of providers or create a new one through the config option from the drop down.
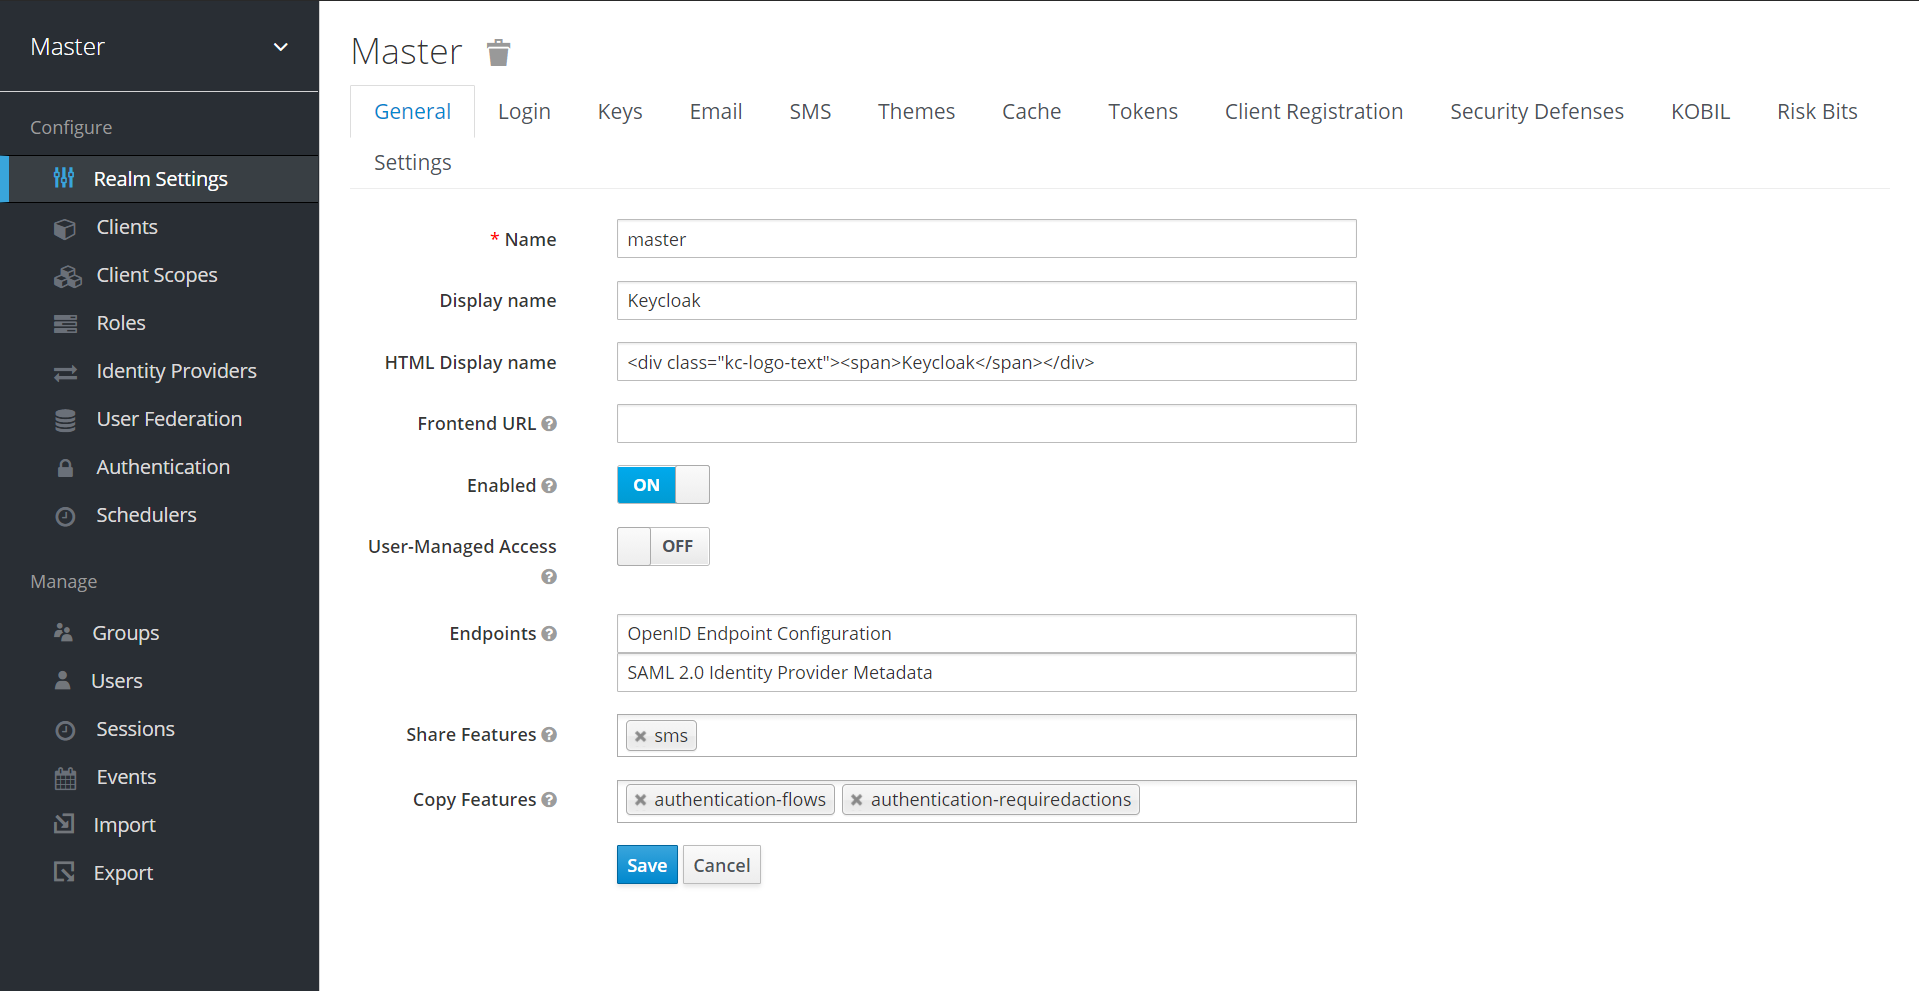
Copy Features
Copy Features allows the entities and configuration patterns of the Master realm to be inherited by the sub realms. Clients, Roles, Registered Required actions and Authentication flows are the features that could be copied from the Master to Sub Realms. The current version supports Authentication flows and Register Required actions alone.
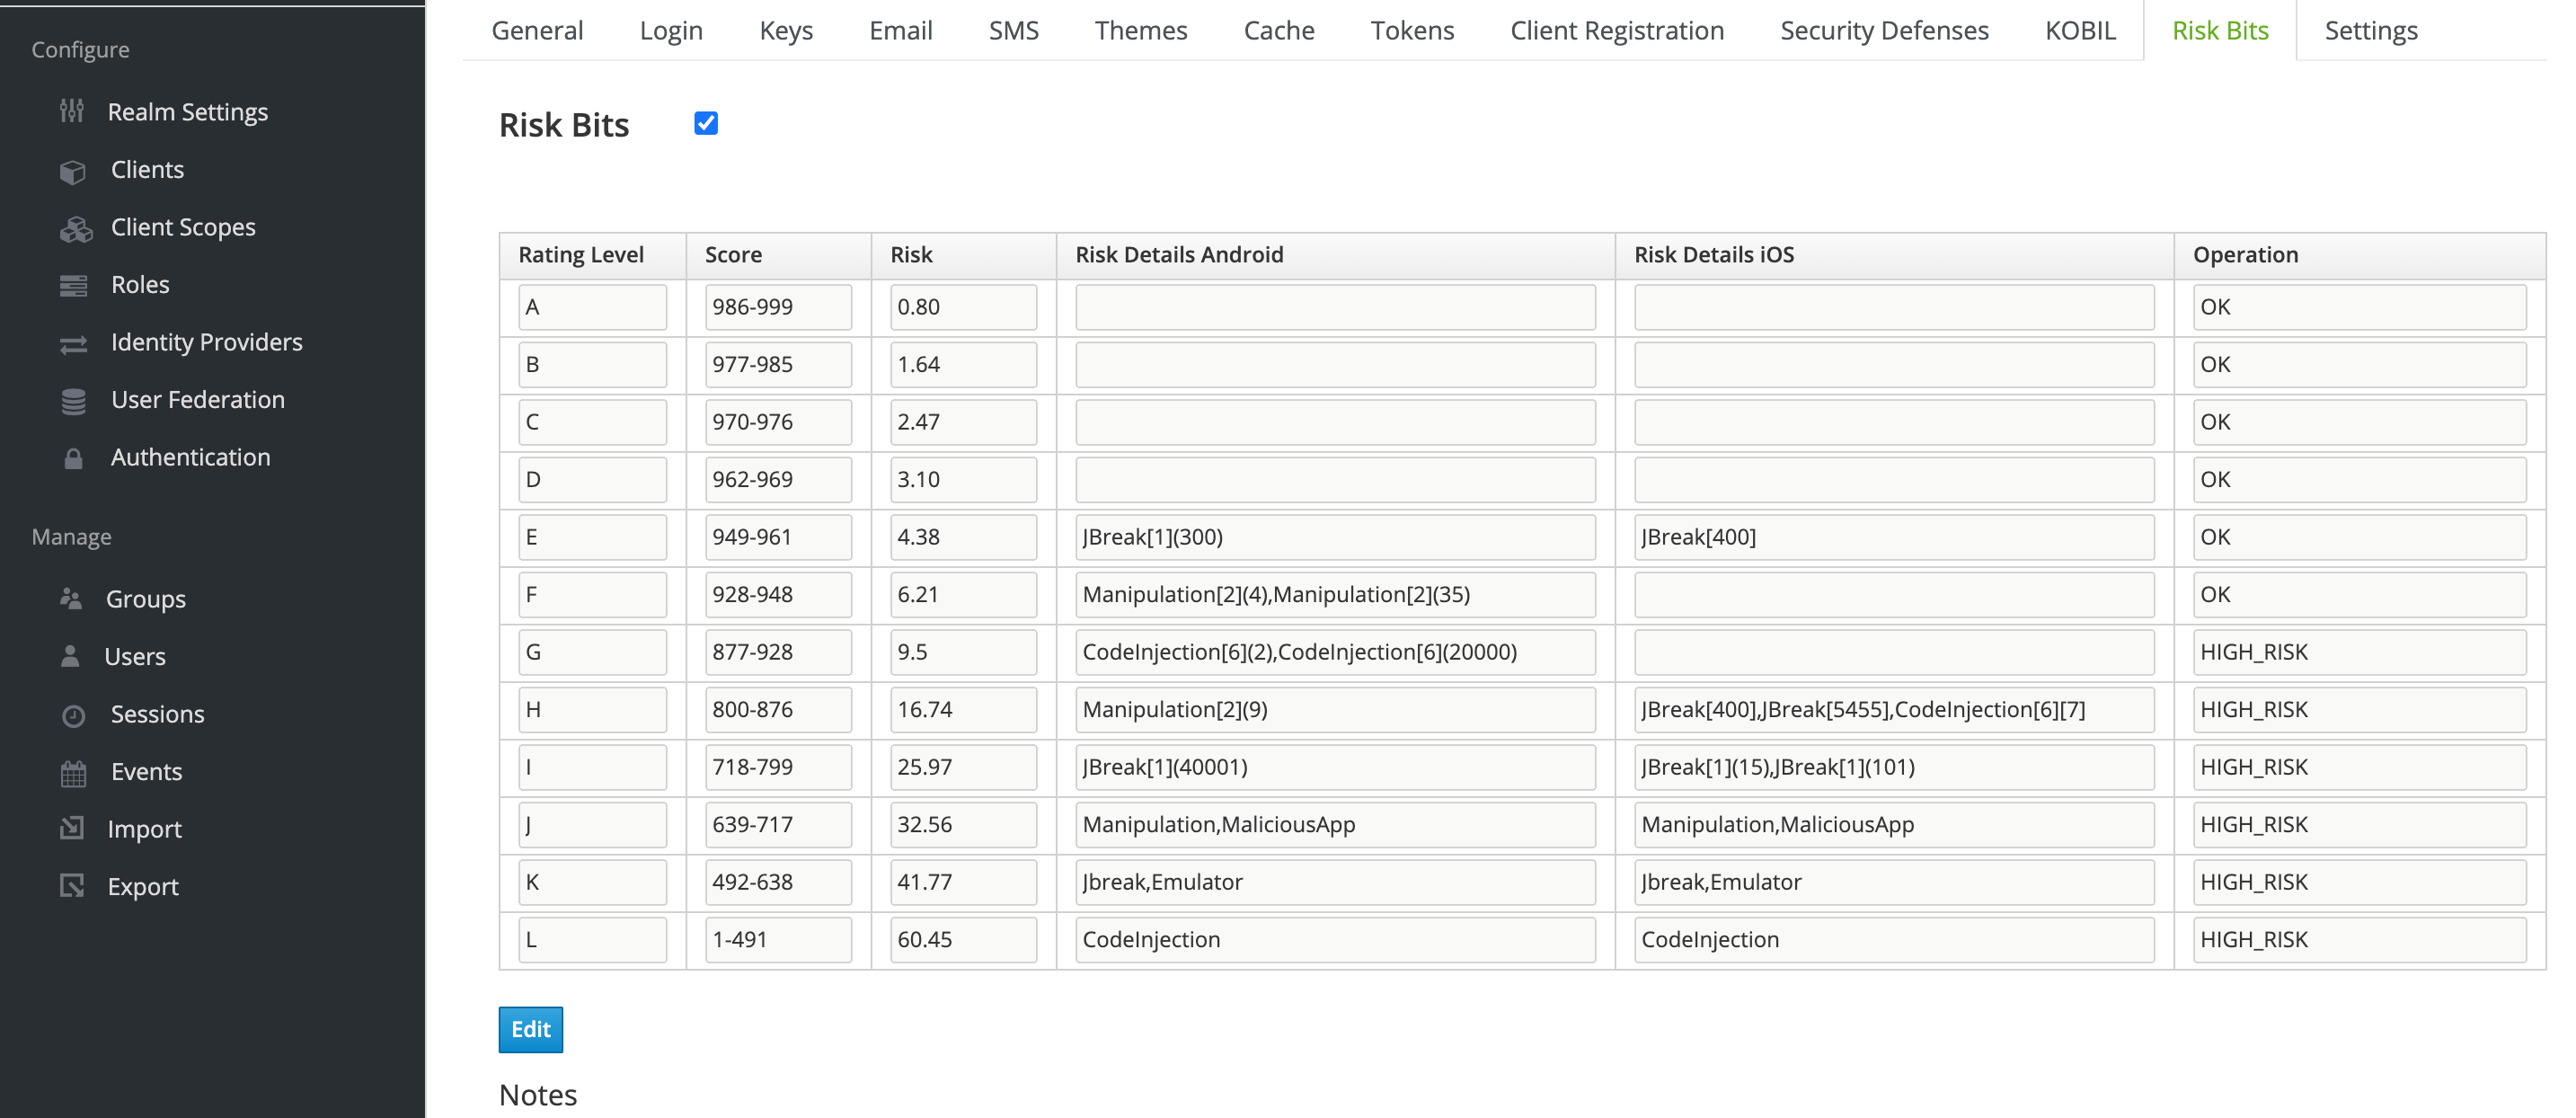
Riskbits
Identity Governance provides risk levels to assist you in categorizing and labeling risk elements that are important to your company. You can change the number of levels, the score, and the risk to suit your business and stakeholders. Risk scoring allows you to specify or calculate risk manually for the entire business as well as individual catalog objects and rules.
Rating Level
Identity Governance provides you the freedom to establish your own risk scale. You can select up to A-Z risk levels. Identity Govenrnance splits the risk levels in even increments and sets the maximum risk value for computed values to the maximum value indicated in your settings when you select the risk level size.
Score
A risk score is a numerical representation of the amount of risk that an entity provides to an organization. A higher risk score means you've identified that item as representing a greater risk to your company. You can manually give risk ratings to individual objects by collecting risk score characteristics along with the objects you gather, or you can use Identity Governance to do so.
Risk
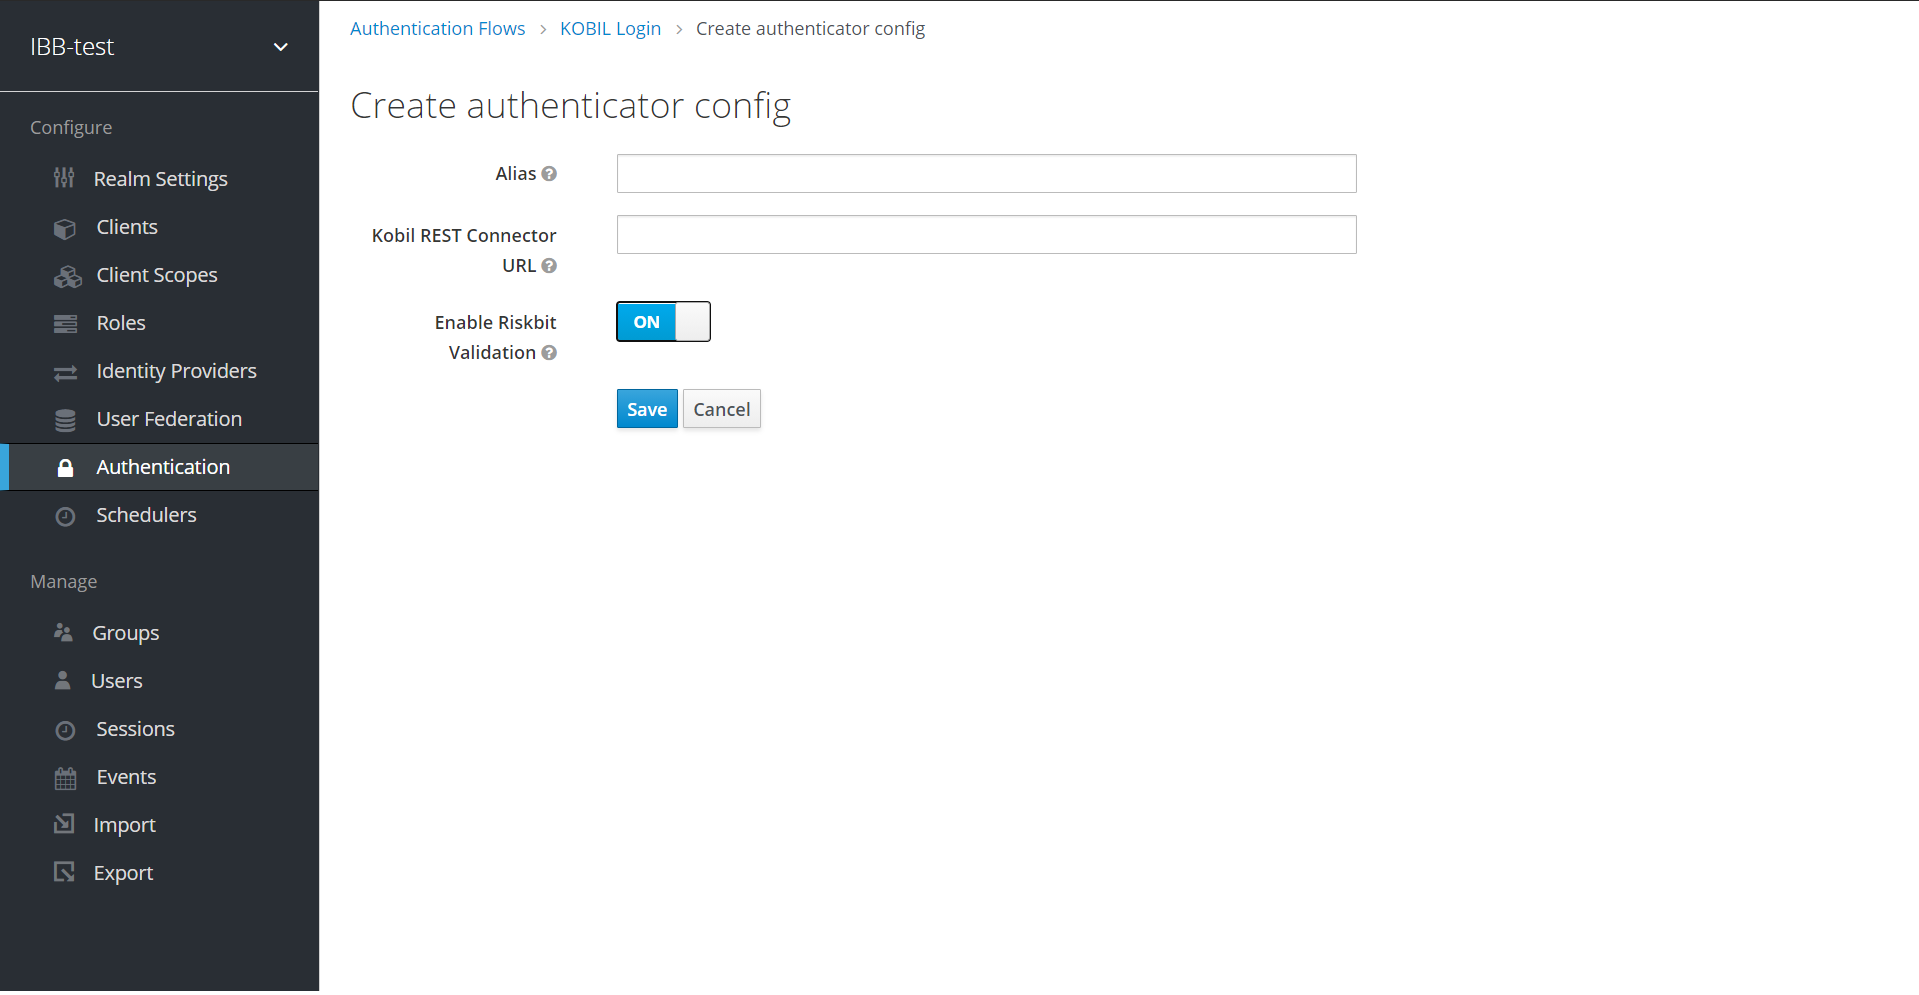
Riskbits are fragments of information indicating the security risks associated with a particular device. Each riskbit is ranked and has a pre-defined score based on the level of risk it runs. For instance, devices with malicious apps or rooted devices are considered risky. A list of riskbits can be added to mID using the Riskbit API.
The riskbit information of every registered device is stored in the mID Server(SSMS), during device activation. Based on this a riskbit score is allocated to each device. This riskbit score can be validated to allow or restrict permissions while performing certain actions or can be included as part of an authenticator to enhance security.
If the riskbit validation fails, then the user device is blocked and a failure response is returned.
Sample Response
{
  "error": "permission_denied"
  "error_description": "The application for this device was blocked due to suspicion threat"
}
Currently Riskbit validation is enabled for KOBIL Oneshot and PAM Oneshot Authenticators(Direct Grant only)and via Riskbit creation API.
To use this functionality, Riskbits must be enabled in Realm settings -> Riskbits as well as in the individual authenticator configuration.
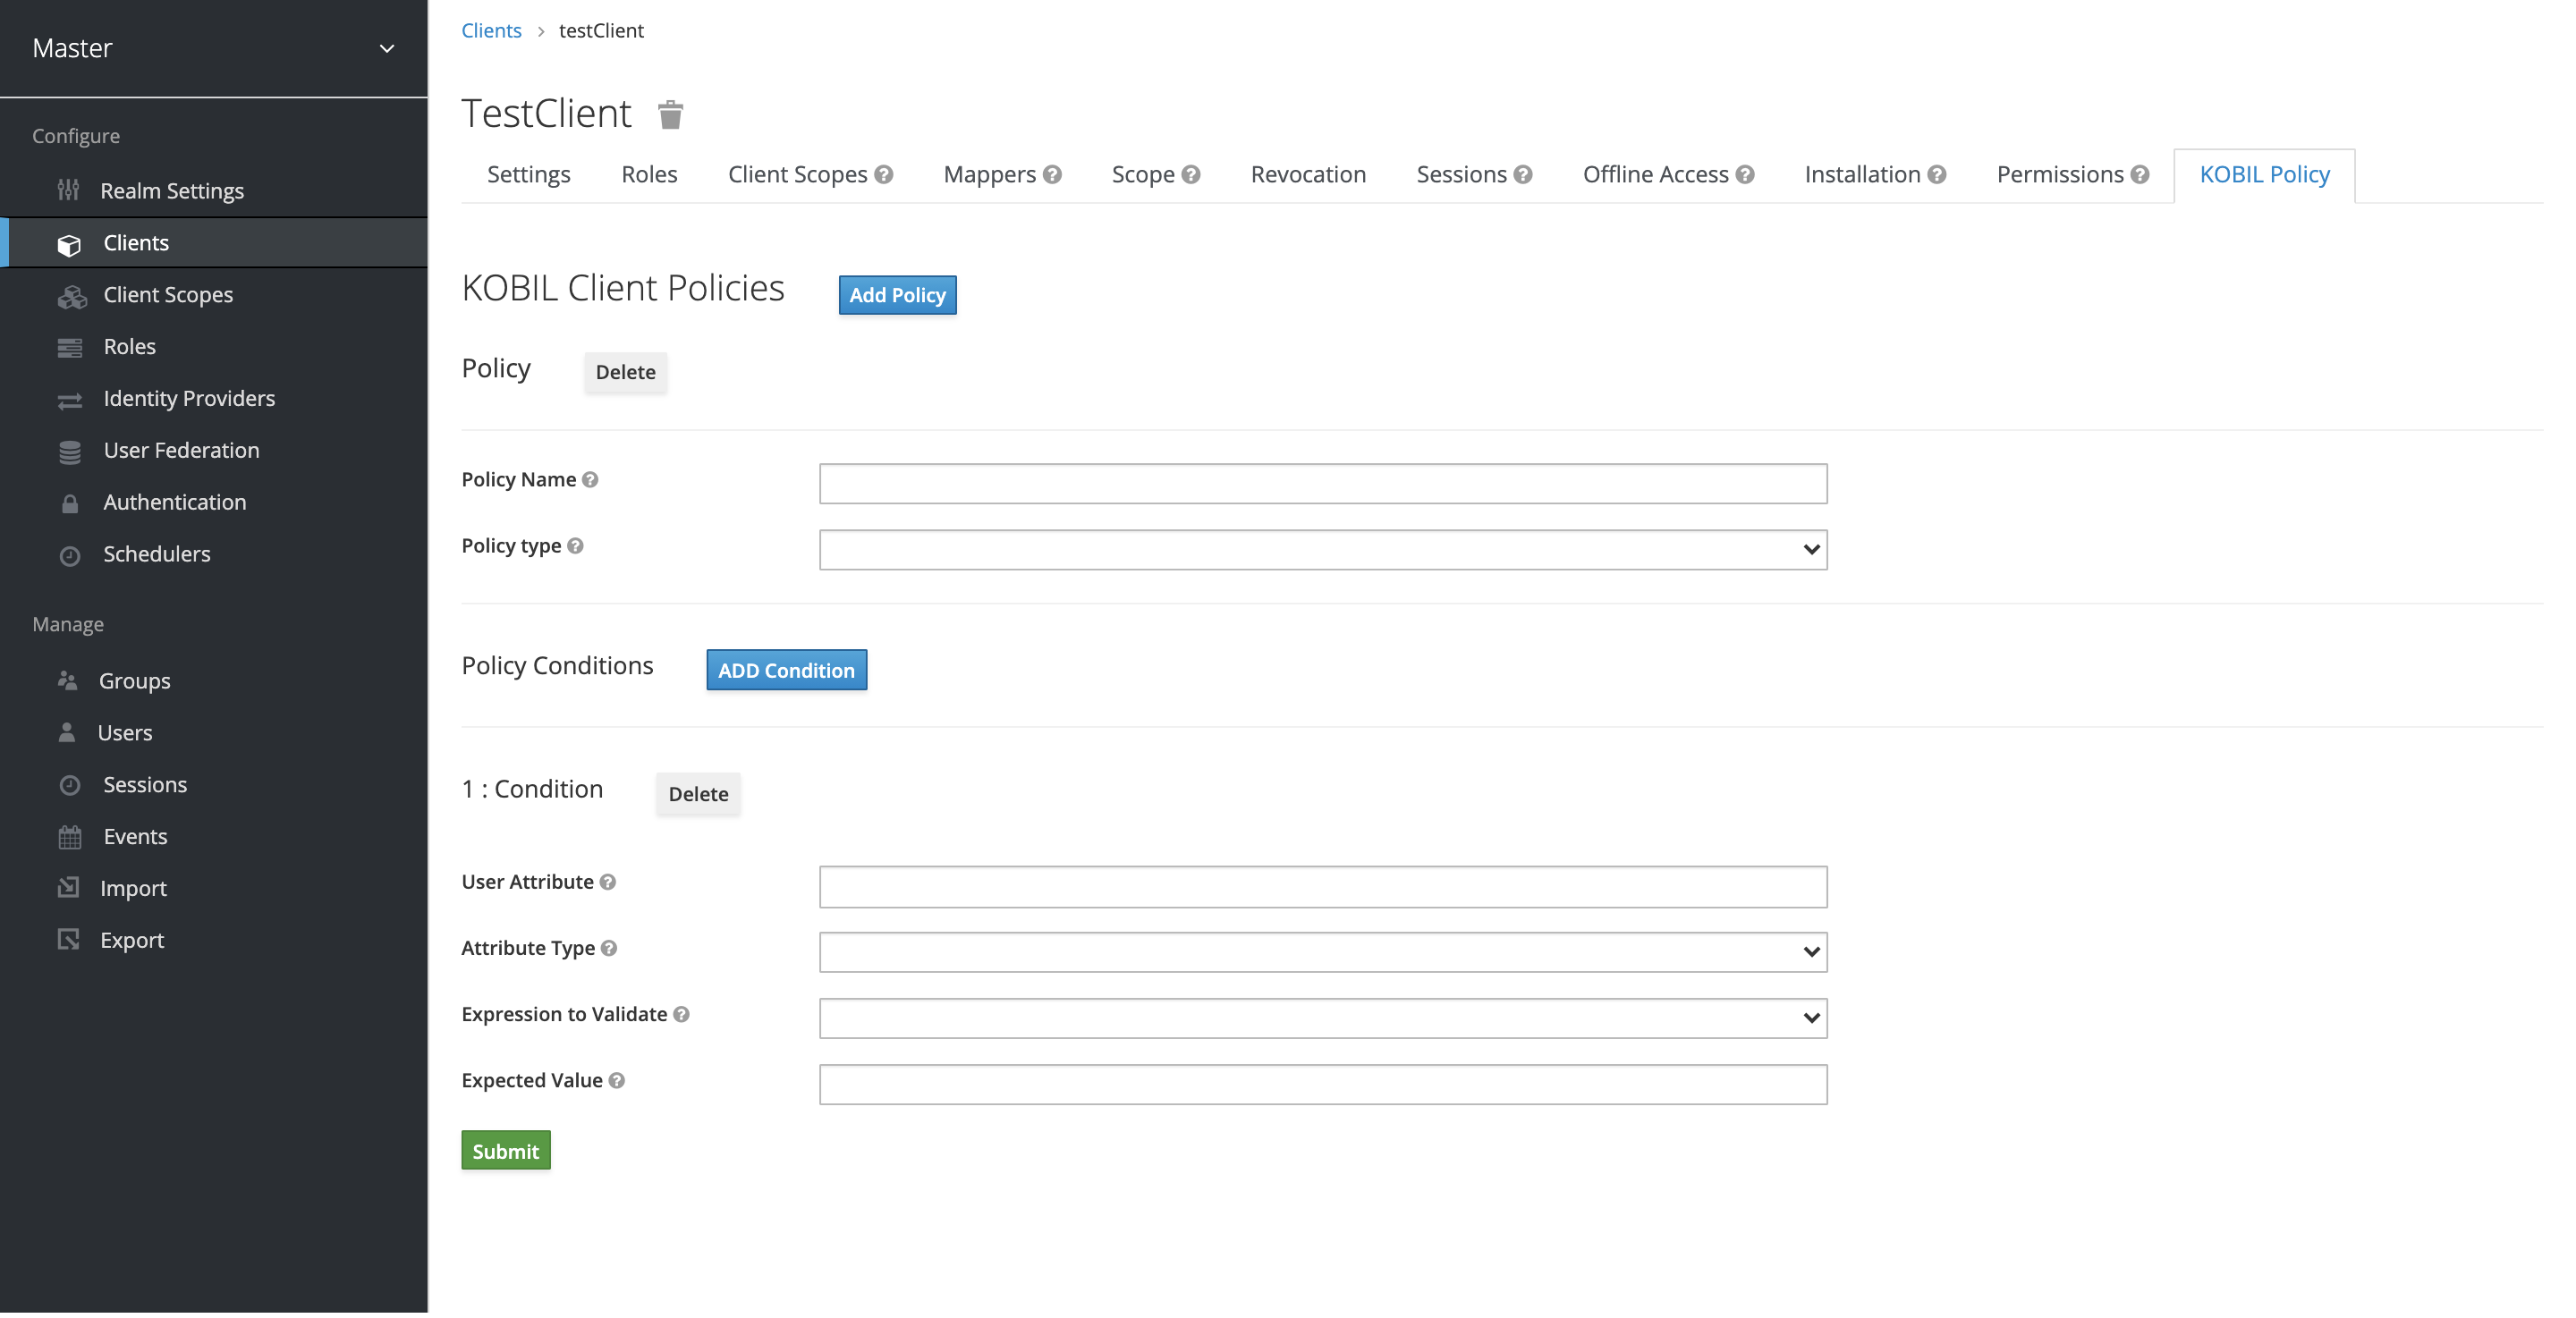
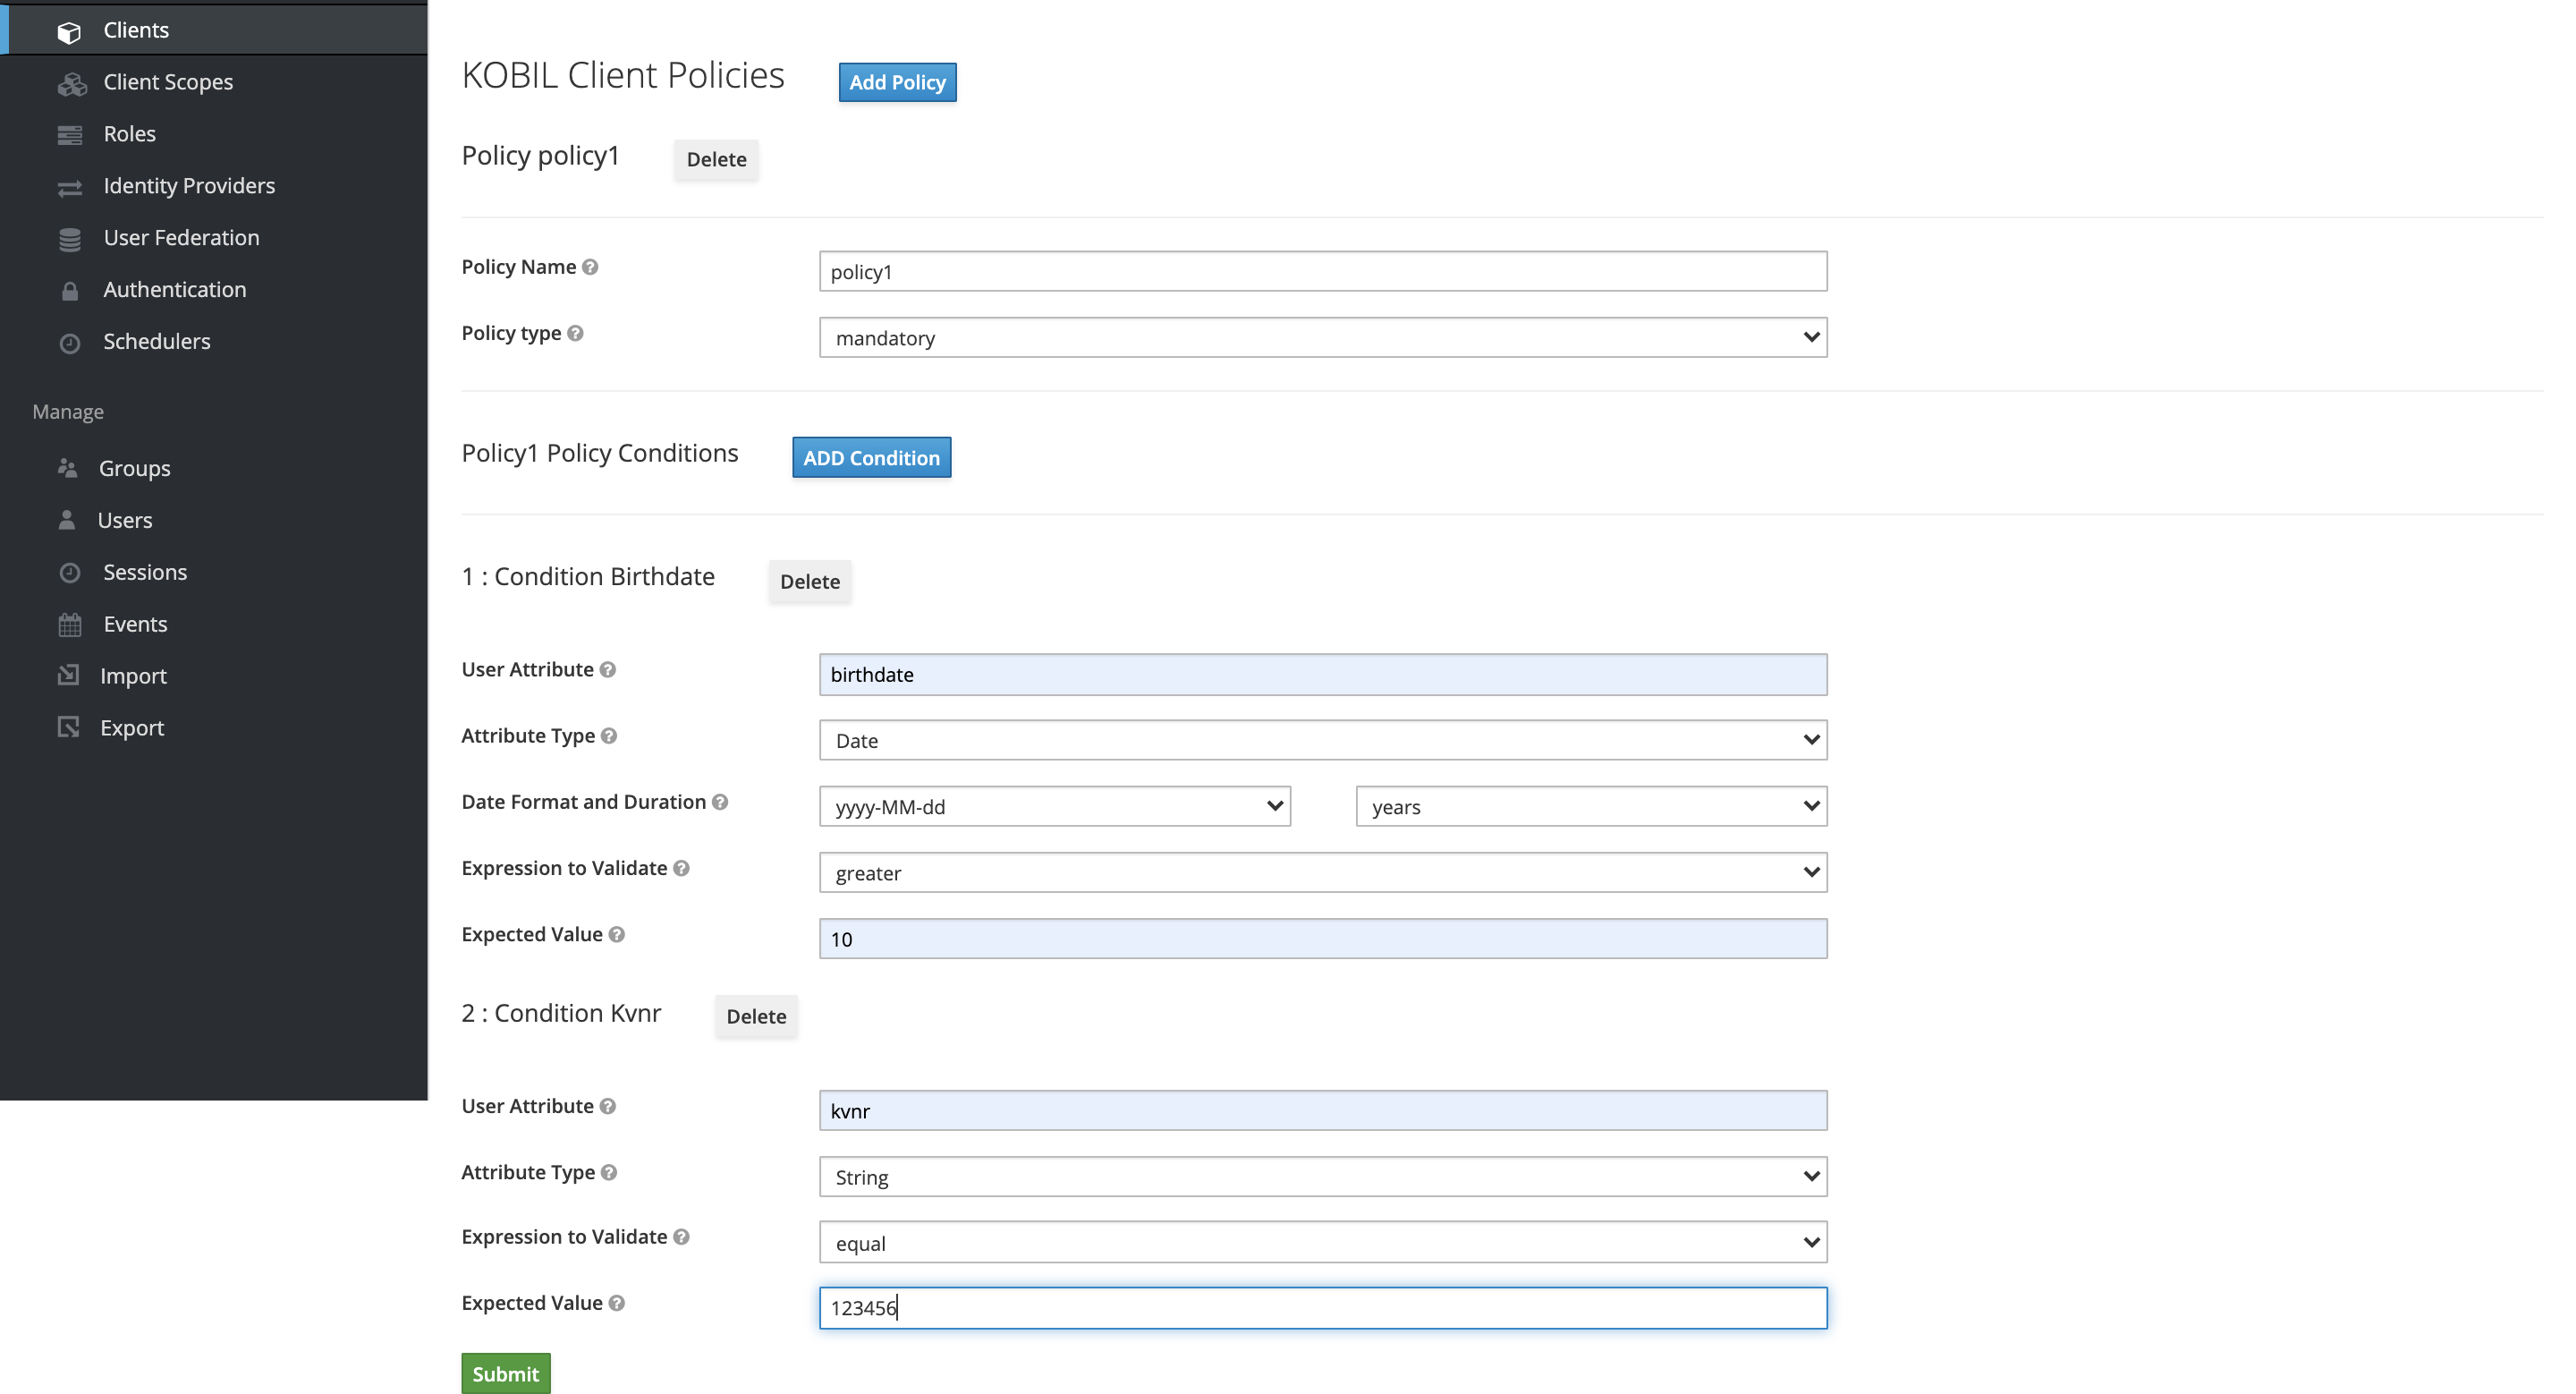
KOBIL Policy Validator
Policy Validator validates the user based on a set of conditions and assigns the policy to the user's scope, if the user satisfies all the conditions in the policy.
Policies can be mandatory or optional. Multiple policies can be defined for a client and each policy can contain multiple conditions. A condition has one user attribute against which the validation is performed, attribute type, expression to validate based on the attribute type and expected value.
For Instance
User attribute : groupname
Attribute type : list
Expression to validate : contain
Expected value : groupA,groupB,groupC
If the value of user attribute 'groupname' is either groupA, groupB or groupC the condition succeeds. A user will be allowed to login only if the user satisfies at least one mandatory policy for that client. Otherwise the policy validation fails.
The policy can be configured by selecting the particular client and configuring the necessary conditions and policies under Client -> KOBIL Policy.
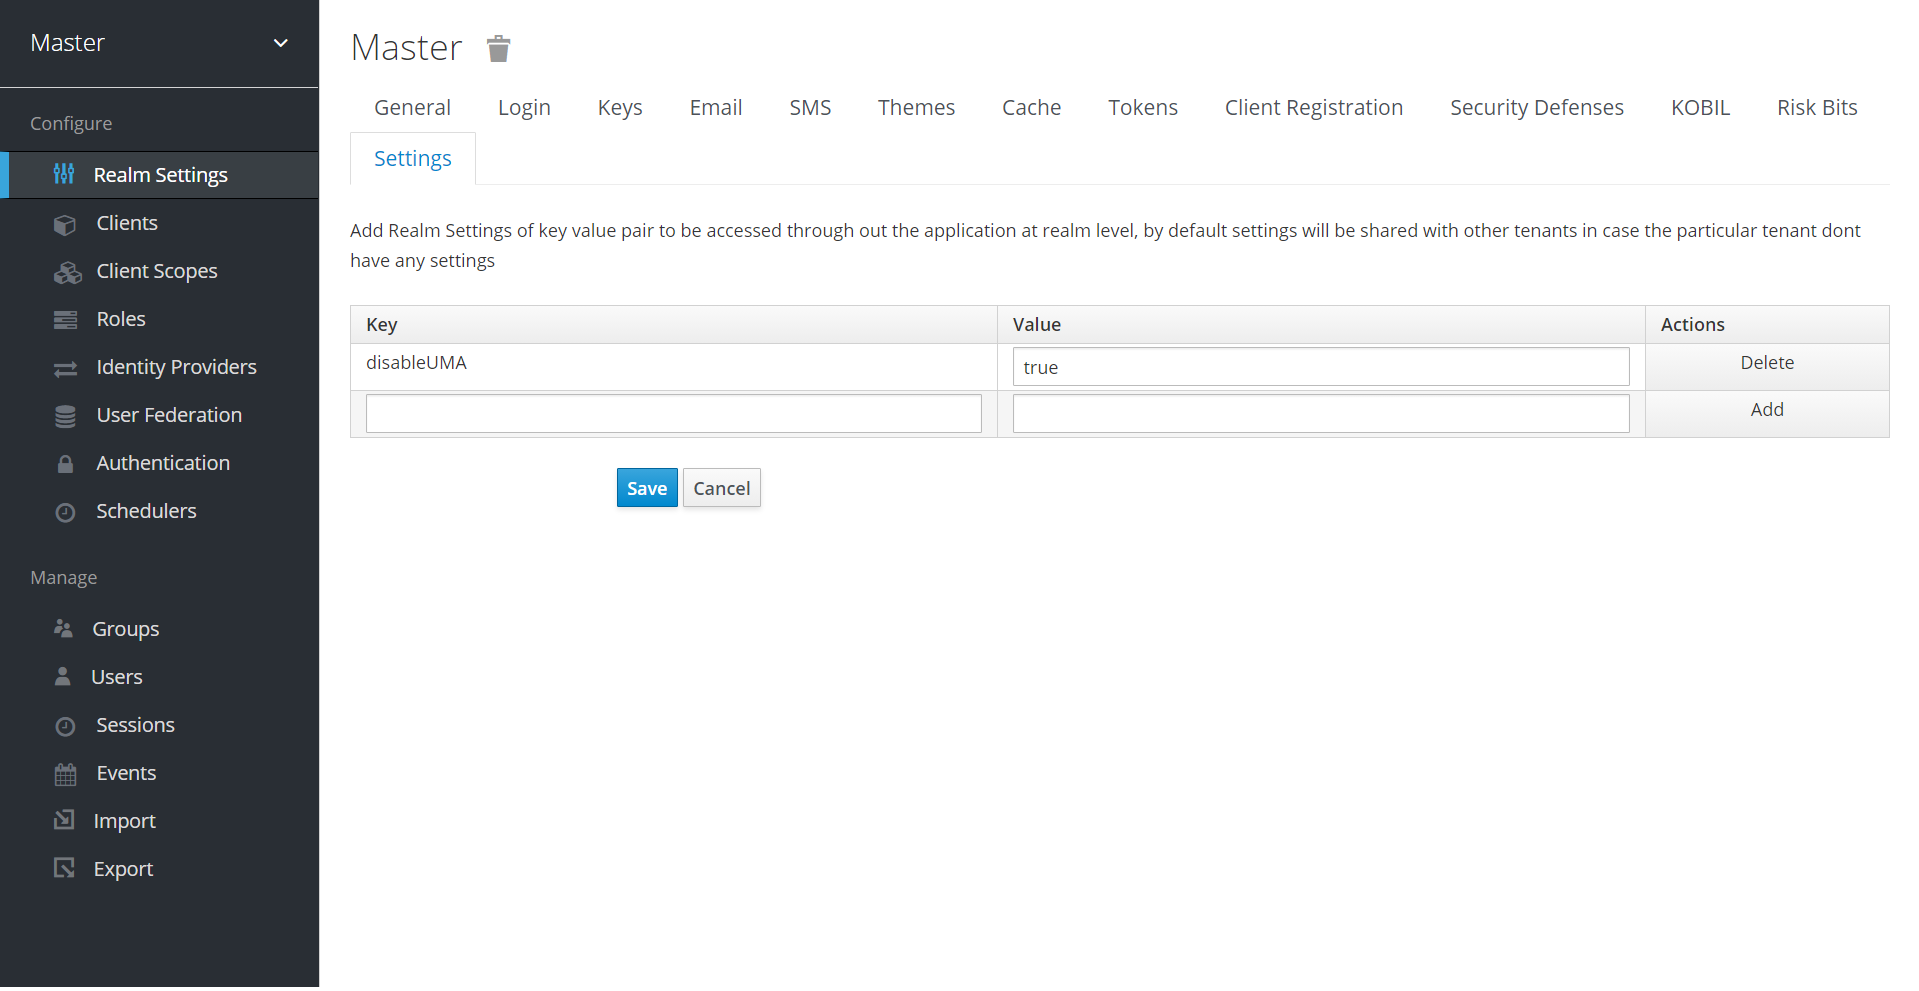
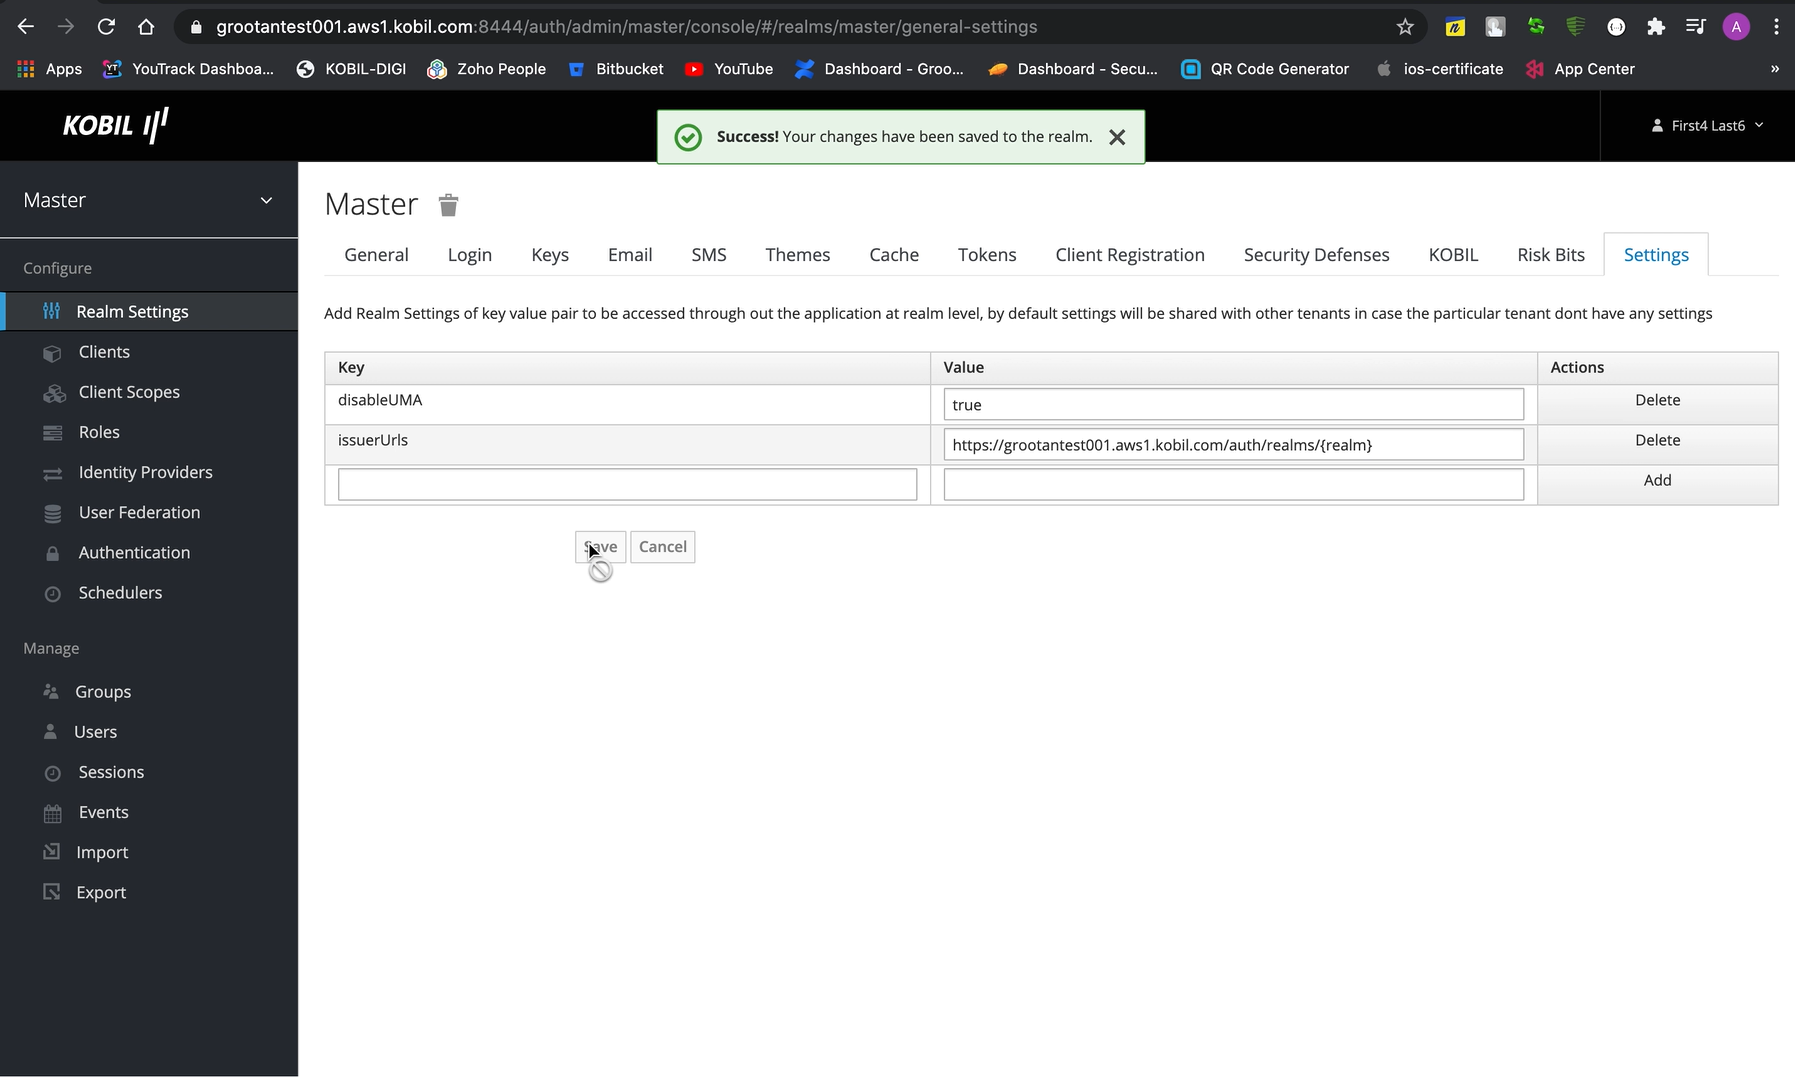
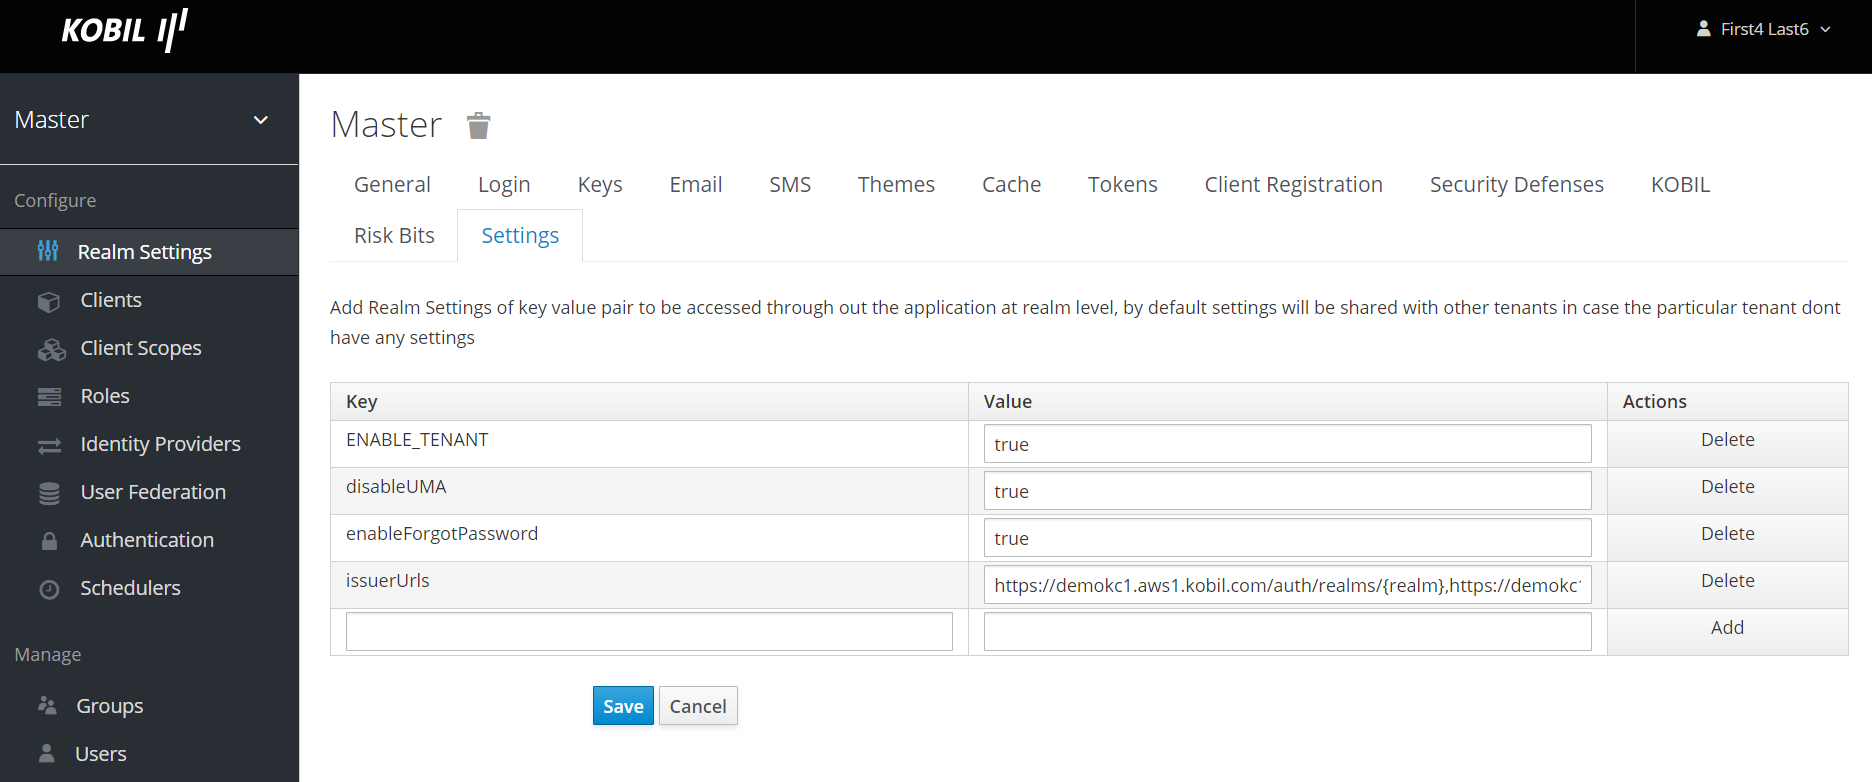
Settings
Disable UMA
When enabled, UMA allows the user to manage their resources and permissions using the Account Management Console.
The disableUMA flag can be set to true in Realm settings -> General -> Settings, to disable UMA for all APIs. If set to false then UMA will be enabled.
Issuer Validation
Use the issuerUrls key in Master -> Realm Settings -> Settings, to accommodate additional issuer URLs as shown below. Multiple issuer URLs can be added separated by comma.
The following link will be an issuer URL https://{realm}.aws1.kobil.com/auth/realms/{realm}. The Placeholder({realm}) primary purpose is to provide service to a multi-tenant environment.
This feature works only while UMA is enabled.
Enable Forgot Password
The EnableForgotPassword flag can be set to true in Realm settings -> Settings, to enable Forgot Password Option at authenticator level. Clicking on forgot password link will get redirected to the reset credential flow. If set to false then Forgot Password Option will be disabled.
If Realm Setting is not available then authenticator level settings will be considered.
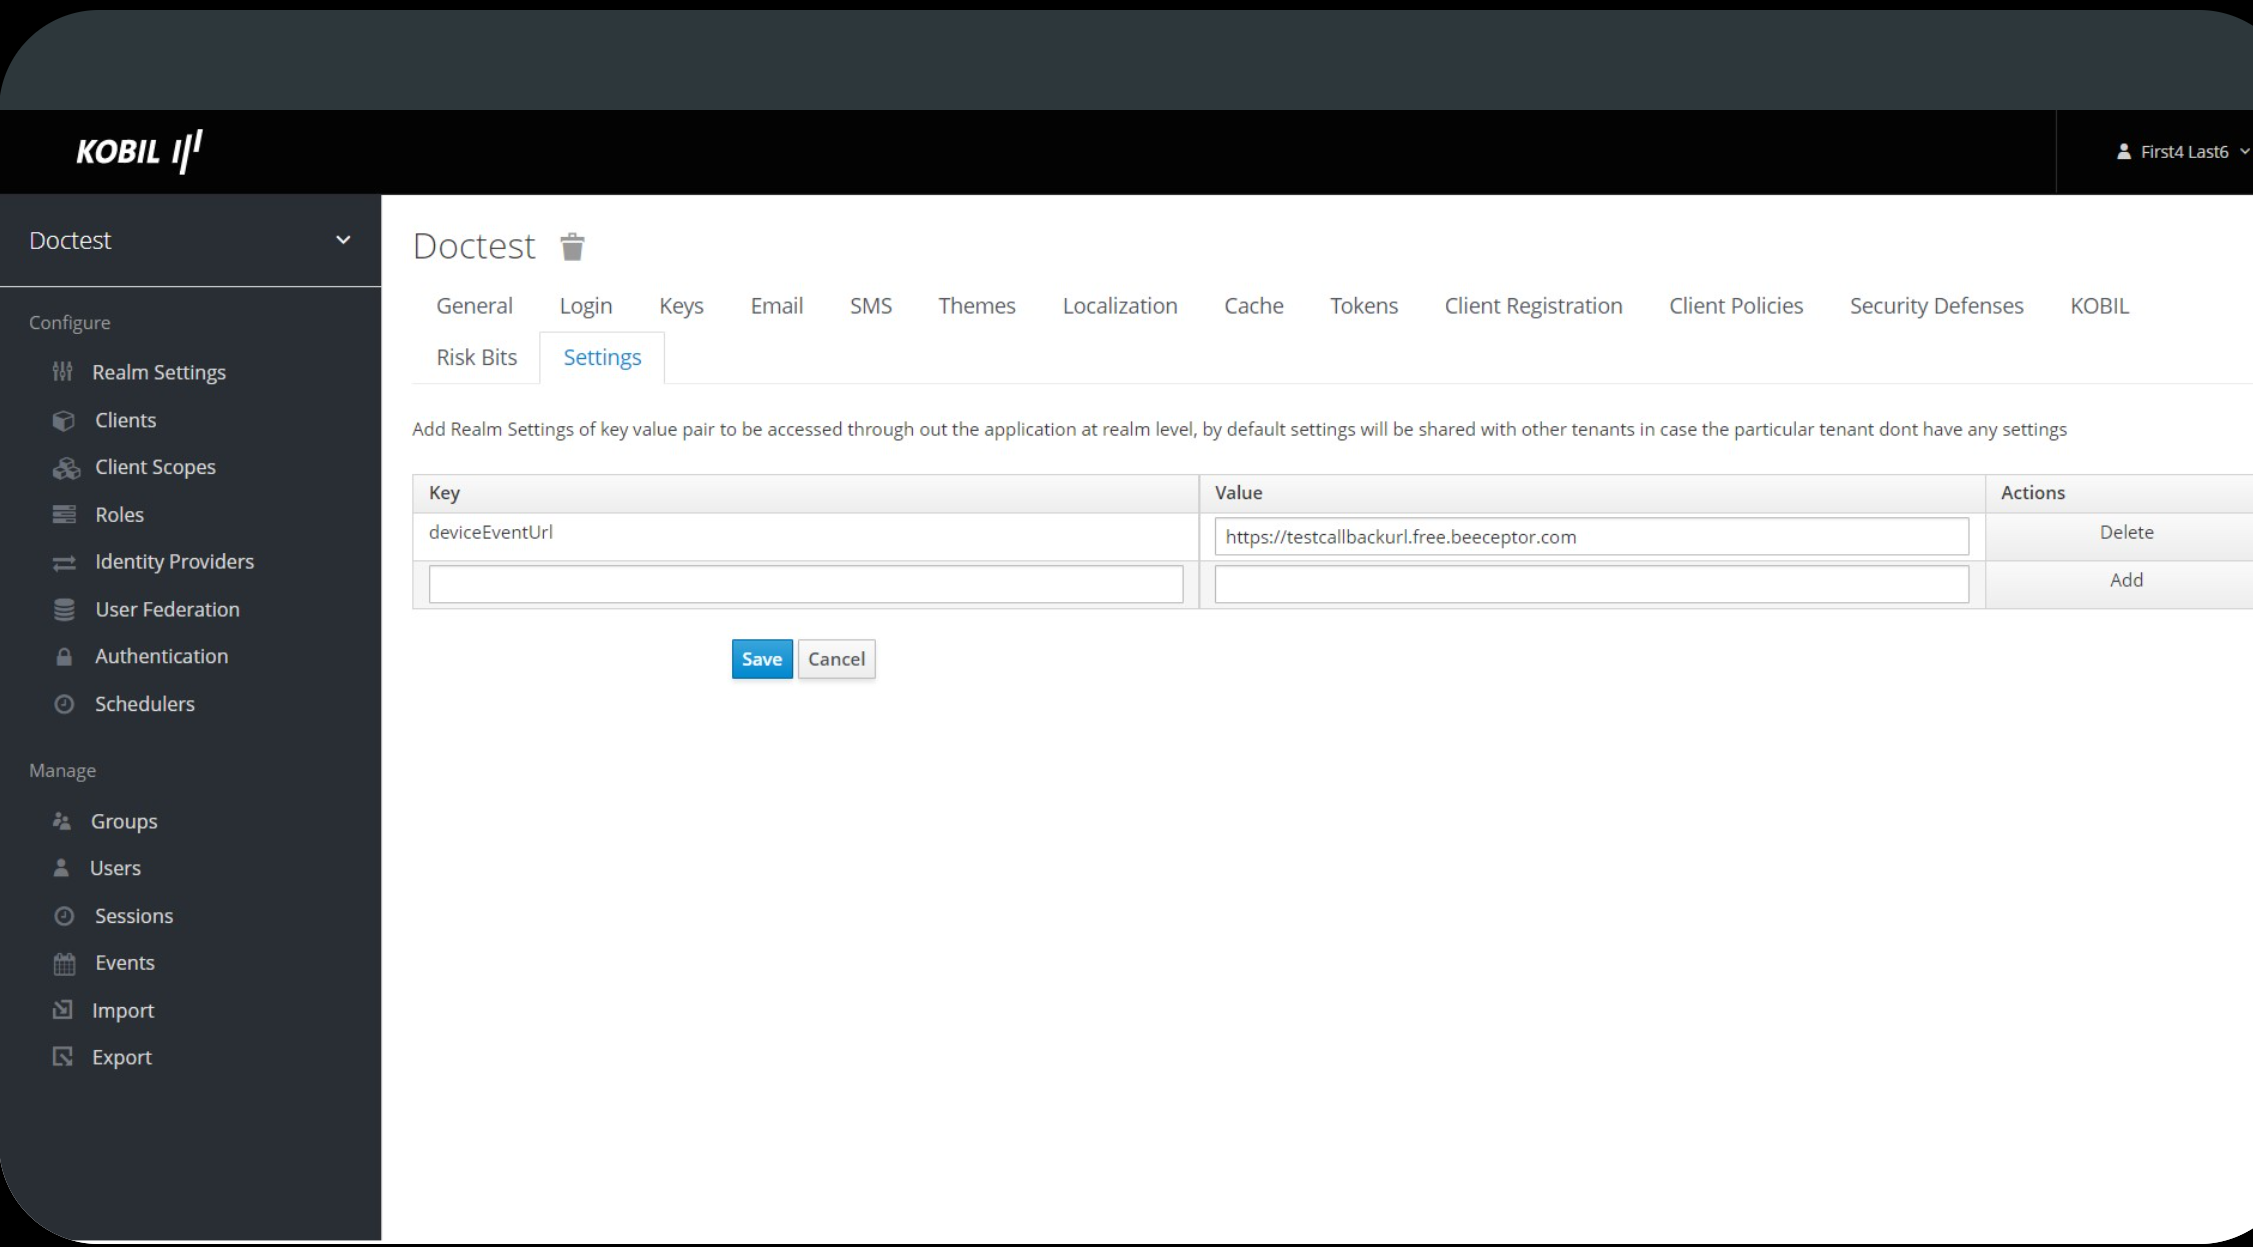
Device Event URL
New Scheduler to listen for Device Activation Events and broadcast the device activation to IDP. Set deviceEventUrl in realm settings to receive the event in a custom callback. If the value is set empty the event will be stored in the below path.
Default deviceEventUrl: https://keycloak:8444/auth/realms/{realmName}/v3_device/events/callback
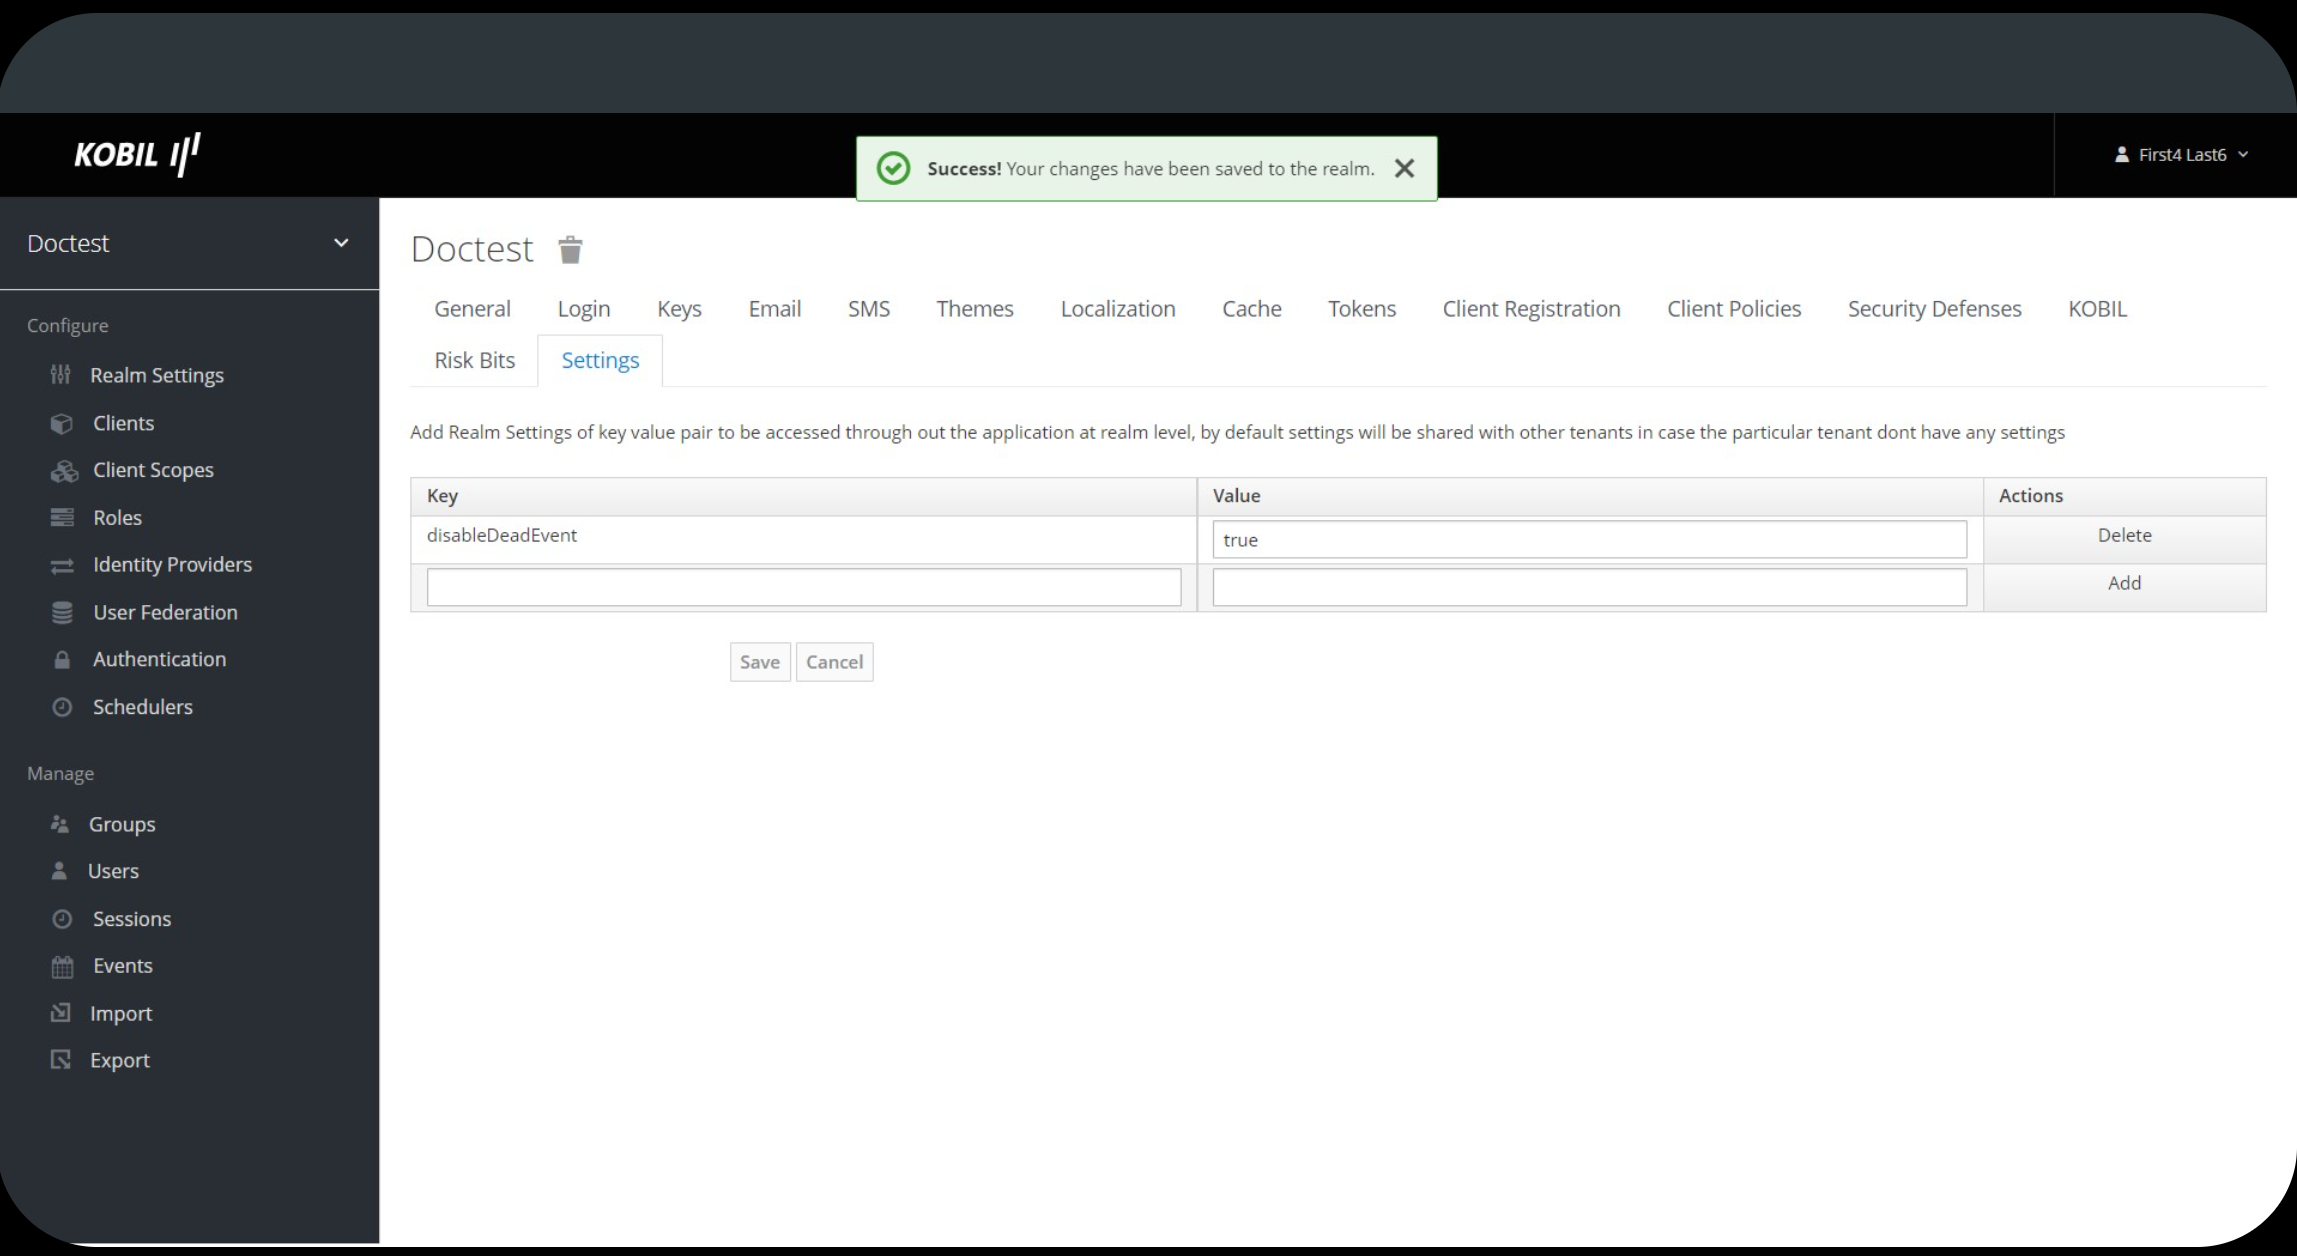
Disable Dead Event
Based on the following name, a realm setting is introduced for storing the dead event pool, incase there's an issue while adding them to the system. If the value is set to true, the failed items will no longer be sent to the dead event pool.
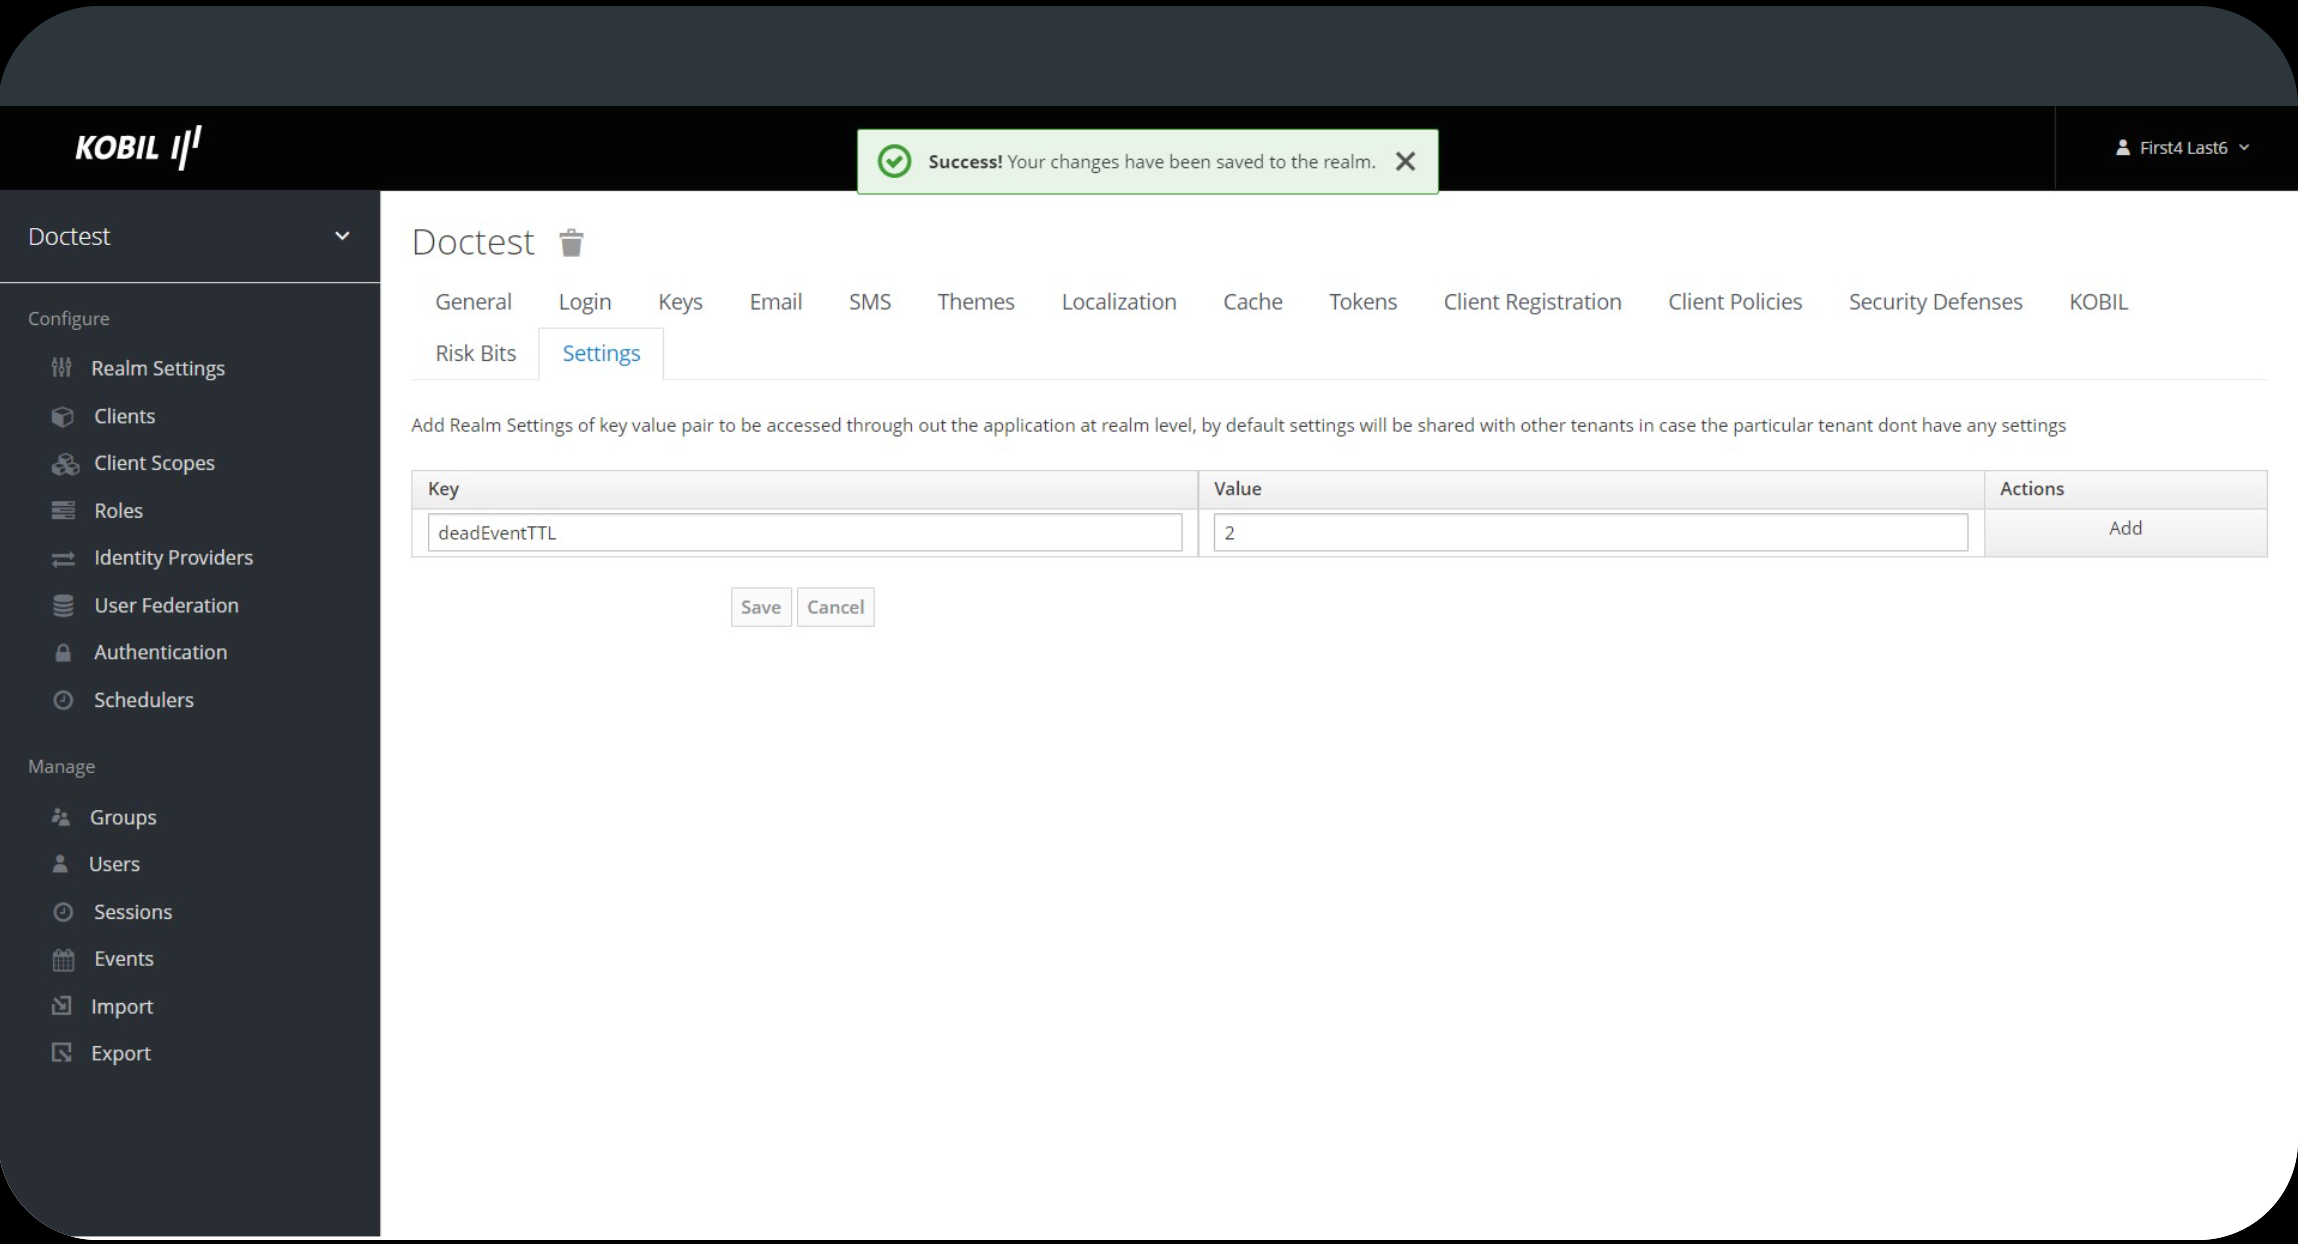
Dead Event TTL
This controls the deletion of dead events depending on the timestamp, and the value should be a non-zero integer number in Days. If nothing is supplied, the value defaults to 7, i.e., seven days. If you set deadEventTTL to 2, the number of dead events will be reduced to two. When you register the Dead Event Cleanup Scheduler, it will erase all of the dead events that were generated two days ago from the database.
Device Events
Connector Events Scheduler can now subscribe to numerous events as comma-separated values in the deviceEvents option under Realm Settings. For example, to subscribe to both events, use NEW_DEVICE and DEVICE_DELETION. All supported events will be unsubscribed when the scheduler is removed.
NEW_DEVICE - When we subscribe to this type of event, we get a callback after a new device is activated, i.e. registration.
DEVICE_DELETION - When we subscribe to this type of event, we get a callback when a device is removed.
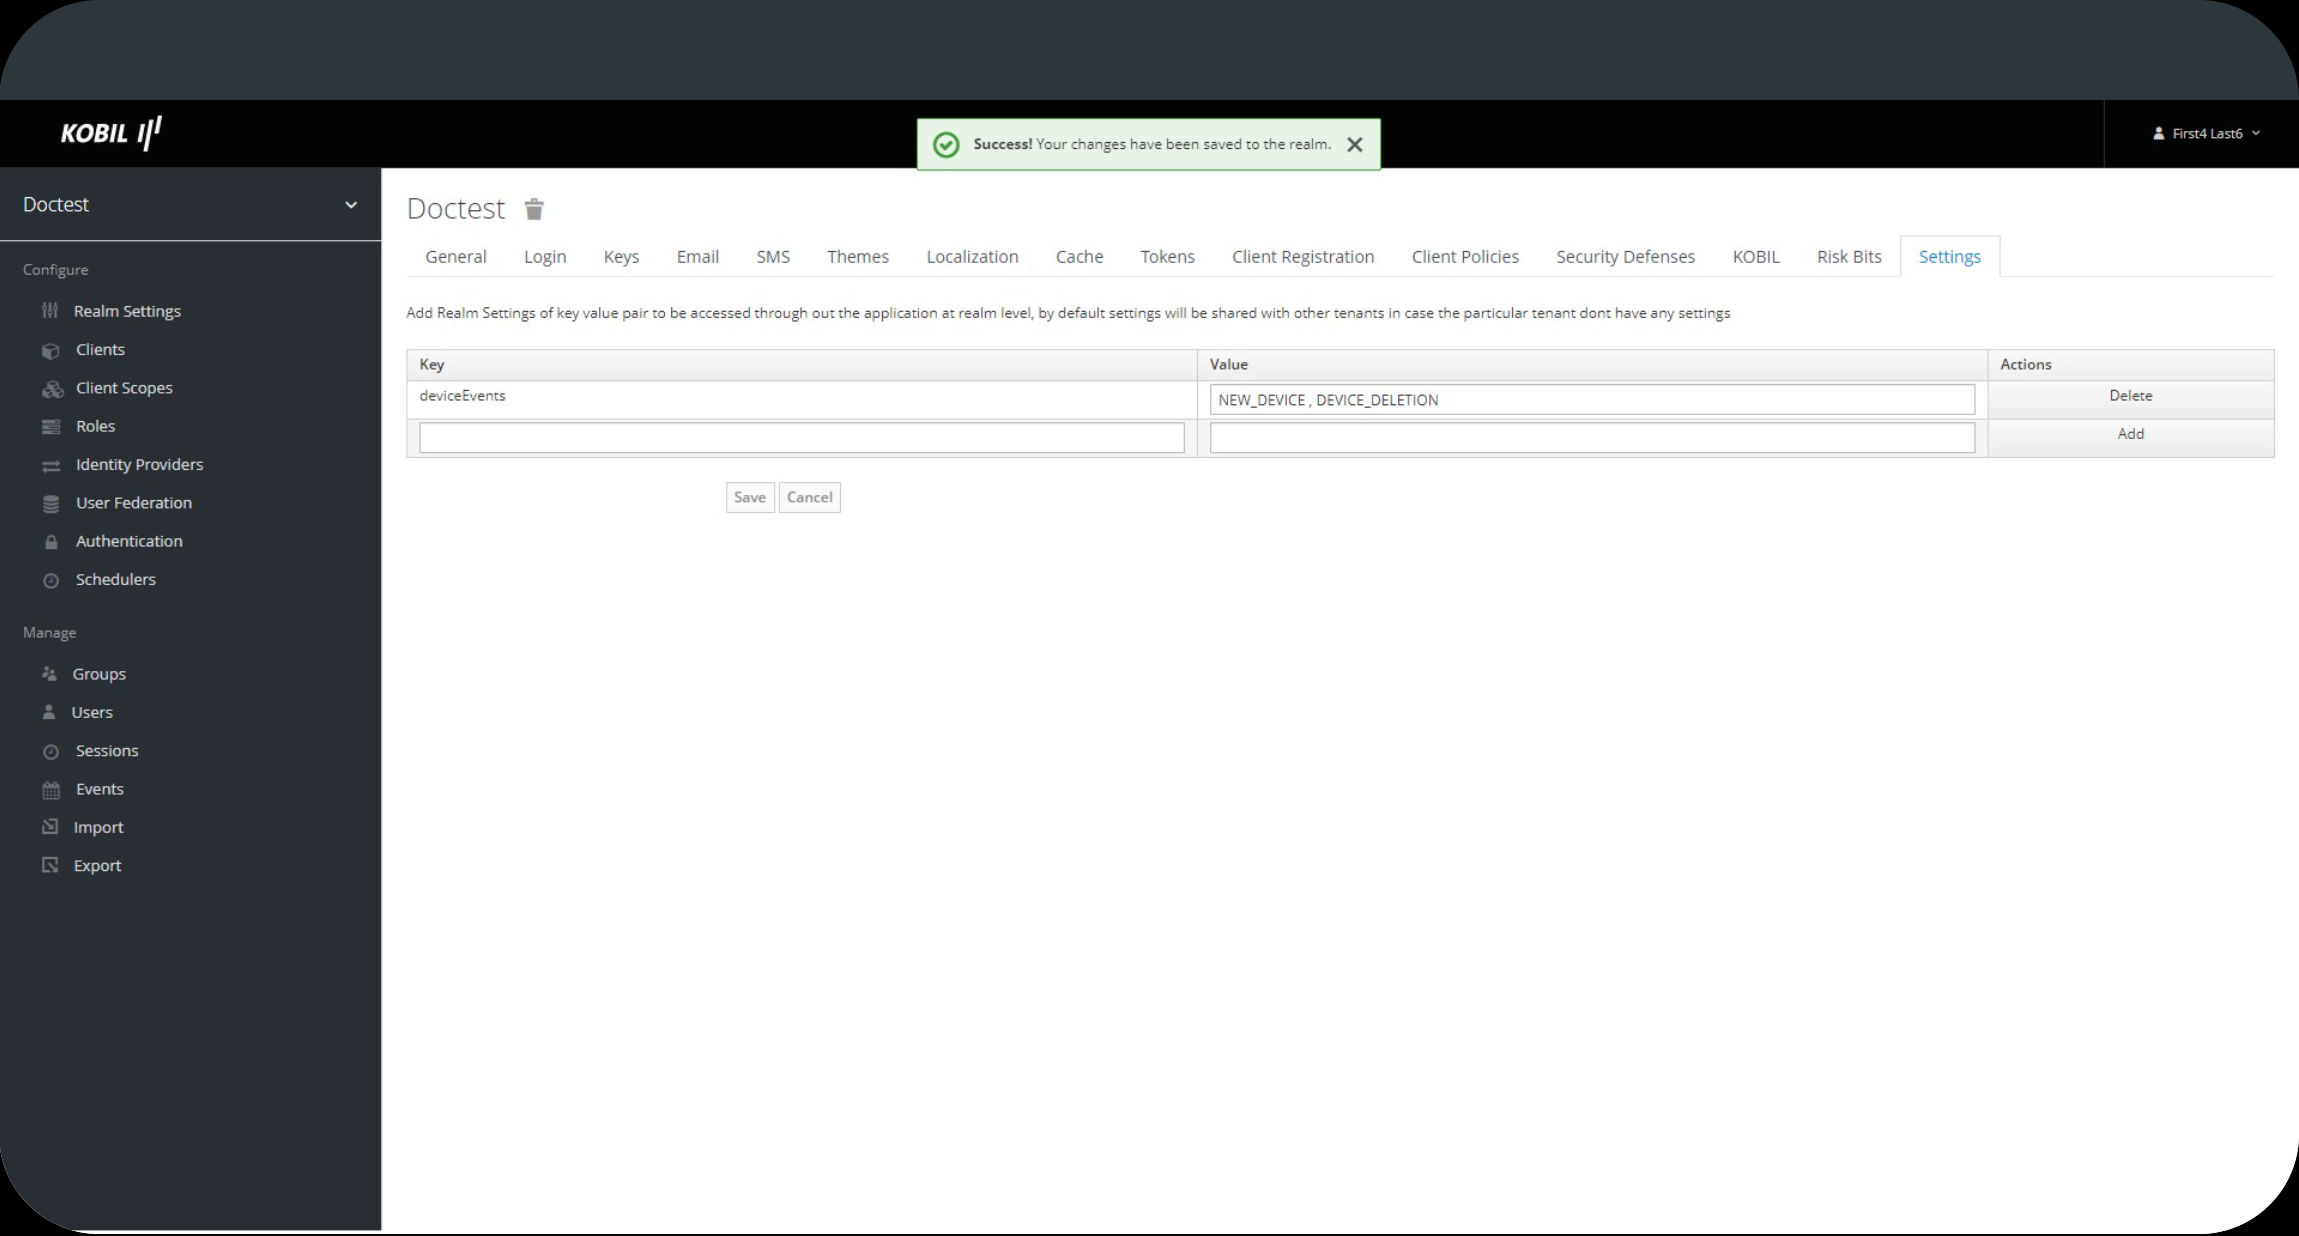
The event type for 'deviceEvents' can be set to a single event or several events separated by a comma, such as NEW_DEVICE and DEVICE_DELETION. NEW_DEVICE will be subscribed by default if 'deviceEvents' is not added or left null.
Hidden Logs
- To display hidden logs, set the following value in the realm's general settings:
- If h_info=true is set, hidden logs will be displayed.
- If h_info=false is set, hidden logs will not be displayed.
- If h_info=true is set, hidden logs will be displayed.

TMS Transaction Keys
To trigger TMS transaction in the KOBIL AST TMS authenticator. The following Keys are mandatory to get the access token for triggering the TMS :
-
AST_ADMIN_CLIENT
-
AST_ADMIN_PASSWORD
-
AST_ADMIN_USER
-
AST_ADMIN_CLIENT_SECRET Key is mandatory for confidential Client's and optional for other Client access type to get the access token for triggering the TMS.
![]()