Update your App
With the help of the Update feature, you can assign the application update to a particular user or multiple users for a particular version as well. This update can be optional or mandatory (depending on the selected date & time).
The following steps are involved in the update feature:
1. Create an App Version
See Register App Version.
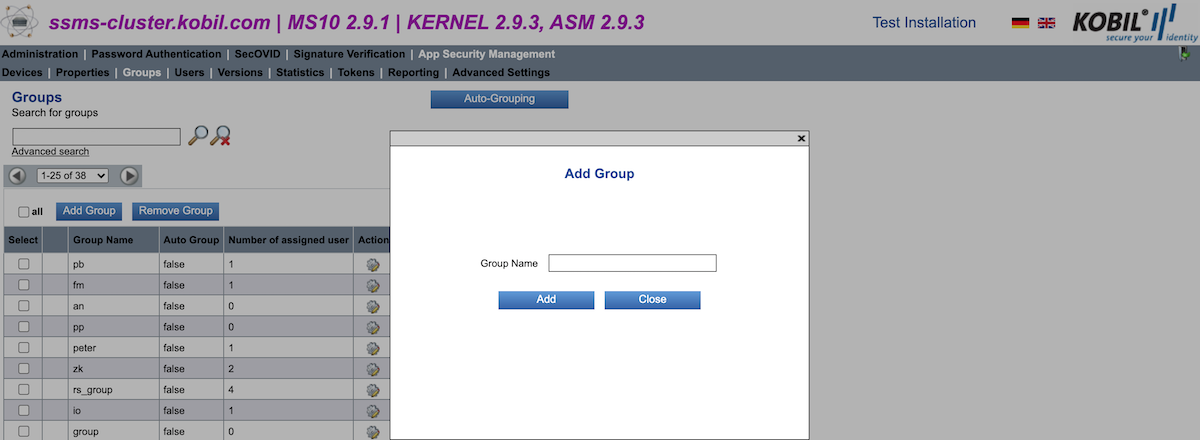
2. Create a Group
You also need to create a new group, or if you already have a group, then you can use the existing one. Below are the steps to create a group via the SSMS:
- Login to SSMS Server.
- Select 'App Security Management' tab.
- Select 'Groups' tab.
- By clicking the 'Add Group' option you can create a new group.
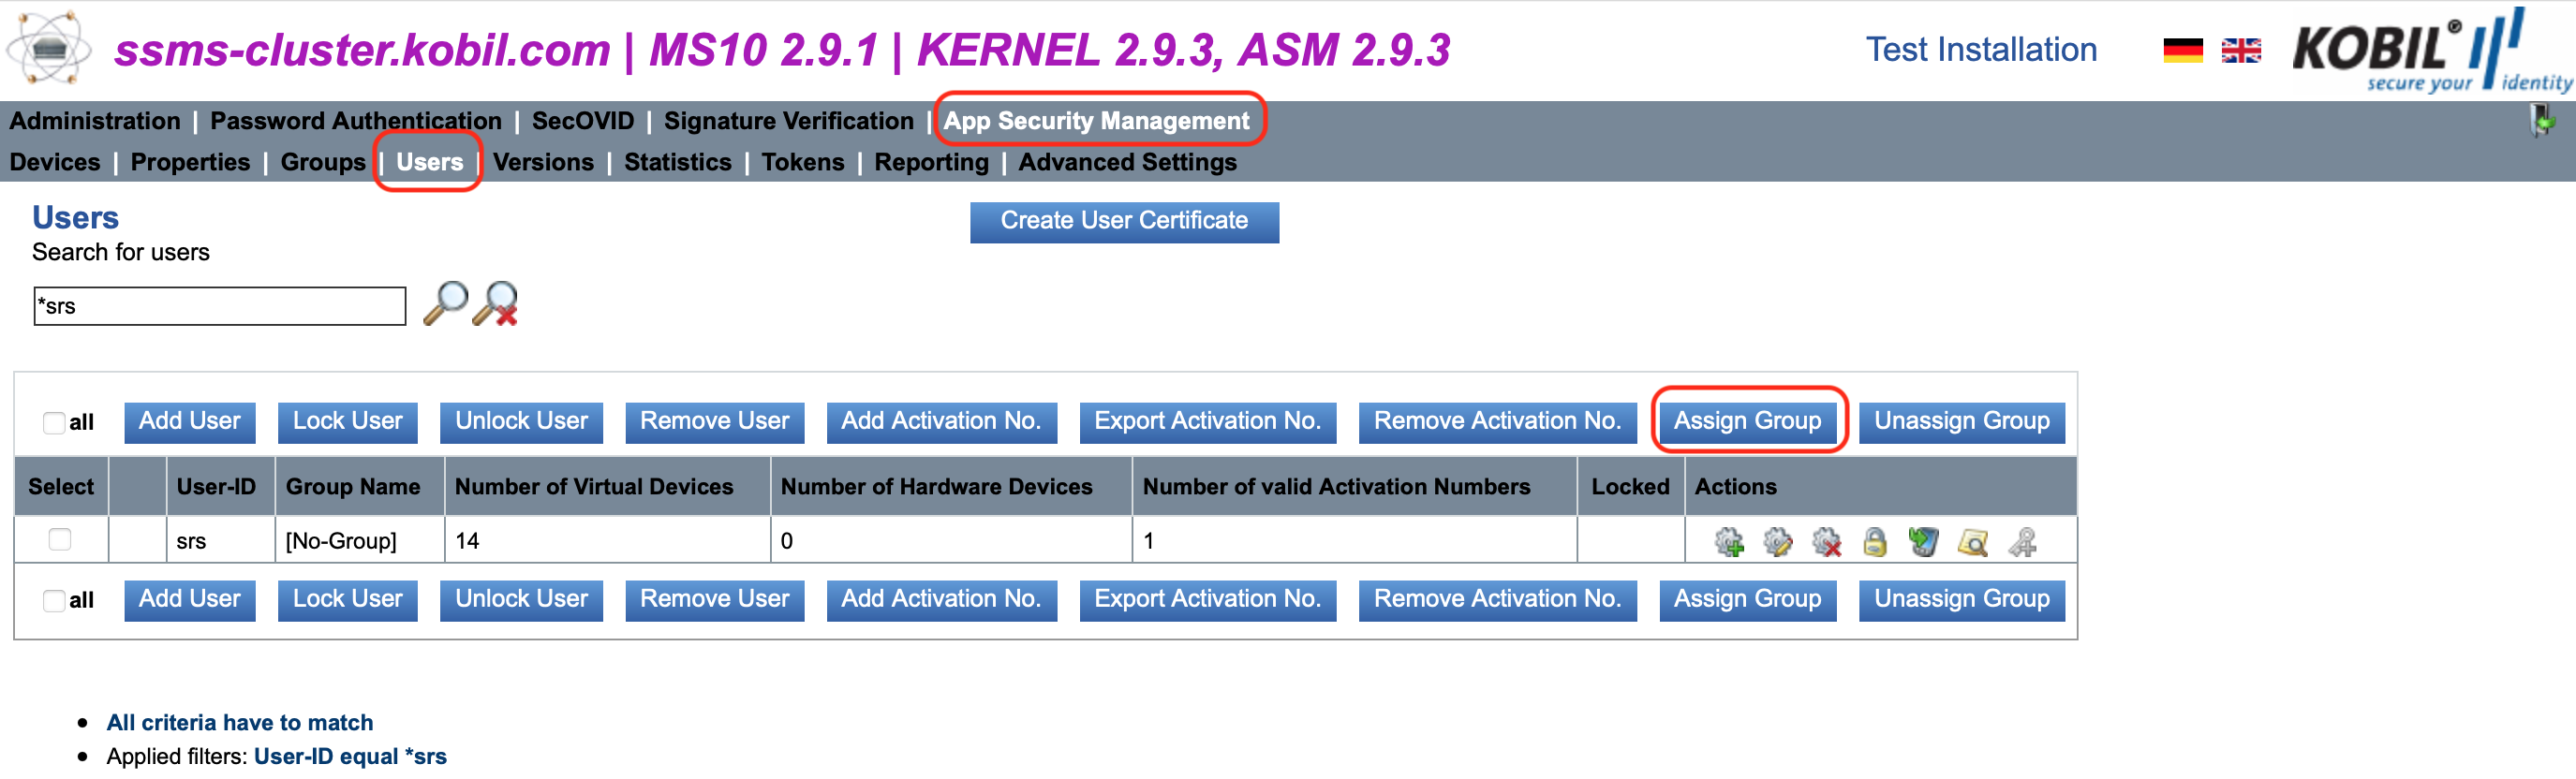
3. Assign the Group
Now you have to assign the group to your user/users. Below are the steps to assign a group to a user via SSMS:
- Login to the SSMS Server.
- Select the 'App Security Management' tab.
- Select the 'Users' tab.
- Now search for your user (which you want to add into the group).
- By clicking the 'Assign Group' option you will see a list of groups. From there you can select your group and click Assign.
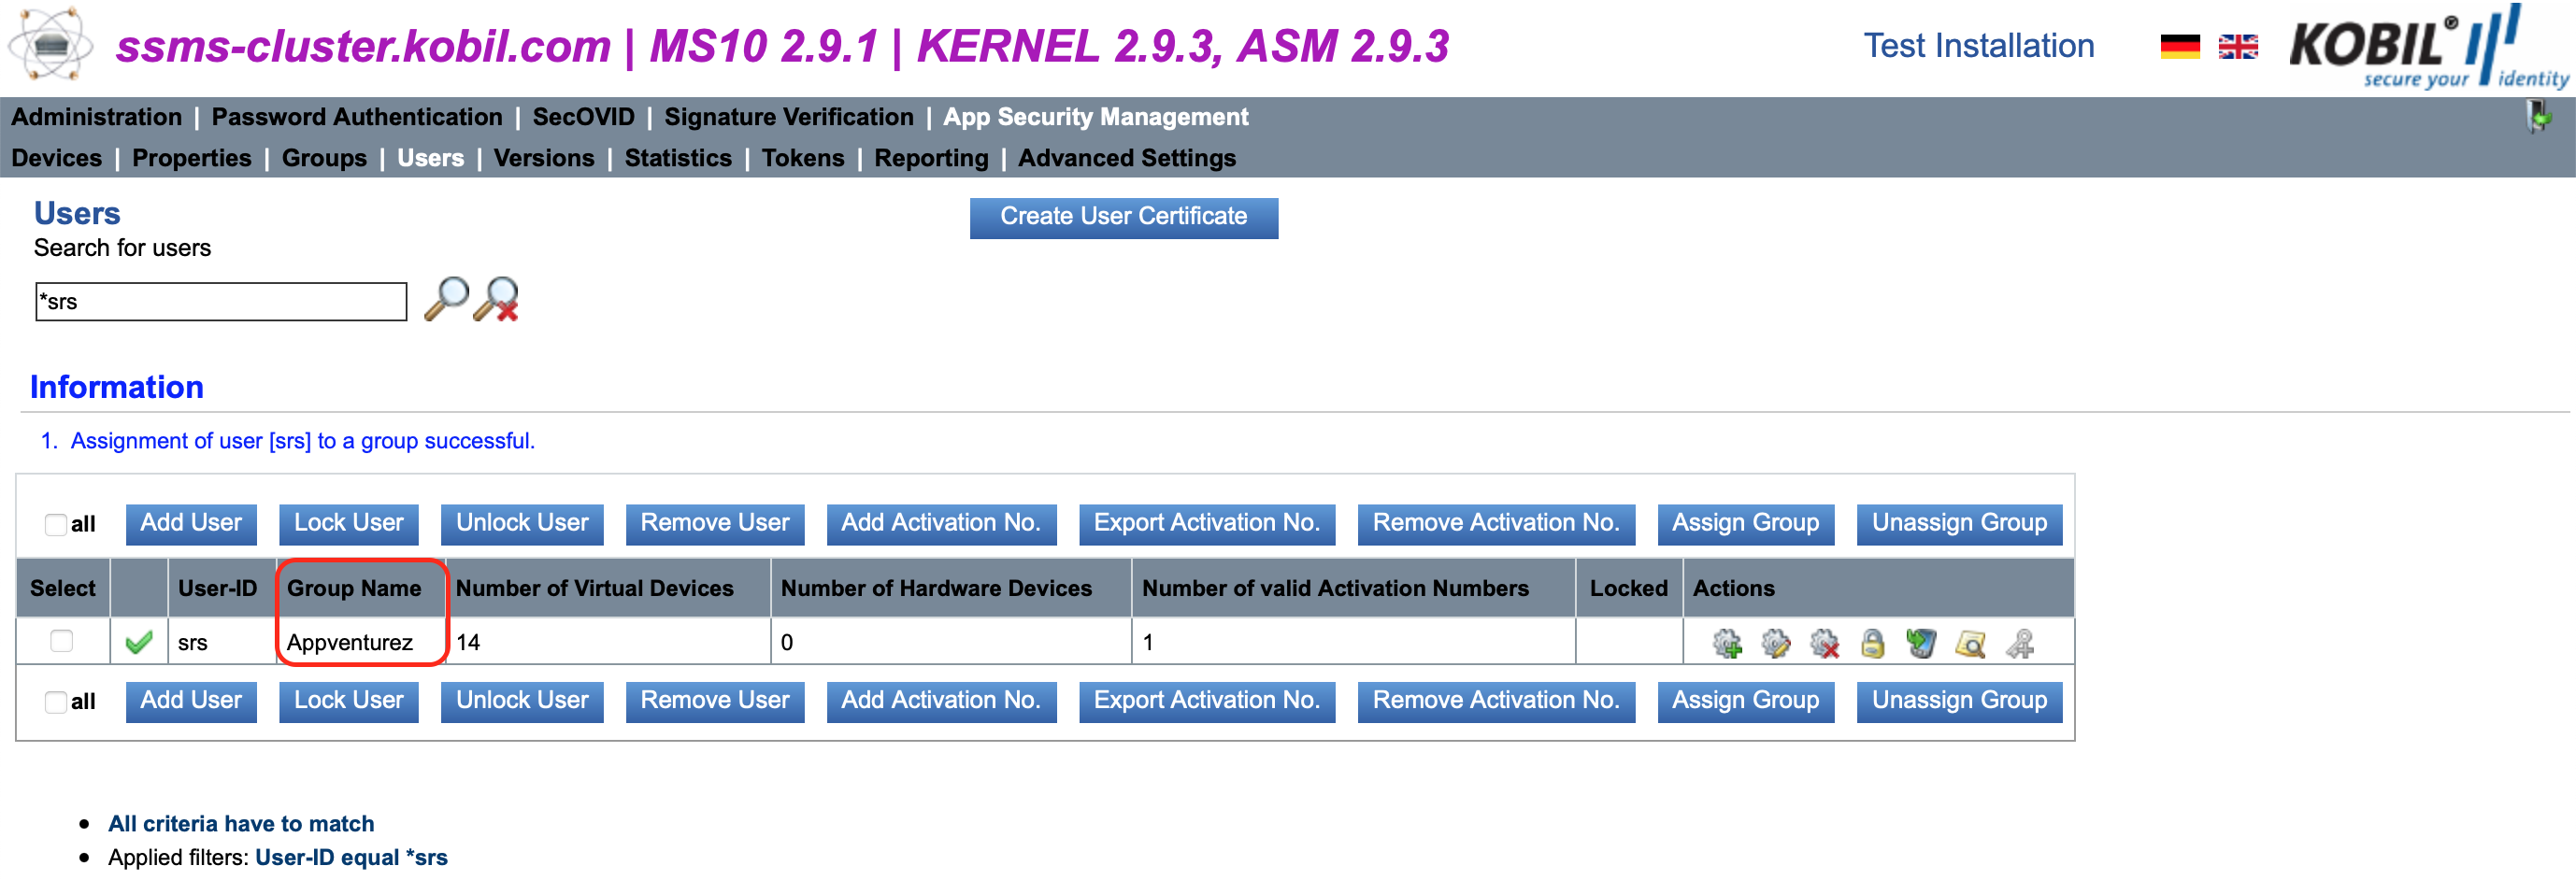
After assigning a group to your user, you can see the group is assigned to your user.
4. Assign a Version Update
Now you need to assign a version update to the application. Below are the steps to assign version update:
- Login to the SSMS Server.
- Select the 'App Security Management' tab.
- Select the 'Versions' tab.
- Select the 'Version-Updates' tab.
- Click on the 'Assign Version-Update' option.
- Now a popup will be shown, where you can select the suitable value for the mentioned fields like Group, App Name, Reference Version etc.
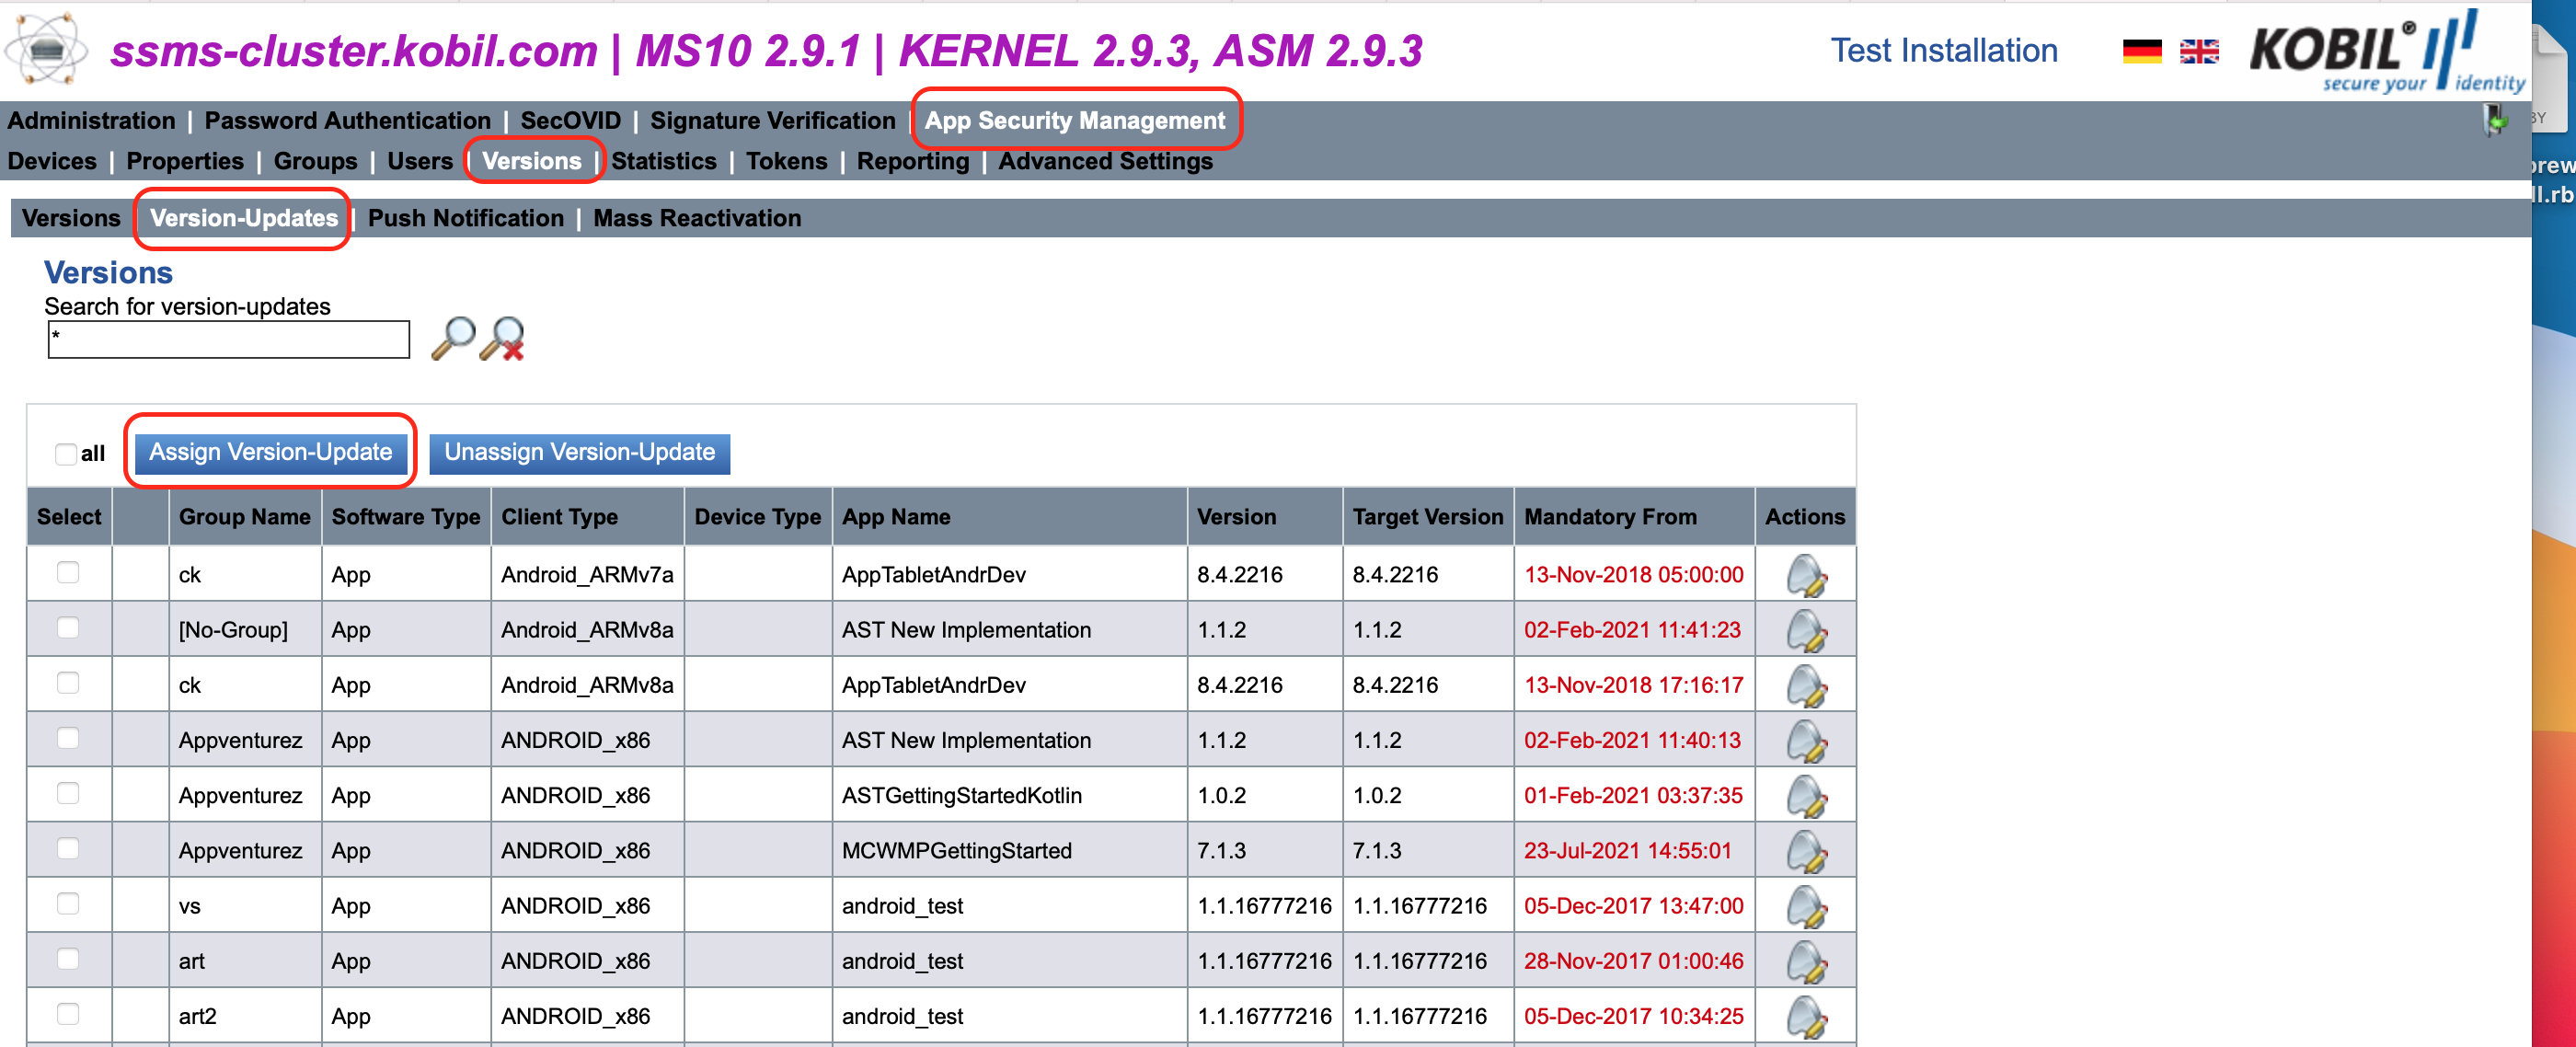
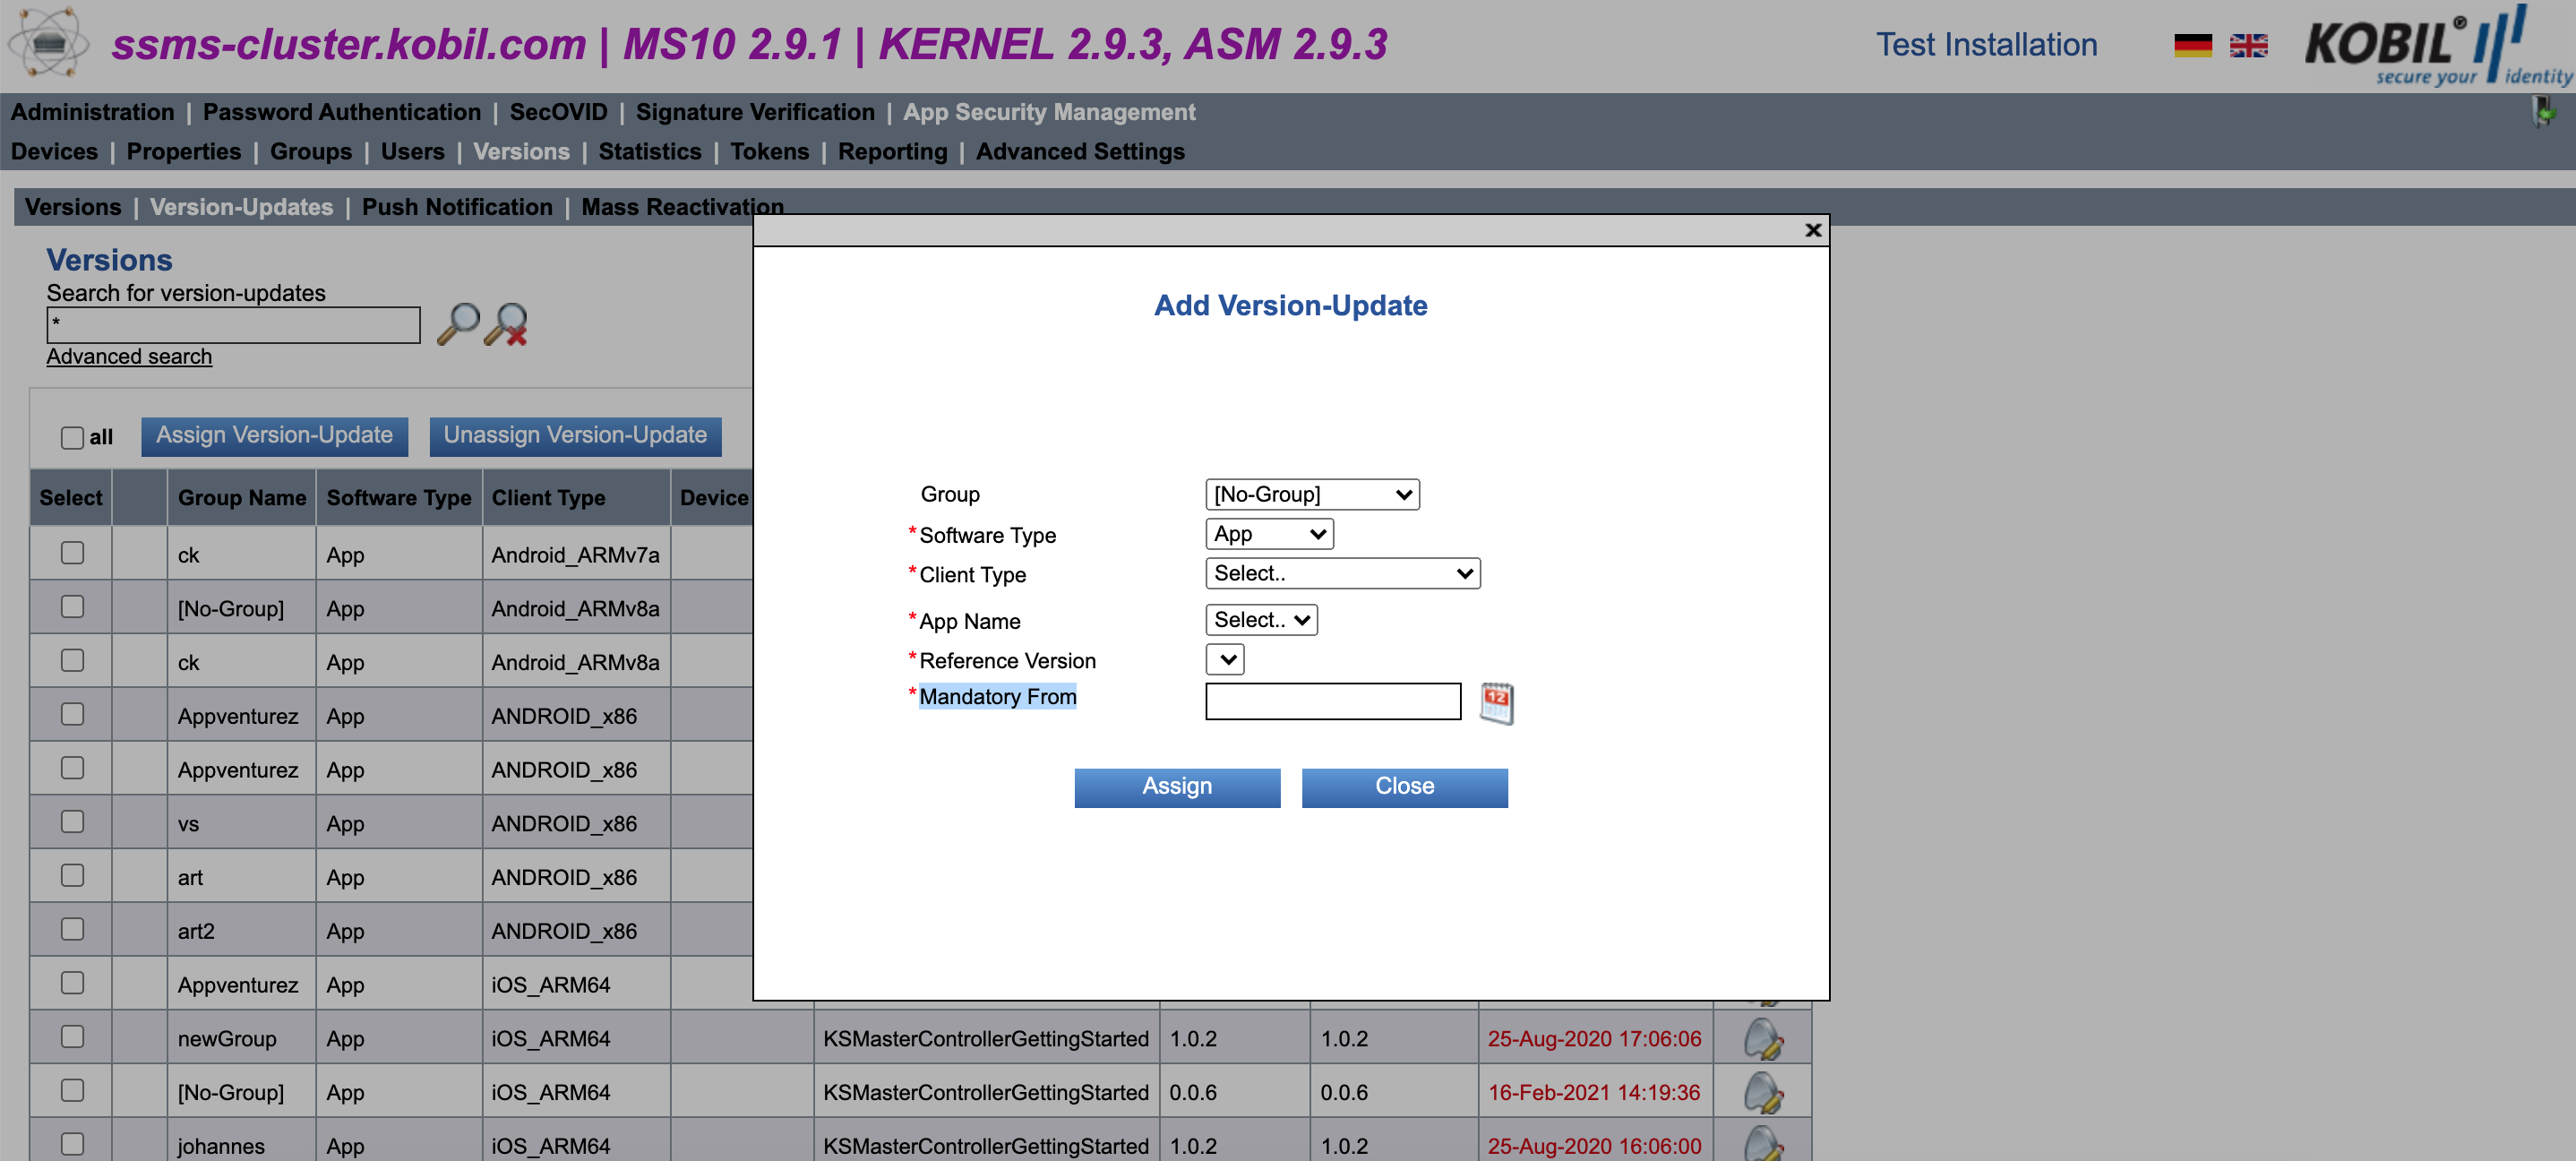
Note: Until the selected date/time for the 'Mandatory From' field expires, version update would remain optional, once the selected date/time expires, the version update becomes mandatory (without updating the app you cannot use the same). Expired time shows in red color.
5. Handling the Update Event
Now you need to handle the version update on the application side. After completing the steps explained above, you start getting the status related to the version update. If you perform Login or Activation, then in the result event (LoginResultEvent/ActivationResultEvent) you receive the status as either UPDATE_AVAILABLE or UPDATE_NECESSARY based on the date and time you set while adding the version update on the SSMS.
A noticeable difference between platforms is in the level of integration of the Webview. While we can directly open URLs in Swift code, for Kotlin, we need to send an event to open a Webview. This makes for a somewhat easier update process in Swift. For Swift, after receiving any of the update related statuses, you need to trigger GetUpdateInformation Event to get information related to the update such as the update URL, info URL, etc. (this is the same information you entered on the SSMS while adding the version as mentioned in the first point). Then, upon receiving the result event, you can just call a function handling the update. A code snippet could look like this:
MCHandler.sharedInstance.getUpdateInformation { (resultEvent) in
        performUpdate(updateEvent: resultEvent)
}
//Handle update event
func performUpdate(updateEvent: KSMUpdateInformationEvent?){
    // Check that update event is not nil.
    guard let resultEvent = updateEvent else {
        Logger.sharedLogger.logError(content: "fail to get update information", context:
                                        "\(type(of: self)).\(#function)")
        MCHandler.sharedInstance.triggerRestartEvent()
      return
    }
    let title = "Update"
    var message: String = ""
    var laterButtonText: String = "Later"
    // create actions
    var actions = Array<AlertActionContainer>()
    if resultEvent.updateStatus == .KSMUPDATE_AVAILABLE{
        let days = Int((resultEvent.expiresInSeconds + 86400 - 1) / 86400)
        if days == 1 {
            message = "Update is available(last day)"
        } else {
            message = "An update is available. You need to update the app today to continue using it."
        }
    }
    if resultEvent.updateStatus == .KSMUPDATE_NECESSARY{
       message = "An update is necessary.\nPlease update your app."
        laterButtonText = "Exit"
    }
    let updateActions = AlertActionContainer(actionText: "Update", actionStyle: .default) {
        MCHandler.sharedInstance.performUpdate()
    }
    actions.append(updateActions)
    let detailAction = AlertActionContainer(actionText: "Detail", actionStyle: .default) {
        GlobalConstant.const.updateUrl = resultEvent.infoUrl
        guard let url = URL(string: resultEvent.infoUrl) else {return}
        DispatchQueue.main.async {
            UIApplication.shared.open(url) { sucess in
                if(sucess){
                    exit(0)
                }
            }
        }
    }
    actions.append(detailAction)
    let cancelAction = AlertActionContainer(actionText: laterButtonText, actionStyle: .default) {
        if resultEvent.updateStatus == .KSMUPDATE_NECESSARY{
            exit(1)
        }else if resultEvent.updateStatus == .KSMUPDATE_AVAILABLE{
            DispatchQueue.main.async {
                InterfaceDelegate.sharedInterface.showTabBar()
            }
        }
    }
    actions.append(cancelAction)
    DispatchQueue.main.asyncAfter(deadline: .now()+2) {
        AlertPresenter().showAlertWithActions(title: title, message: message, actions: actions, completion: nil)
    }
}
For Kotlin, things are a bit more involved. Again, after receiving any of the update related statuses, you need to trigger GetUpdateInformation Event to get information related to the update such as the update URL, info URL, etc. (this is the same information you entered on the SSMS while adding the version as mentioned in the first point).
fun triggerGetUpdateInformationEvent() {
    synchronousEventHandler.postEvent(GetUpdateInformationEvent())?.then {
        // handle result
    }
}
As response to this event, Master Controller provides UpdateInformation Event with required information. After receiving the response from Master Controller, we show an update related popup to the user with mainly 'Update' and 'Detail' buttons.
5.1. On click on 'Update'
We trigger the Update Event and after receiving the UpdateResult Event as response to the triggered event, we open the update url (received in UpdateInformationEvent) in the device browser.
fun triggerUpdateEvent() {
    synchronousEventHandler.postEvent(UpdateEvent())?.then {
        // handle result
    }
}
private fun handleUpdateResult(event: UpdateResultEvent) {

    if (event.updateStatus == UpdateStatus.OK) {
        if (updateInformation == null) {
            logDebug(
                    "could not perform update, update information result is null.",
                    "handleEvent",
                    "KsBaseActivity"
            )
            return
        }
        restartApp()
        updateInformation?.updateUrl?.let { it1 -> openWebPageDefaultSystemBrowser(it1) }
            .orElse {
                logDebug("Not valid update url", "handleUpdateResult", TAG)
            }
    } else {
        logError(
                "Update has failed, the status result of UpdateResultEvent is = ${event.updateStatus}",
                "handleUpdateResult",
                TAG
        )
        Utils.showAlertDialog(
            context = this,
            text = getString(R.string.ks_ast_015_login_view_alert_updatefailed),
            title = getString(R.string.label_error),
            clickListener = null
        )
    }
}
5.2. On click on 'Detail'
We trigger the OpenInfoUrl Event and after receiving the OpenInfoUrlResult Event as response to the triggered event, we open the info url (received in UpdateInformationEvent) in the device browser.
fun triggerOpenInfoUrlEvent() {
    synchronousEventHandler.postEvent(OpenInfoUrlEvent())?.then {
        // handle result
    }
}
private fun handleOpenInfoUrlResult(openInfoUrlResultEvent: OpenInfoUrlResultEvent) {
    openInfoUrlResultEvent.let {
        restartApp()
        updateInformation?.infoUrl?.let { it1 -> openWebPageDefaultSystemBrowser(it1) }.orElse {
            logDebug("Not valid info url", "handleOpenInfoUrlResult", TAG)
        }
    }.orElse {
        logError(
                "Unexpected event received for OpenInfoUrlResultEvent",
                "handleOpenInfoUrlResult",
                TAG
        )
        restartAppWithAlert()
    }
}