IAM Settings & Text Resources
IAM Settings
Identity and Access Management support feature
Security Server provides the feature of using an external authentication & authorization application, especially an Identity- & Access Management System, named IAM in the following.
The IAM shall act as an identity provider to authenticate users to access services provided by Security Server. For now, the IAM shall only provide the authentication. The service provider Security Server shall remain as the authorization provider for its services. The IAM must provide authentication information to Security Server as part of an ID token. The ID token will be provided as JSON Web Token (JWT). Security Server accepts identities and their attributes, which the IAM authenticates.
- Using an IAM for user authentication during login process to Security Server is only enabled for Security Server Management GUI.
- Security Server SOAP or REST services are currently not managed by a configured IAM.
- Security Server Configuration Utility is not managed by a configured IAM.
- Security Server is still the authorization provider for Security Server management services.
- Security Server can communicate with any IAM application which supports the OpenID Connect protocol (part of OAuth2).
- User authentication during login process to Security Server will be handed over to a configured IAM.
- If the user is authenticated by the IAM, Security Server accepts the provided ID token, verifies the validity of the ID token and the provided user (operator) information and authorizes the user for Security Server management services as usual. The operator information must match an existing operator in Security Server.
- If the IAM feature is enabled, no login with Security Server SSL client certificate as well as the user/password login and basic auth is possible. Except will be the use of Security Server client certificate SUPER_ADMIN, for more check this.
- During the Security Server session the validity of the ID token is not verified again. This is to ensure, that configurations done in the Security Server management GUI session will not get lost, if the ID token is limited in time (by max_age ID token claim). The outdated ID token would cause a logout propagation of the user.
- If the user logs out at IAM and the user has not logged out from Security Server manually before, no logout propagation by IAM is supported by Security Server. The user can still operate on Security Server. The user must logout from Security Server manually or Security Server will run into the session timeout, if the operator does not use the system for specified period.
- No further Security Server user logout handling with the IAM is currently implemented.
- SSMS_Operatorname custom claim as a Security Server user attribute must be added to the ID token returned by the IAM.
The current implementation is a basic design of OpenID Connect protocol and the authorization grant flow standard for authenticating a user using an IAM. Following protocol attributes are supported.
Additional claims to be added to the ID token
The ID token
The ID token is created and returned by the IAM on authentication request of Security Server. The ID token is returned as a JSON Web Token (JWT) with properties accordingly to the value of the OpenID protocol attribute scope, defined in the settings view. This provides the default user attributes required by Security Server to identify the user and provide the authorization rules. Additionally, the JWT ID token must have compiled a custom claim with extended information about the user.
Custom claims
⚠️ Custom claims must be compiled separately as a part of the ID token. This must be done by the IAM administration
Beside the default JWT claims the ID token must provide following custom claim:
Custom claim key | Value type | Description |
|---|---|---|
SSMS_Operatorname | String | IAM must return the operator name in this claim. This is to provide the possibility for IAM administration to use the default claim “sub” for whatever the IAM administration requires it for other managed applications (i.e. the username). The operator name is the username in Security Server provided by the user /password login or the SSL client certificate. This is mandatory. NOTE: IAM administration must compile this custom claim into the ID token. Otherwise the Security Server will return 401, unauthorized message. |
Supported claims
Accordingly to the default scope “openid” Security Server supports following claims:
- iss
- exp
- aud
Additional supported claims:
- nonce
All other claims are ignored.
The IAM Settings view
To use the IAM feature, Security Server has integrated a view in Administration view, named “IAM Settings”. This view is to configure, if the IAM authentication shall be used or not, and to define the required attributes to communicate with the IAM server endpoints. If an IAM is configured, the use of the IAM can be toggled on and off without the need to redefine all the properties again. If changes done here, Security Server nodes get informed automatically, no restart of Security Server is required.
⚠️ Be very careful with the definitions made in this view and having switched on the usage of an IAM. If any misconfiguration in the endpoints or in the settings have been made, this would lock Security Server for any other user than the SUPER_ADMIN operator. For more about having locked Security Server see section Help for locked up Security Server by misconfigured IAM
Required user permissions
To enable to view this submodule and manage the settings two permissions are provided which are not assigned to any role by default at installation. You first must assign those permissions to at least the SUPER_ADMIN role. KERNEL_IAM_SETTINGS_VIEW is required to enable managing the settings by giving the additional permission KERNEL_IAM_SETTINGS_MANAGE.
Permission | Display name | Description | Default assignment to role |
|---|---|---|---|
KERNEL_IAM_SETTINGS_VIEW | Kernel IAM Settings View | Display IAM settings view | None |
KERNEL_IAM_SETTINGS_MANAGE | Kernel IAM Settings Manage | Edit IAM settings | None |
Description of the Settings
This chapter explains the IAM settings and the configuration possibilities of the KOBIL Security Server. Following IAM settings can be adjusted:
Enable IAM | Enable or disable user authentication during login using an IAM based on OpenID Connect protocol. Default value is untoggled (disabled, false) |
|---|---|
IAM URL | The IAM URL, including protocol, host and port (if required). E.g. https://kobil.ergon.ch:8080 Default value is empty. |
Authorization Code Endpoint | Path for getting the authorization code. E.g. "/auth/oauth2/authorizationCodeEndpoint" Default value is empty. |
Token Endpoint | Path for getting the authorization token. E.g. "/auth/oauth2/tokenEndpoint" Default value is empty. |
Client Id | The client ID of Security Server to be defined by the IAM administration. E.g. "kobiltest". It is the unique identifier for the application managed by IAM. Default value is empty. |
Client Secret | The client secret for Security Server to be defined by the IAM administration. E.g. "jwAJR2chPCU6FCTt4q9GFyyf3C6BcBUE" Default value is empty. |
Scope | The scope(s) (separated by blanks) used by Security Server during authentication to authorize access to required user details provided by OIDC standard claims in the ID token. Accordingly, to OpenID Connect standard, the value “openid” is required. Security Server currently requires it to get user information belonging to this scope. Please do not remove it. Further standard values are profile or email. Default: "openid" |
Use Nonce | If enabled, Security Server sends additionally a nonce when requesting the authorization code. This nonce is verified when retrieving the token to ensure, that Security Server is the initiator of the IAM request. May prevent relay attacks. Default: Enabled (toggled, true) |
Socket Timeout | Timeout in milliseconds when communicating with IAM server for requesting the ID token. It specifies the timeout for waiting for data or the maximum period of inactivity between two consecutive data packets. Default: 5000 |
Connect Timeout | The connection timeout in milliseconds for establishing the connection to IAM when sending the ID token request. Default: 5000 |
Connection Request Timeout | The connection request timeout in milliseconds for requesting a connection for establishing the connection to IAM when sending the ID token request. Default: 1000 |
Help for locked up Security Server by misconfigured IAM
This section shall give you information what needs to be done, if Security Server is configured to use the IAM feature and:
- IAM settings have been misconfigured
- IAM does not respond due to network problems or IAM malfunctions
- unexpected login-preventing situations
To prevent this lock of Security Server Management GUI, it is possible to by-pass the IAM authentication during the login to Security Server by using a client-auth certificate, which according user in Security Server has the role SUPER_ADMIN. When using this certificate, the authentication at IAM will not be done, Security Server treats this certificate as if no IAM is configured. Therefore, KOBIL strongly recommends storing the certificate separately from Security Server machines on a separate secured storage.
Text Resources
Some modules of the Security Server (ASM, SecOVID) contain a function in the Advanced Settings for creating Text Resources. Text resources are templates to display transaction-related messages to the users. The following chapters describe the creation of templates and the settings of the values connected to them.
Text Resources View
The customer can sign payment transactions with his app. During the transaction, relevant information about the transaction is displayed to the customer on the app. To show the transaction information, templates can be created in this view, which are, then, dynamically filled in with the concrete values of a transaction (for example Amount, Currency, Reference).
The templates are defined by a unique key and the key value. The key is language-dependent, this means, in case you want to define and use a template for more languages, you must import or add the template in the Text Resources for each language. Therefore, you can create templates for different uses and languages. The components of a template in a payment transaction are the following and include static and dynamic components:
- Static text (in the selected language),
- Formatting characters as well as
- wildcards (transaction items)
In the Text Resources view, you can add templates for different languages. In addition, you can change or delete already saved templates.
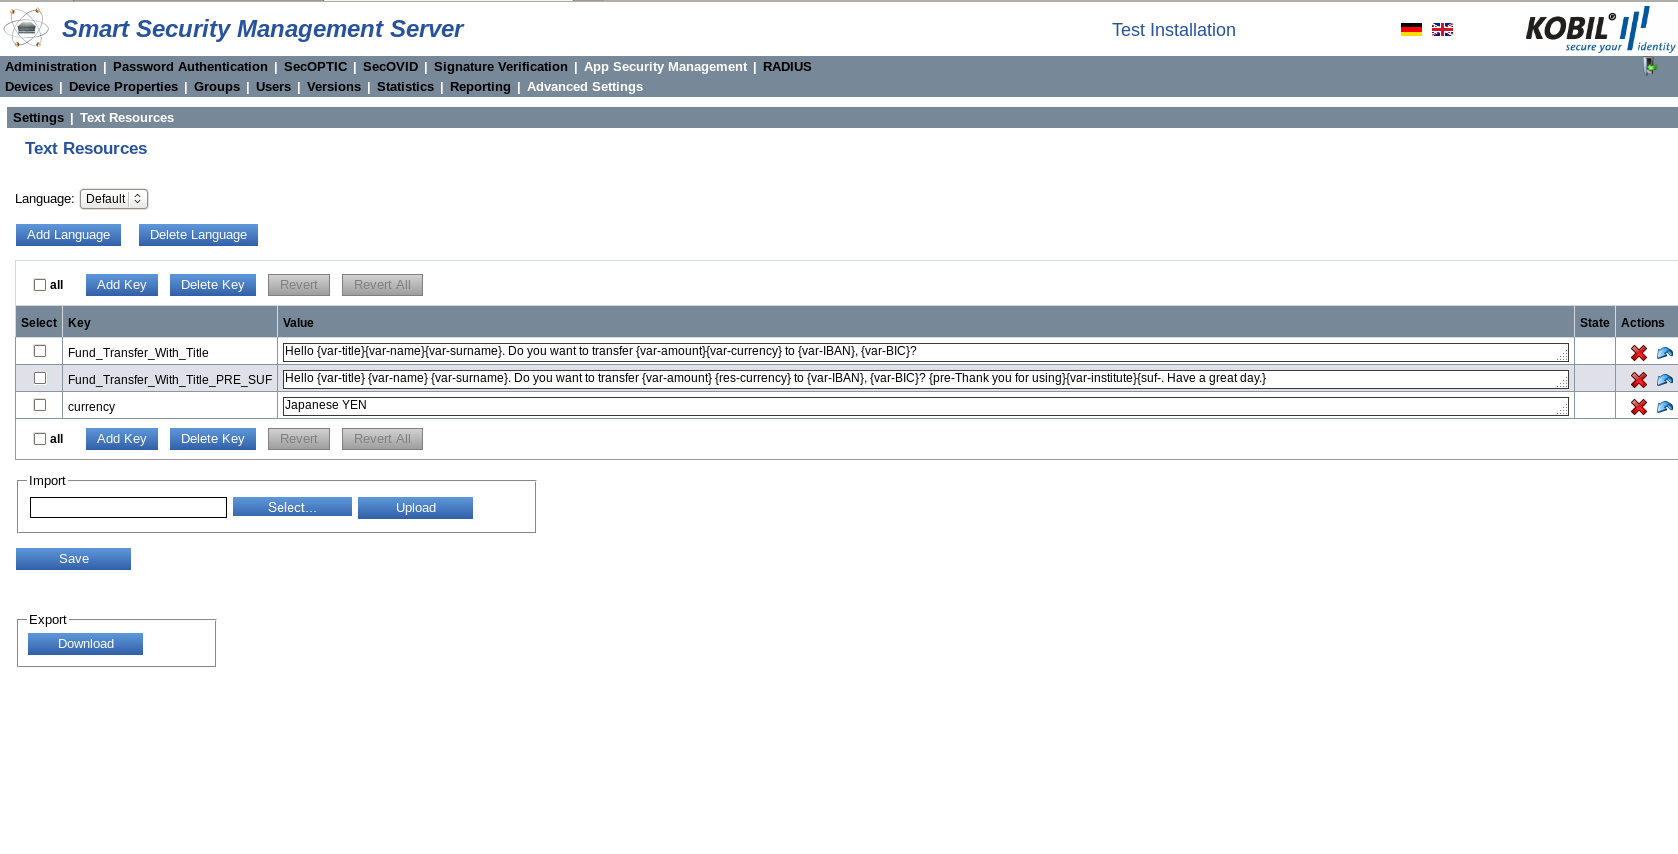
The list in the Text Resources view informs about the key, its value, its state and the actions that can be carried out with it.
Select | Checkbox for selection |
|---|---|
Key | The language-dependent key for which the template is valid |
Value | The value of the key. The value defines the information message generated on the device or on the app |
| State | Status notification about the template (is generated by the system) |
| Actions |
Template Description
Templates allow re-using information with content, which varies only in part. More precisely, during the web services method calls, the template stored in the text resources is referenced and the variable content is written in an ItemList and passed. A template contains text and formatted elements (items). An item consists of the following elements.
- Start sequence {
- Item name (var/res/pre/suf)
- Separator -
- Contents content of the template
- End sequence }
Item name | Description |
|---|---|
var | “var” defines the content of a key in the ItemList < SimpleEntryItem >. The ItemList is a list to be filled by the customer. If no entry is found in the list, an exception is thrown. If the value of “SimpleEntryItem” is “null”, the complete “var” item, in case it is surrounded by “pre” and “suf”, is ignored. |
res | The content of “res” is a resolving entry from the ResourceBundle. If no entry was found in the ResourceBundle, an exception is thrown. |
pre | A “pre” item can precede a “var” item. The content of the “pre-text” is displayed before the next “var”. This item is optional. |
suf | A “suf” item can follow a “var“ item. The content of the suffix text is displayed after the “var”. The item is optional. |
A template is validated at run time with the values that the client passes in a transaction. During the validation, the template is parsed, and the elements mentioned above are recognized. If one symbol of the item must be displayed in the text, this element is preceded with a hash as escape character #. To display var, pre and suf as text within the sequence { }, also use hash #. To display the hash # itself, it must be escaped with #.
Basic example:
The following template is included in the English text resources:
TextResourceKey(TemplateKey) -> Fund_Transfer_With_Title
TextResourceValue(TemplateValue) -> Hello {var-title} {var-name} {var-surname}. Do you want to transfer {var-amount} {var-currency} to {var-IBAN}, {var-BIC}?
An object is generated by the portal at run time (TransactionParam.java), with the following values, among others:
• deviceId=1; (or -1 in case the Security Server decides to which user’s device the transaction is sent)
• userId=Kazunori.Yamauchi; (or depending on how the customer stores his users)
• templateName=Fund_Transfer_With_Title;
• List<SimpleEntryItem> list = new List<SimpleEntryItem>();
- list.add(new SimpleEntryItem(title, Mr.));
- list.add(new SimpleEntryItem(name, Kazunori));
- list.add(new SimpleEntryItem(surname, Yamauchi));
- list.add(new SimpleEntryItem(amount, 1000));
- list.add(new SimpleEntryItem(currency, YEN));
- list.add(new SimpleEntryItem(IBAN, JP 03 1234 1234 1234 1234 56));
- list.add(new SimpleEntryItem(BIC, ABCDEFGH));
• entryItems=list;
The Security Server resolves the template as follows:
Hello Mr. Kazunori Yamauchi. Do you want to transfer 1000 YEN to JP 03 1234 1234 1234 1234 56, ABCDEFGH?
Advanced example, with RES(resource):
TextResourceKey(TemplateKey) -> Fund_Transfer_With_Title_RES
TextResourceValue(TemplateValue) -> Hello {var-title} >{var-name} {var-surname}. Do you want to transfer >{var-amount} {res-currency} to {var-IBAN}, {var-BIC}?
PLUS
TextResourceKey -> currency
TextResourceValue -> Japanese YEN
An object is generated by the portal at run time (TransactionParam.java), with the following values, among others:
• deviceId=1; (or -1 in case the Security Server decides to which user’s device the transaction is sent)
• userId=Kazunori.Yamauchi; (or depending on how the customer stores his users)
• templateName=Fund_Transfer_With_Title_RES;
• List<SimpleEntryItem> list = new List<SimpleEntryItem>();
- list.add(new SimpleEntryItem(title, Mr.));
- list.add(new SimpleEntryItem(name, Kazunori));
- list.add(new SimpleEntryItem(surname, Yamauchi));
- list.add(new SimpleEntryItem(amount, 1000));
- list.add(new SimpleEntryItem(IBAN, JP 03 1234 1234 1234 1234 56));
- list.add(new SimpleEntryItem(BIC, ABCDEFGH));
• entryItems=list;
In the list, no value for “currency” is specified, as this is marked with “{res-“. Consequently, the Security Server will search for it in the Text Resources. The text depends on the value and on the language (for example English “Japanese YEN”, German “Japanischer YEN”).
With this functionality, you can use the template in many variations.
The Security Server resolves the template as follows:
Hello Mr. Kazunori Yamauchi. Do you want to transfer 1000 Japanese YEN to JP 03 1234 1234 1234 1234 56, ABCDEFGH?
Advanced example, with PRE and SUF:
TextResourceKey(TemplateKey) -> Fund_Transfer_With_Title_PRE_SUF
TextResourceValue(TemplateValue) -> Hello {var-title} {var-name} {var-surname}. Do you want to transfer {var-amount} {res-currency} to {var-IBAN}, {var-BIC}? {pre-Thank you for using}{var-institute}{suf-. Have a great day.}
PLUS
TextResourceKey -> currency
TextResourceValue -> Japanese YEN
An object is generated by the portal at run time (TransactionParam.java), with the following values, among others:
• deviceId=1; (or -1 in case the Security Server decides to which user’s device the transaction is sent)
• userId=Kazunori.Yamauchi; (or depending on how the customer stores his users)
• templateName=Fund_Transfer_With_Title_RES;
• List<SimpleEntryItem> list = new List<SimpleEntryItem>();
- list.add(new SimpleEntryItem(title, Mr.));
- list.add(new SimpleEntryItem(name, Kazunori));
- list.add(new SimpleEntryItem(surname, Yamauchi));
- list.add(new SimpleEntryItem(amount, 1000));
- list.add(new SimpleEntryItem(IBAN, JP 03 1234 1234 1234 1234 56));
- list.add(new SimpleEntryItem(BIC, ABCDEFGH));
- list.add(new SimpleEntryItem(institute, null));
• entryItems=list;
The Security Server resolves the template as follows:
Hello Mr. Kazunori Yamauchi. Do you want to transfer 1000 Japanese YEN to JP 03 1234 1234 1234 1234 56, ABCDEFGH?
If the value of “institute” is set to null, the part of the template that contains the variable “institute” is not returned, if it is surrounded by “{pre- … {suf-“.
In case a value is added for “institute”:
• deviceId=1; (or -1 in case the Security Server decides to which user’s device the transaction is sent)
• userId=Kazunori.Yamauchi; (or depending on how the customer stores his users)
• templateName=Fund_Transfer_With_Title_RES;
• List<SimpleEntryItem> list = new List<SimpleEntryItem>();
- list.add(new SimpleEntryItem(title, Mr.));
- list.add(new SimpleEntryItem(name, Kazunori));
- list.add(new SimpleEntryItem(surname, Yamauchi));
- list.add(new SimpleEntryItem(amount, 1000));
- list.add(new SimpleEntryItem(IBAN, JP 03 1234 1234 1234 1234 56));
- list.add(new SimpleEntryItem(BIC, ABCDEFGH));
- list.add(new SimpleEntryItem(institute, All Nippon Bank));
• entryItems=list;
The Security Server resolves the {pre- … {suf- template and the following message is generated:
Hello Mr. Kazunori Yamauchi. Do you want to transfer 1000 Japanese YEN to JP 03 1234 1234 1234 1234 56, ABCDEFGH? Thank you for using All Nippon Bank. Have a great day.
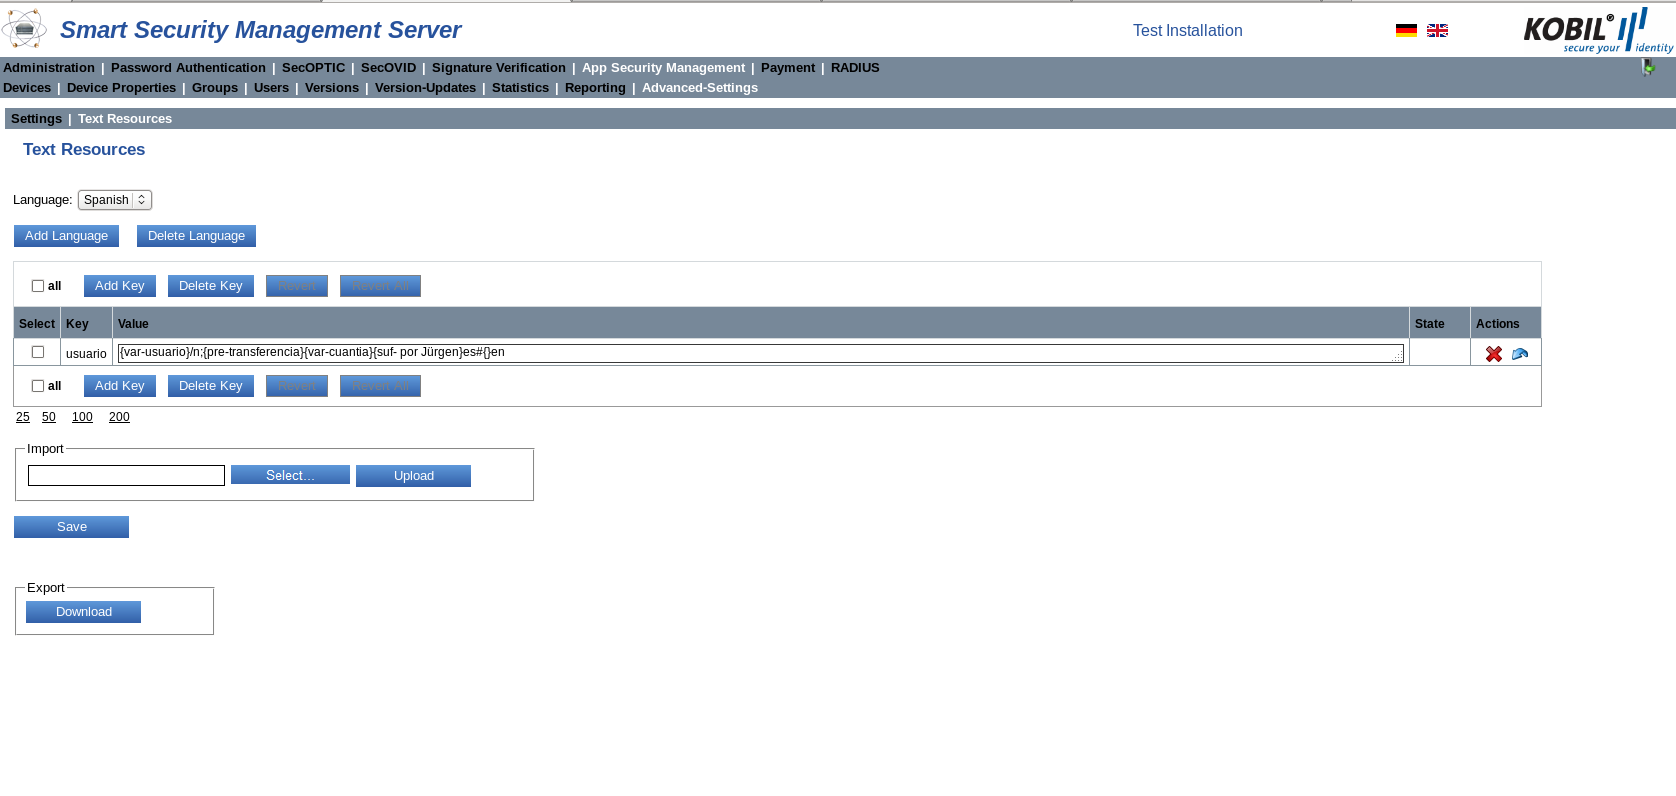
Add Language
You can add languages by clicking the button “Add language”. Default value is no language; consequently, all input values of the text resources are saved under the setting “Default”. After you chose the desired language, you can define the text resources with respect to it.
After clicking the button “Add language”, this window opens where you can choose the language from the drop-menu and click “Add”.

To save the languages, you must “Save” your settings in the text resources view.
Delete Language
To delete a previously added language, you can select the language and click “Delete Language”.
A dialog box pops up, in which you must confirm the deletion of the language.
⚠️ Please note that the removal of an entry cannot be reset
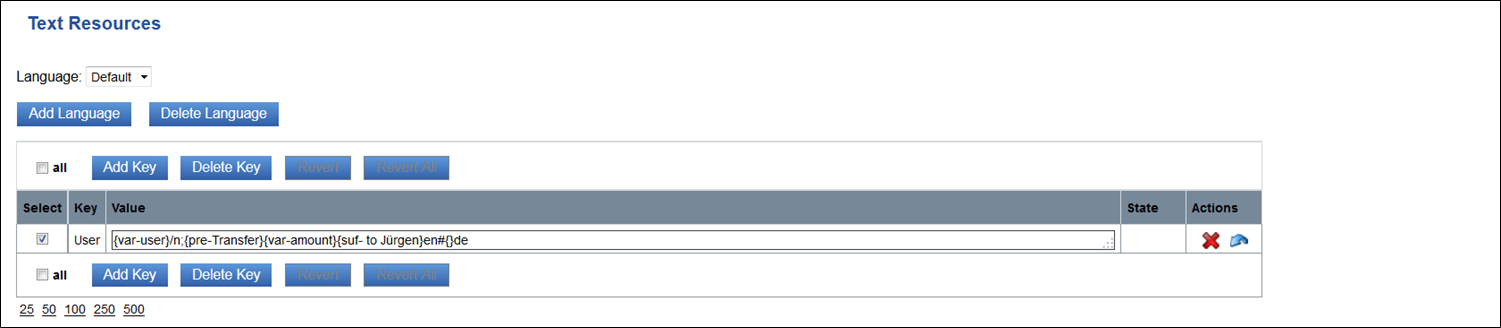
Add Key
Click the button “Add Key” to add language-specific entries for the language previously chosen, according to the templates described in here. To do this, select the respective language via the drop-down menu. If you have no added languages, the key will be added to the default language.
The following is the window for adding a new key:

Example:
Key: User
Value: {var-user}/n; {pre-Transfer}{var-amount}{suf- to Jürgen.}en#{}de
To confirm the input values, click “Save” in the general Text Resources view.
⚠️ During the creation of a key, the syntax of the value is not verified
Delete Key
To delete an already existing key, select the language of the key, check the box of the key and click the button “Delete key”. If you have no added languages, the key will be removed from the default language.
More precisely, carry out the following steps:
- Select the language or use Default
- Check box of the key

- Delete the key

- Save
To confirm the input values, click “Save” in the general Text Resources view.
You can also delete a key by clicking the red cross in the actions icon column and by saving the changes.
Revert/ Revert all
With the buttons “Revert” and “Revert all”, you can reset the changes that have not been saved on the server yet and bring the Text Resources to the original condition.
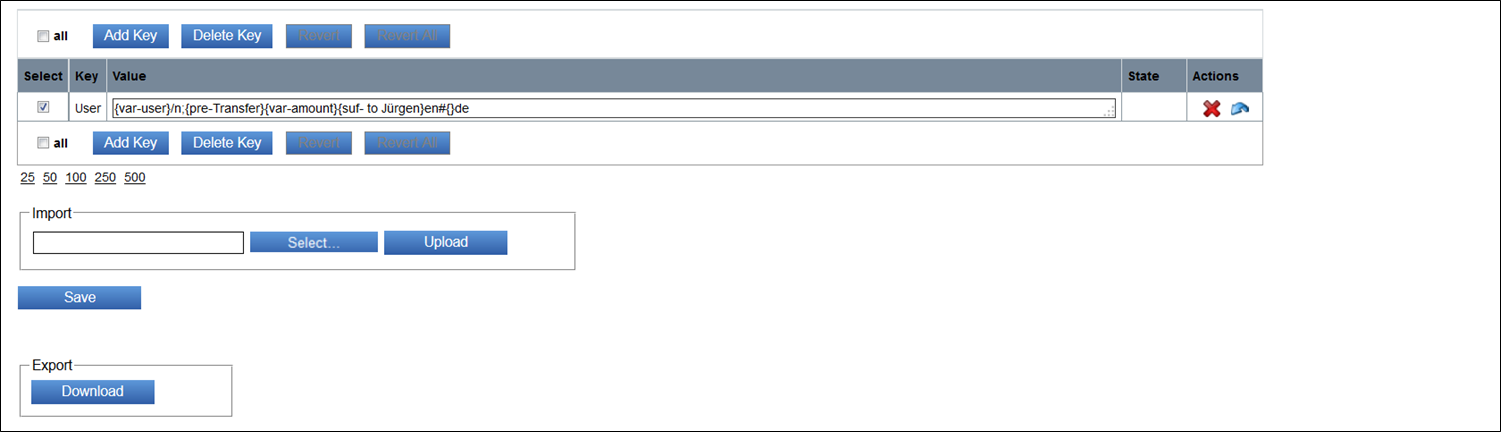
Import
In the area “Import“, you can simultaneously import many templates saved in a file.

After importing the templates from an external file, click “Save” to confirm the changes on the server.
⚠️ Please note that the encoding of the imported file must be UTF-8
Export
In the area “Export”, you can store templates saved on the server in an external file, by clicking “Download”.
Licenses of third-party Software
Security Server uses components of third parties and is obliged to make the license texts of these components available.
It is enough that these licenses are named in the accompanying documentation; they must not be available in the binary itself or in the GUI. KOBIL must inform you, as a customer, that these texts or the basic information about the licenses are named. In addition, take notice of the restrictions named in the KOBIL license.