Security Server GUI Views
Kernel Views
The Administration view contains a menu to access the functions for administrating the KOBIL Smart Security Management Server. The submenus of the Administration view are:
- Information
- Access Management
- Users
- Portal-Services
- License management
- Audit
- Monitoring
- IAM Settings
- Advanced-Settings
Information View
The information view informs you in detail about the system configuration. As shown in Figure 8, the view is divided into the two areas listed below. The number of the nodes in the first area can vary, depending on how many nodes (servers) you have configured.
- information
- Database information
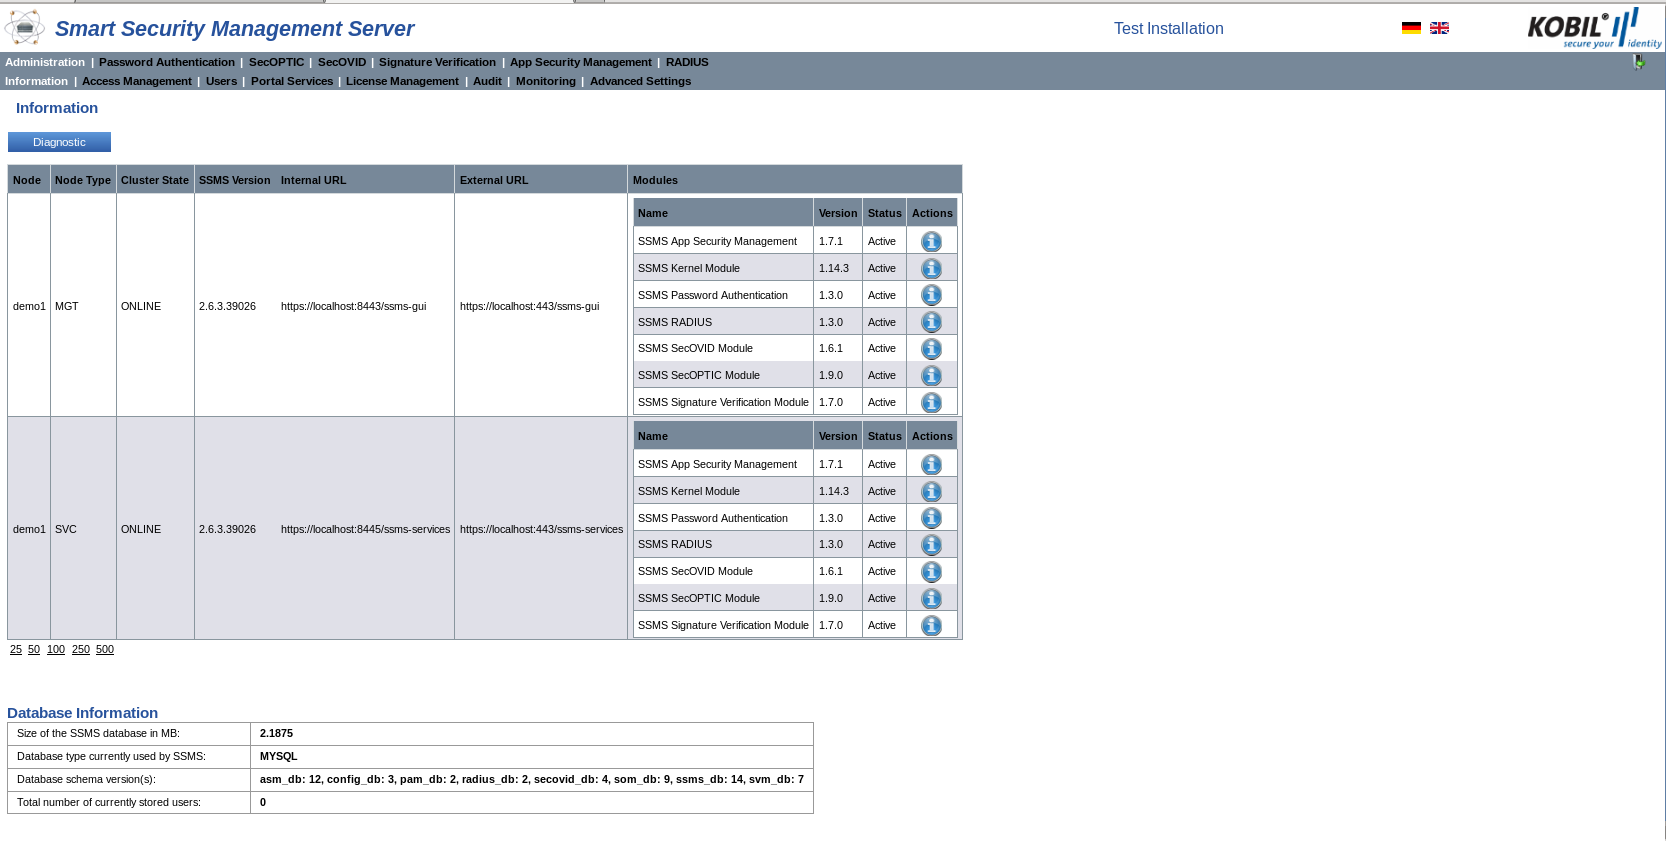
The following table explains the descriptions contained in the two areas.
Node | Name of the installed node. | |
|---|---|---|
Node Type | Node type: Management (MGT) or Services (SVC). | |
Cluster State | Current status of the node. If the node is active, the status is ONLINE; if the node is inactive, the status is OFFLINE. | |
Security Server Version | Version of the installed Security Server. | |
Internal URL | The internal URL under which the node can be reached. | |
External URL | The external URL under which the node can be reached. | |
Modules | Name | The exact module description. |
Version | Version number of the module. | |
Status | Current status of the module. | |
| Actions | By clicking on the icon the detailed system properties are displayed |
Detailed module properties are displayed as follows:
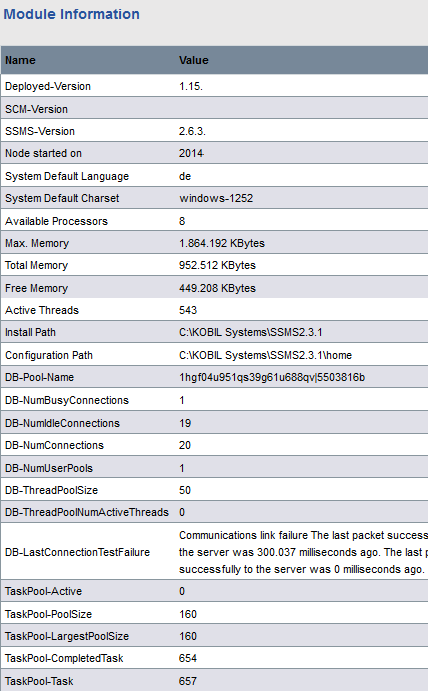
Module information
Name | Value |
|---|---|
Deployed-Version | Module version |
SCM Version | Revision number |
Security Server-Version | Security Server version |
Node started on | Date on which the node was started |
System Default Language | Information about the operating system: system settings for language |
System Default Charset | Information about the operating system: system settings for charset |
System Time | Current timestamp when the information about the node was created |
Available Processors | Information about the machine: number of processors |
Max. Memory | Size of the maximum available memory for the application |
Total Memory | Size of the memory reserved for the application |
Free Memory | Size of the reserved memory currently used by the application |
Active Threads | Number of the currently active threads |
Install Path | Path to the installation directory |
Configuration Path | Path to the home directory |
DB-Pool-Name | Name of the database connection pool |
DB-NumBusyConnections | Number of busy connection in the pool |
DB-NumConnections | Number of connection in the pool |
DB-NumIdleConnections | Number of all idle connections in the pool |
DB-NumUserPools | Number of users in the pool |
DB-ThreadPoolSize | Number of threads in the pool |
DB-ThreadPoolNumActiveThreads | Number of active threads in the pool |
DB-LastConnectionTestFailure | Error message of the last failed database connection. Please note that the server might still be working despite the error message. |
TaskPool-Active | Active number of tasks that currently run in the background. |
TaskPool-PoolSize | Number of tasks in the pool. |
TaskPool-LargestPoolSize | Maximum number of tasks running simultaneously observed at some point in time. |
TaskPool-CompletedTask | Tasks completed during the whole uptime of the server. |
TaskPool-Task | Number of tasks running since the node start-up. |
TaskPool-Task | Number of tasks running since the node start-up. |
Database information:
Size of the Security Server database in MB | Size of the Security Server database. |
|---|---|
Database type currently used by Security Server | Database type (e.g. MSSQL, MySQL or Oracle). |
Database schema version(s) | Schema version of the database for every module. |
Total number of currently stored users | Number of users added to the database. |
Diagnostic
Via a diagnostic feature in the information view, you can receive additional information about the Security Server. In particular, by clicking the button “Diagnostic”, a dialog box appears where you can choose the date when you want to generate a diagnostics file, which is per default the current date. After clicking “Create Diagnostics” a .zip file is created containing the Security Server log file, the settings of every module and database information.
Every time that you create a diagnostic file, you receive information about the time in which the last diagnostic file was created.
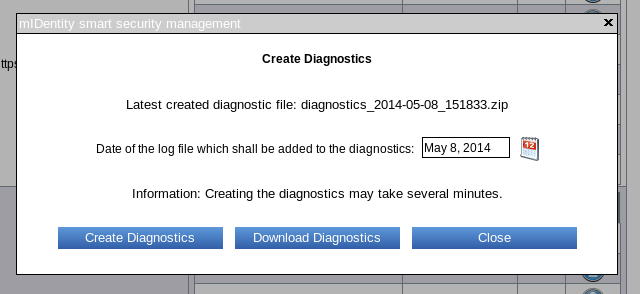
After receiving successful confirmation of the creation of a diagnostic file, you can download and unzip it. The following information is generated:
- Log files of every node
- The configured advanced settings of every module
- Database type and size as well information about the module versions in the database
- Configurations of the Security Server connections
- Installed and deployed modules
- Radius trace file (in case Radius is used)
- Tomcat trace file
Access Management View
The Access Management view is divided into three submenus:
- Operator Management
- Role Management
- Role-Permissions
These menus stand for creating certificates for Security Server operators, giving operators roles and granting specific permissions to roles respectively.
Operator Management
In the Operator Management view, you can create certificates for all the operators of the Security Server. The certificates assigned to the operators define their roles. They are listed in tabular form in the Operator Management view.
After the installation, the certificate for the role Super Administrator is listed in the table. This certificate allows producing other certificates assigned to operators.
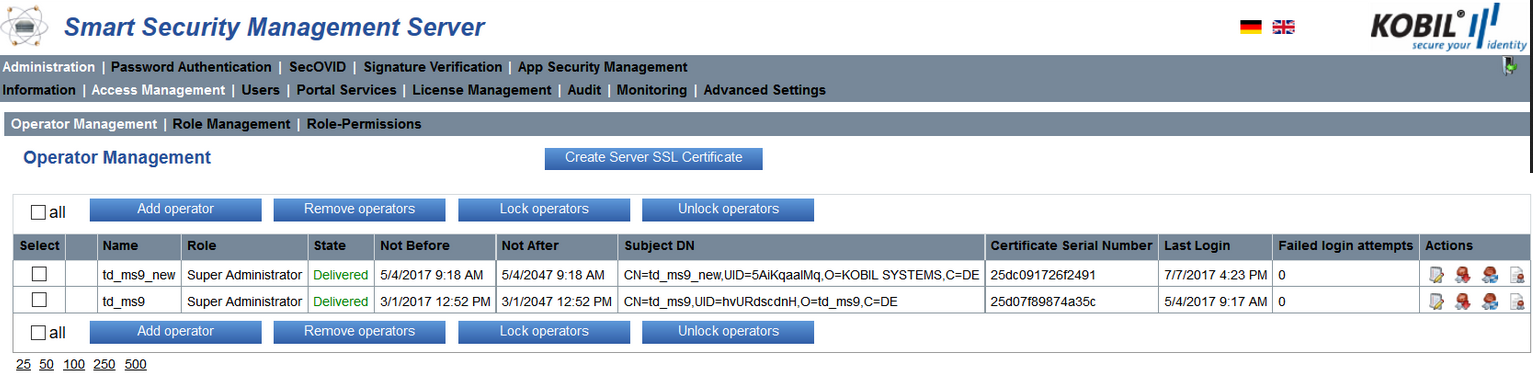
The table with the certificates contains the following information.
Select | Put a checkmark to select one or multiple entries. |
|---|---|
Name | Operator name as contained in the Subject DN. |
Role | The role of the certificate. |
State | The status is “Produced” after clicking the button “Generate certificate” and “Delivered” after clicking the “Download” action icon. |
Not Before | The date since the certificate can be used |
Not After | The date until the certificate can be used |
Subject DN | Unique name of the certificate. |
Certificate Serial Number | Unique serial number of the certificate. |
Last Login | When an operator logs in to Security Server, login time is stored and displayed here. |
Failed login attempts | Number of failed login attempts since last successful login. The counter will be only increased if the login fails due to an error that is in the technical scope of Security Server, i.e. operator is blocked, or operator has no role assigned. Errors during SSL connection establishment are not counted. Maximum possible value: 32767. Default value: 0 |
| Actions |
In addition to the actions in the table, you can also manage the operators by means of the buttons above the table. In particular, you can remove, lock or unlock the operators by selecting one or multiple operators in the left-most column and by clicking the action button.
Add Operator
In order to produce certificates assigned to operators click “Add Operator” on the top left of the page. In the window that pops up, you enter the operator name, his e-mail and the role assigned to the operator. In addition, you must generate a password for the certificate and enter your CA (Certificate Authority) password.
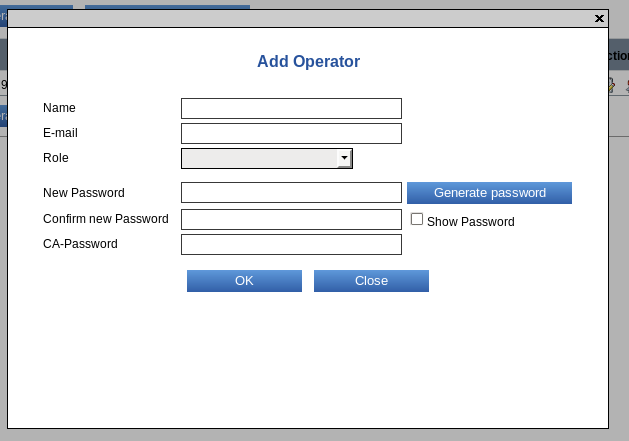
The certificate is generated and has the status “Produced”. Via the action button, you can download the certificate and transfer it to the operator.
⚠️ The certificate status “Delivered” does not mean that the operator has received the certificate. This must still be additionally delivered to the respective operator
⚠️ For security reasons, send the password and the certificate separated from each other
Remove, lock and unlock Operator
In the view Operator Management, you also have the possibility to remove, lock and unlock operators. You achieve this by selecting an operator or all the operators in the left-most column “Select” and by clicking the corresponding button.
Create Server SSL Certificate
By clicking on the button „Create Server SSL Certificate“, you have the possibility to create an X.509 certificate for the purpose of SSL server authentication.
A dialog will pop up where you can upload the certificate signing request, initiate the certificate creation, and download your created certificate.
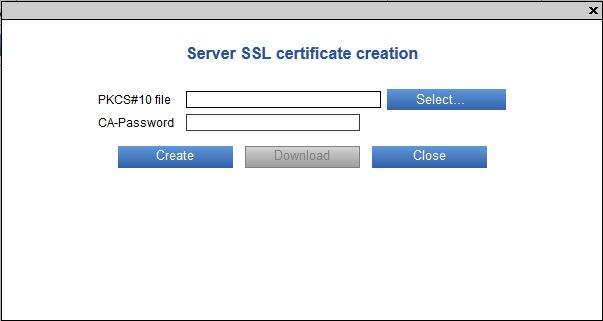
Certificates are issued by the Security Server CA using the signing algorithm "SHA256-RSA". The certificate request must be uploaded as a PKCS#10-file within the dialog from the local directory. From the request file, the name of the applicant (field subject) and the public key (field subjectPublicKey) are used as input for the certificate creation. The name of the applicant is also taken as the value for the X.509 "Subject Alternative Name" extension of type "DNS Name" or "IP Address" accordingly chosen to the syntax of that name. The supported encoding formats of the PKCS#10-file are DER, PEM and Base64.
Role Management
The Role Management view lists the system roles available directly after the Security Server installation and the roles that you add by yourself.
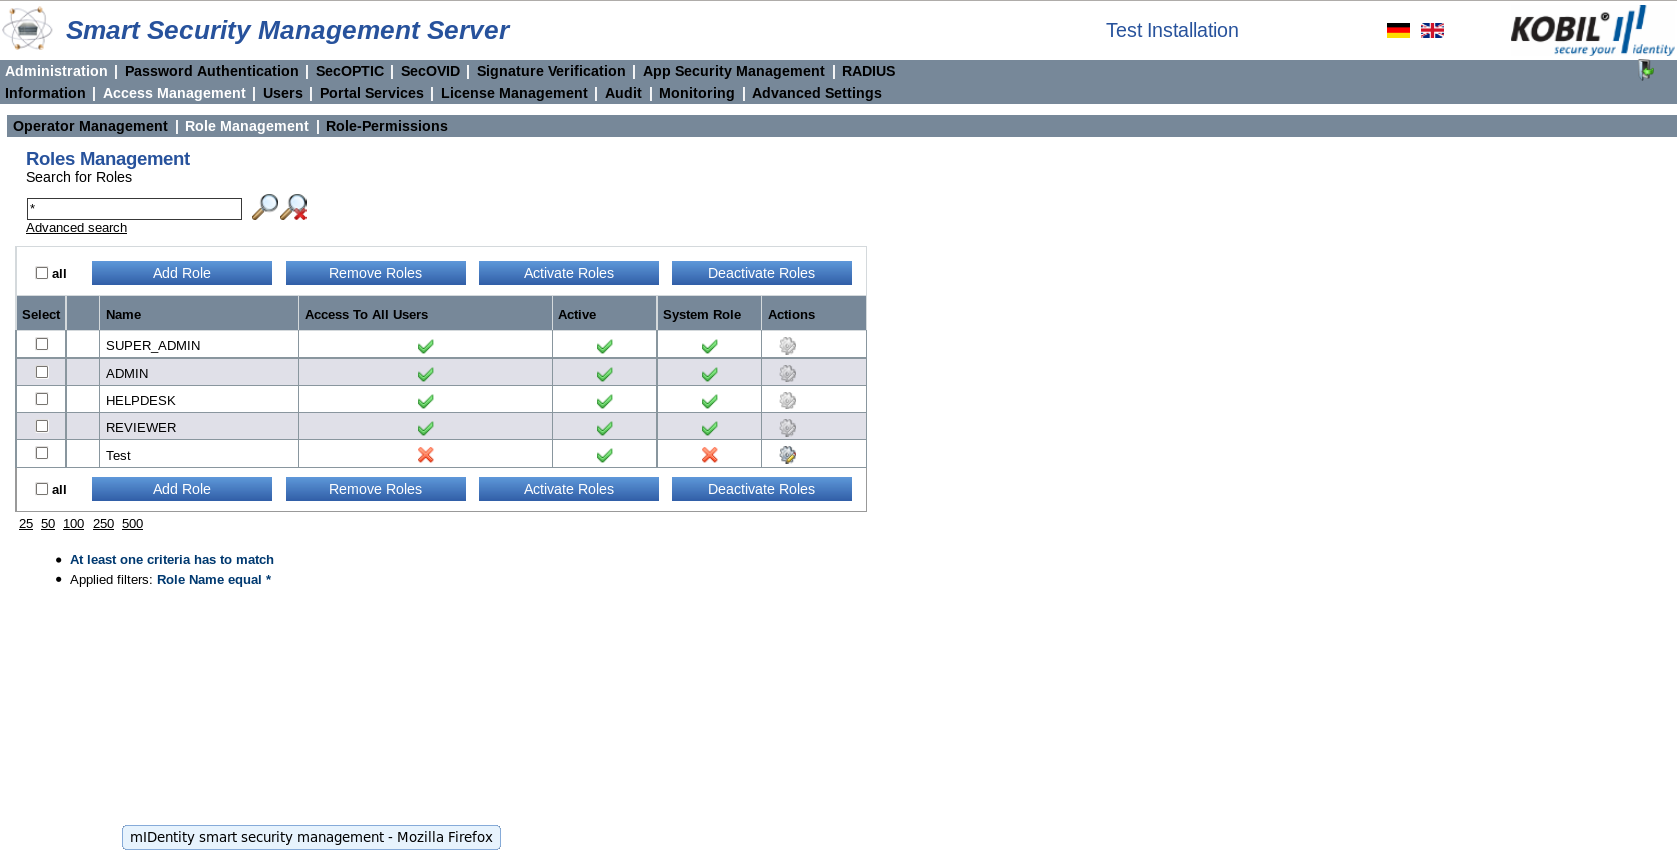
The roles table contains the following information:
| Select | Put a checkmark to select one or multiple entries. |
|---|---|
| Name | Role name. |
| Access To All Users | Defines whether the role has access ✔️ or ❌ not to all users. |
| Active | Defines whether the role is active ✔️ or not ❌. |
| System Role | Defines whether the role is a system role ✔️ or not ❌. |
| Actions |
In addition to the action in the table, you can also manage roles by means of the buttons above the table.
Add Role
In particular, you can add other roles than the roles assigned by the system by clicking the button “Add Role”. In the window that pops up, you can enter a name for the new role, define whether the role has access to all users and select the already existing role that has similar permissions to the new role.
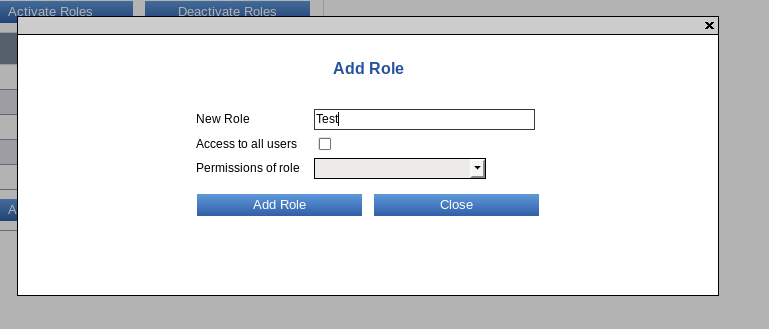
The newly created role can be assigned to an operator as described in here.
Remove Roles
In addition, you can remove already added roles by selecting one or multiple roles in the most-left column and by clicking the button “Remove Roles”. Please note that you are only allowed to remove roles with specific features: different roles than the role assigned to you or to another operator, non-system roles and roles that have no permissions assigned. If you try to remove prohibited roles, a red cross appears on the left of the role name and an error message appears above the table.
Activate and deactivate Roles
When you add a role, it is automatically active, so you need the option “Activate Roles” only in case you deactivated a role beforehand. You can deactivate roles by selecting one or multiple roles in the most-left column and by clicking the button “Deactivate Roles”. Please note that you are not allowed to deactivate the role assigned to you or to another operator.
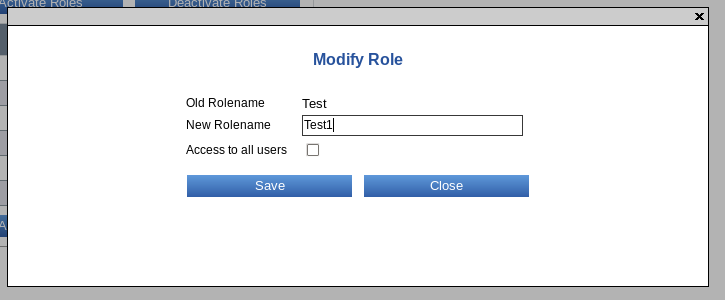
Modify Role
You can modify the role by clicking ![]() . In particular, you can change the role name and the permission to access all users.
. In particular, you can change the role name and the permission to access all users.
Role-Permissions
You can view the system roles and the roles that you created in the view “Role Management” with their permissions in the view “Role-Permissions”.
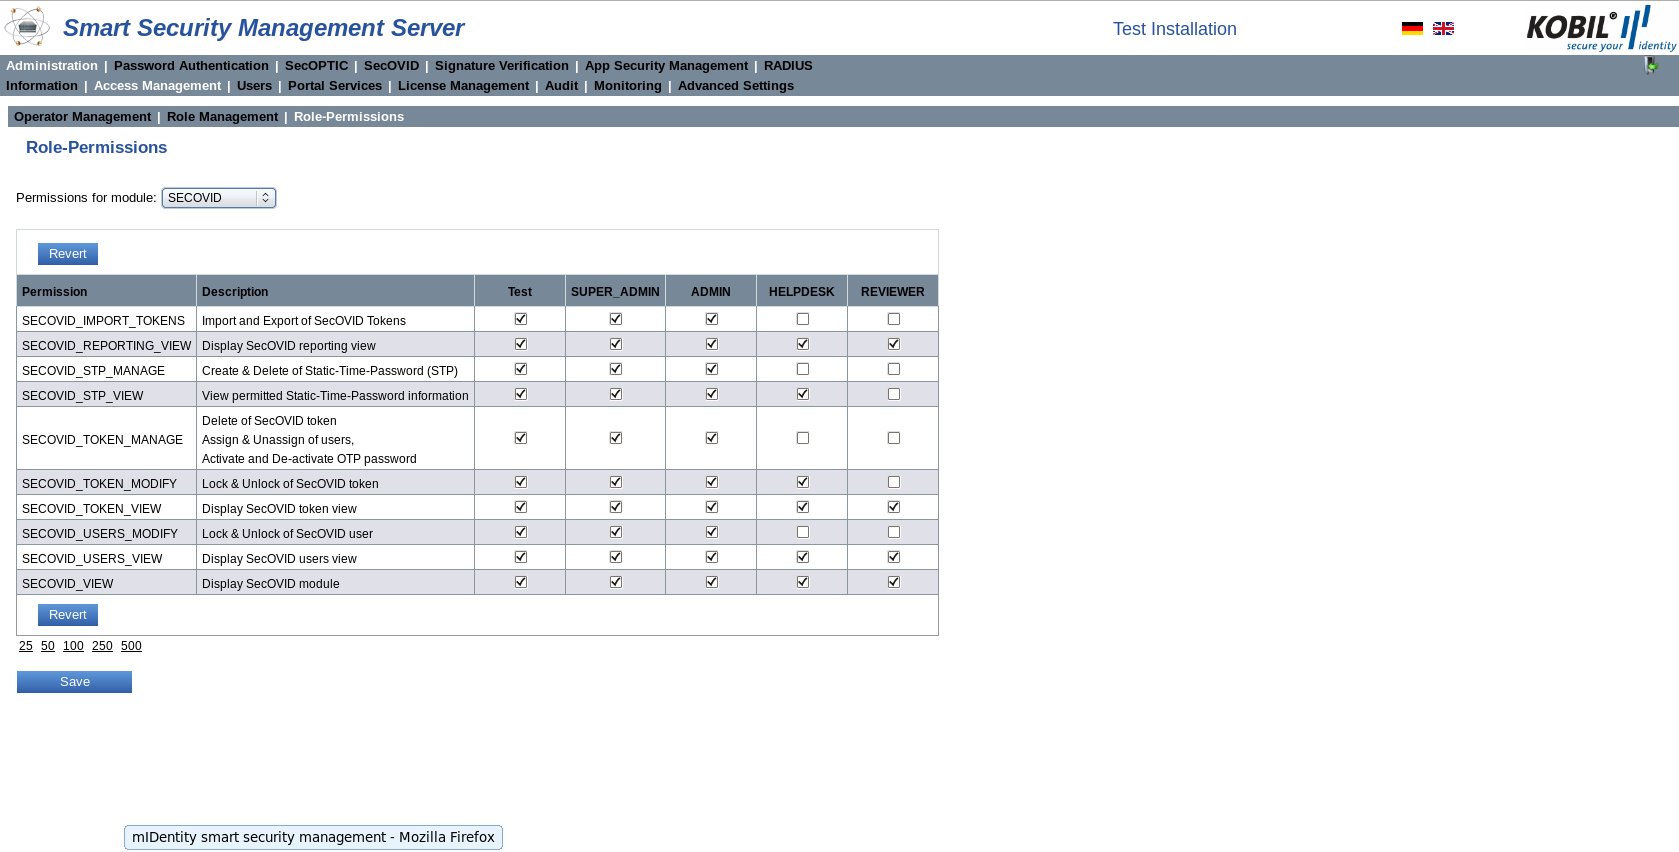
In this view, you can change both the permissions of the system role and of the roles you created. You can select “All Modules” from the dropdown list on the top or select a module in order to show only the permissions of that module. To change the permissions, check or uncheck the boxes relating to the role and the permissions.
To make your changes effective, you must confirm them by clicking on the “Save” button at the bottom of the page. If you refresh the page or click on the “Revert” button before saving the changes, the changes will be lost.
Roles and permissions are also needed for the management of the SOAP interface. You can find a description of the single methods in the single administrator manuals. The services SOAP interface is secured by a SSL authentication and does not require any further user authentication.
Users View
The Kernel Users view shows all the users of the Security Server in tabular form.
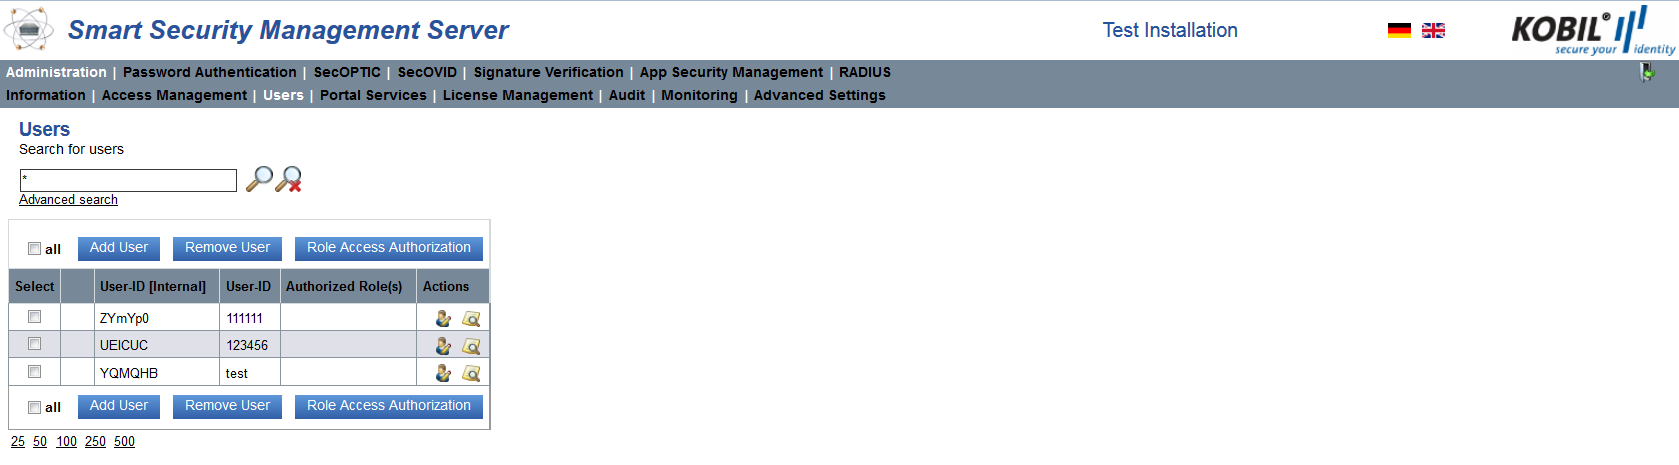
The following table lists the information contained in the view.
Select | Put a checkmark to select one or multiple entries. |
|---|---|
User-ID[Internal] | User unique name (visible only on Security Server). |
User-ID | User unique name. |
Authorized Role(s) | The roles which can manage the user. Please note that the system roles have access to all users. |
| Actions | |
Add User
You can a user to the Kernel module by clicking on the button “Add User” and entering the unique username.

Please note that the maximal size of the user ID is 64 bytes, which does not always correspond to 64 characters. In case of UTF-8:
- a-z, A-Z, 0-9 are 1 byte
- Turkish, Cyrillic, special characters are 2 bytes
- Arabic, Asian languages 3 bytes
Therefore, according to the character type, 64, 32 or 21 characters can be used for a user.
Remove User
You can remove one or multiple users by making one or multiple selections on the left-most column and clicking the “Remove User” button.
Role Access Authorization
You can decide which role or roles have the permission to one or multiple users by making one or multiple selections on the left-most column and clicking the button “Role Access Authorization”. A window pops up where the User-ID is shown and where you can select which role or roles have access to that user. The name of the role shows up in the column Authorized Role(s).
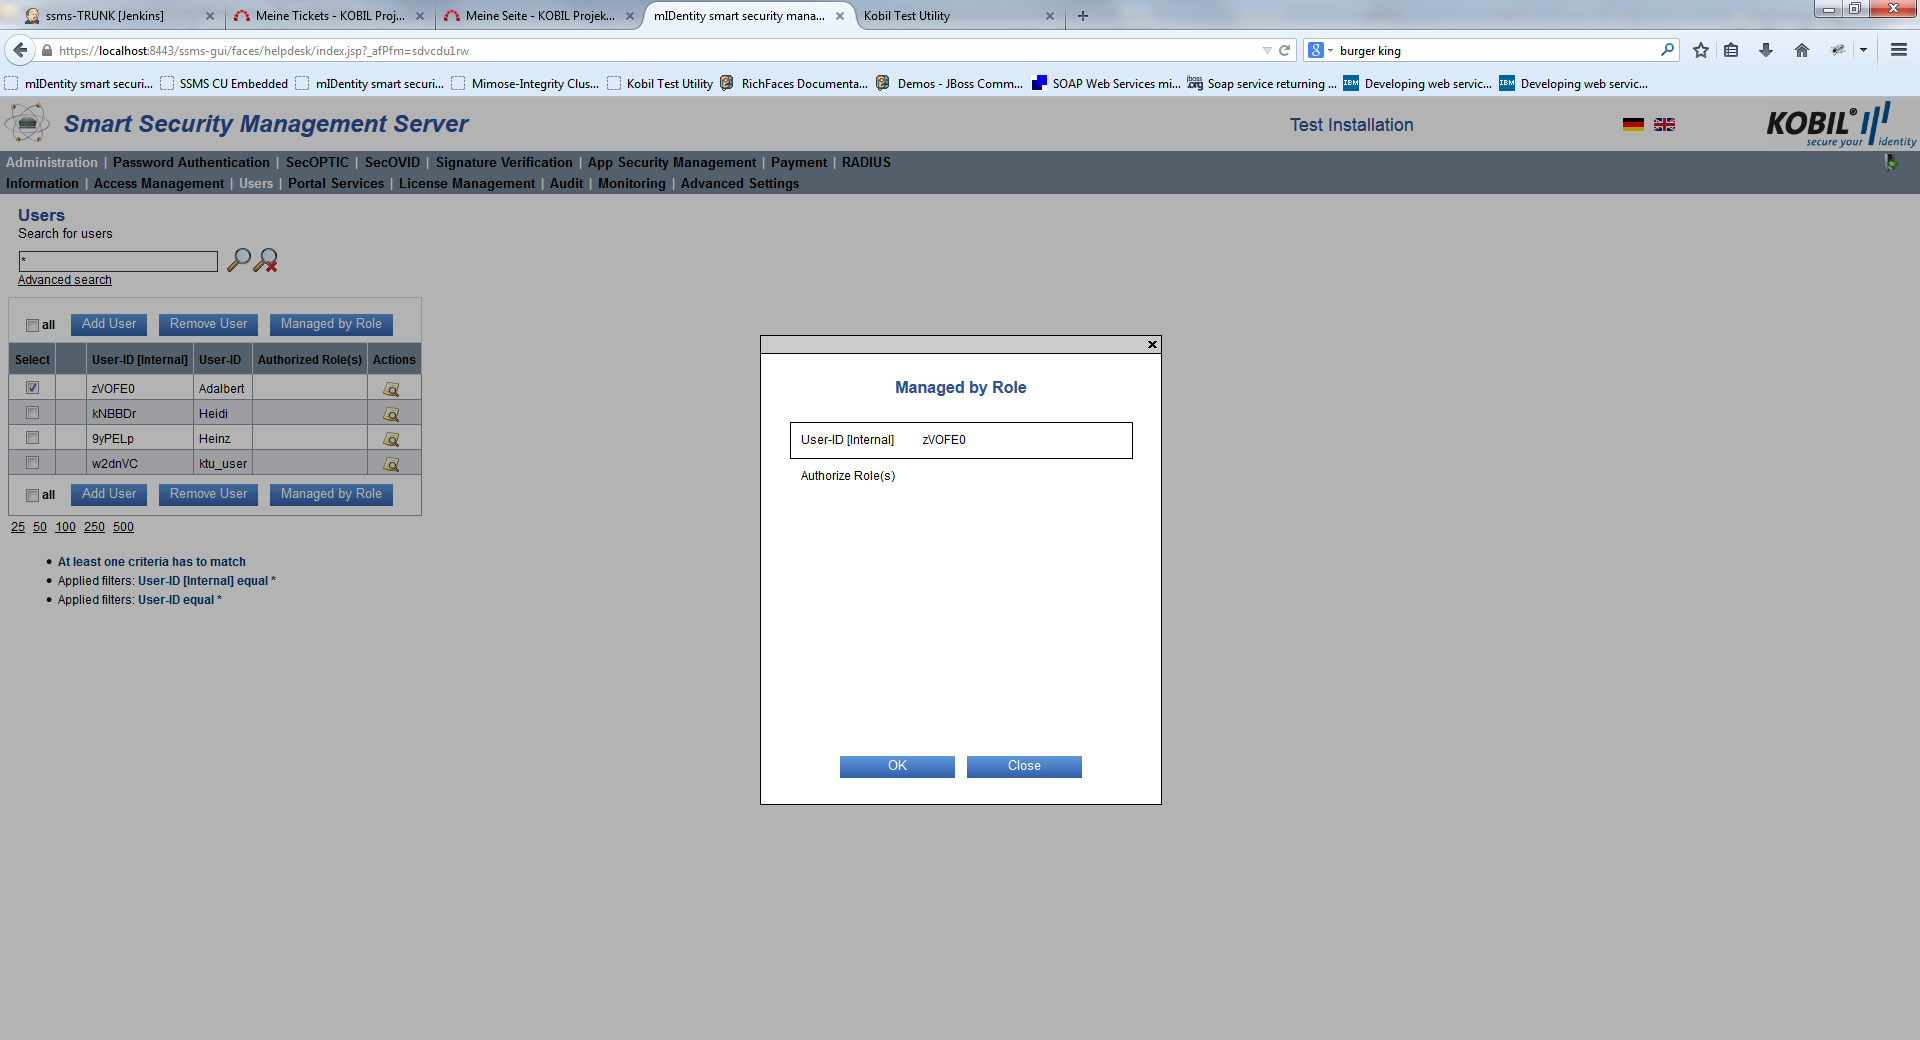
Please press “OK” in order to save your changes.
Portal Services View
The function of the Portal-Services is to manage the portals that communicate with the Security Server via the SOAP interface. In case many portals are active, the Security Server must be able to identify the single portals. This authentication is accomplished by HTTP BASIC Authentication (RFC 2617). More precisely, the Portal ID functions as UserName and the portal password (SharedSecret) functions as password. As the communication with the SOAP interface is SSL-based, the UserName and the Password are protected against unauthorized access.
Authentication is required for SSMS 3.*
Due to the multi-tenancy as part of the standard SSMS functionality the Authentication is always required. The tenant-context as part of the portal service authentication is used by SSMS processing then. If no tenant-context is set (when only portal name is set) the default tenant context is used (see tenant list).
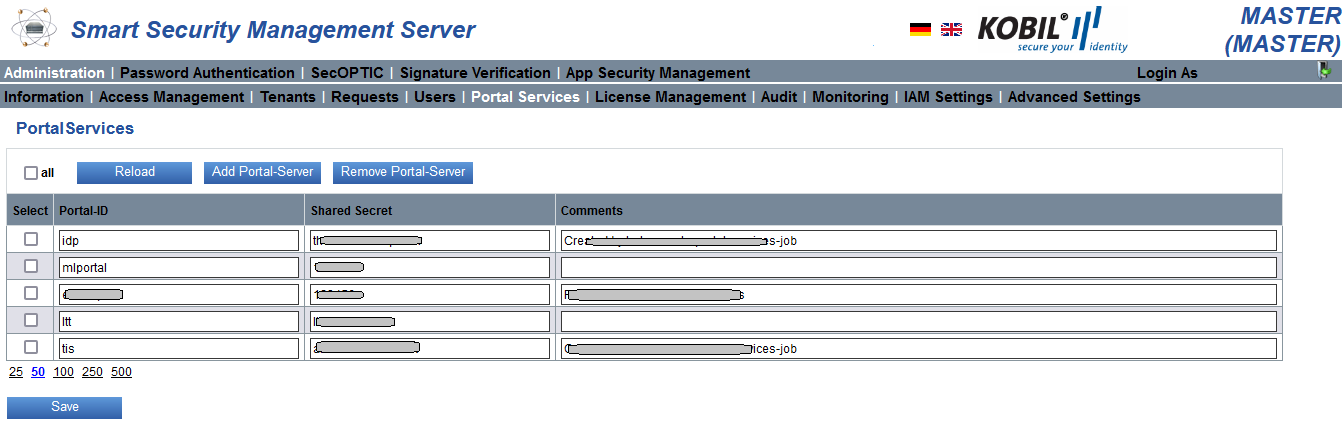
Add Portal-Server
You can add a portal by clicking “Add Portal-Server”. The number of portals you can add depends on the kernel license restriction indicated by the name maxPortals (check this topic). If the restriction maxPortal is not specified, only one portal can be connected to the Security Server.
You can add the information contained in the following table:
Portal-ID | Name of the Portal-Server to be connected |
|---|---|
Password | Password of the Portal-Server to be connected |
Comments | Input field for additional information about the portal (optional) |
Be careful when portal IDs are used these must be unique for each portal.
After you added one or multiple portals, remember to click “Save” in order to make your changes effective.
Remove Portal-Server
You can remove portals by selecting the appropriate checkboxes on the left and by clicking “Remove Portal-Server”.
License Management View
The KOBIL Security Server has a license system for the entire product portfolio. The license file defines how long you are authorized to use the licenses for the modules installed. During this time period, you can use a certain number of devices or tokens. The license file also defines, according to the license scope, which access rights you have to the different modules. If the license has expired, you have restricted access to the system. You receive an error message and the service will not work anymore. The data stored in the database remain preserved.
The license upload into the system is reserved to the role of the super administrator.
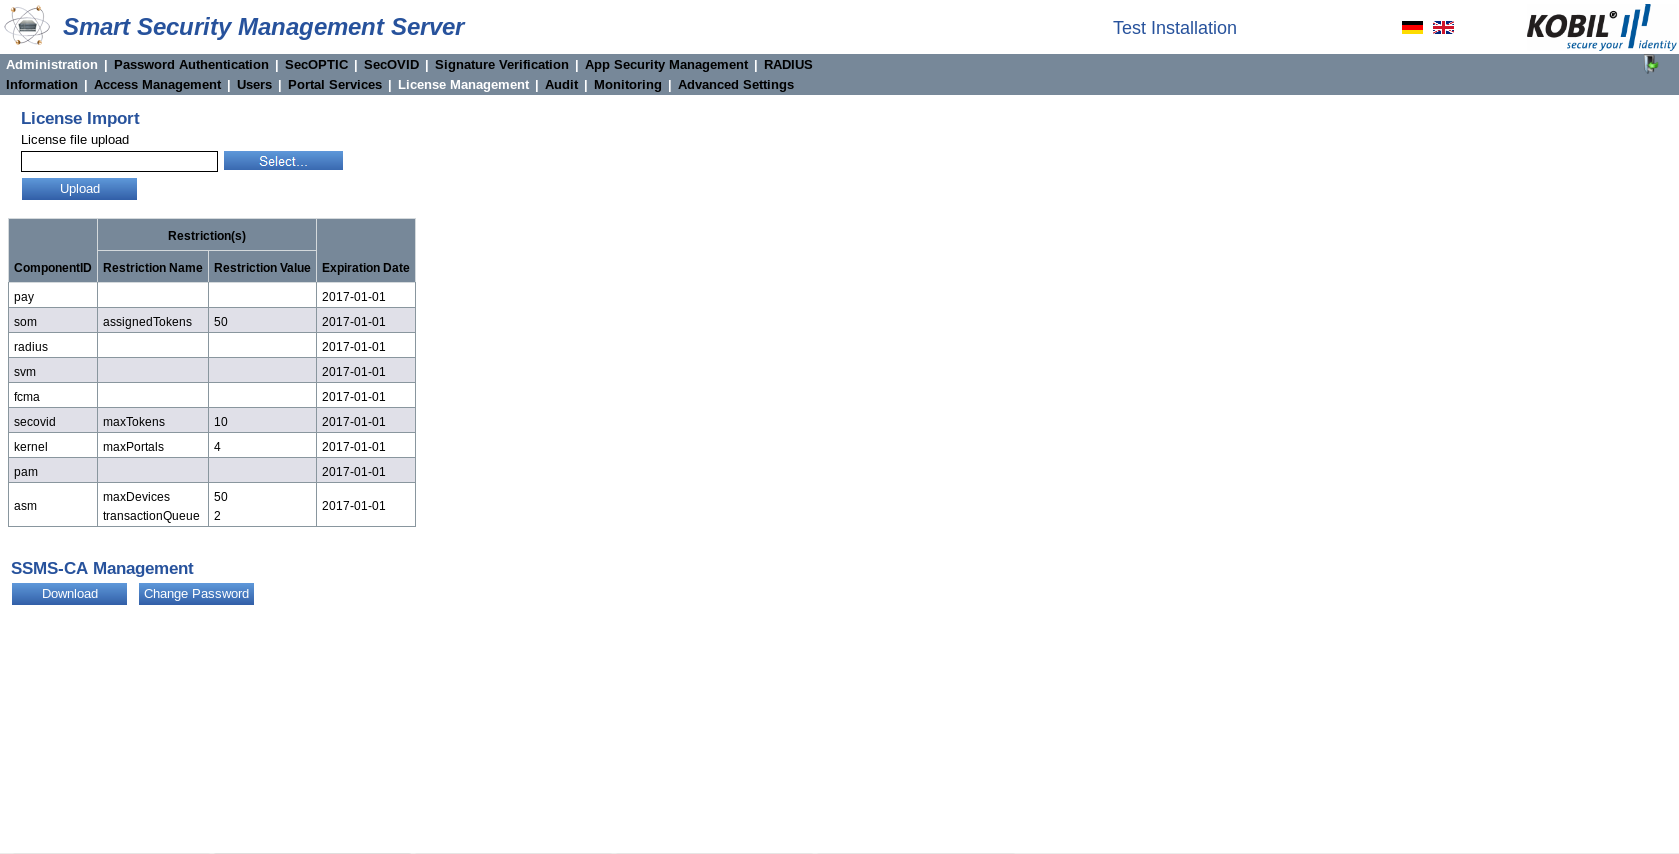
Along with the expiration date of the license, some modules have additional restrictions. For example, the module SOM has a maximum number of tokens that can be assigned. When the number is reached, the operator receives the error message that no tokens can be added. To make full use of the license, you can delete unused tokens from the database and add others until you reach the limit defined by the license.
A license change can be requested at KOBIL. The license file is sent by KOBIL in XML format contains the module-specific restrictions. It must be then imported in the License import GUI.
Download the Security Server-CA Certificate
You can download the certificate via the button „Download“. This certificate is needed during the order process of a new license.
Change the CA Certificate Password
You can change the Security Server CA certificate password via the button „Change Password“. Please enter the old as well as the new password into the input field and confirm via the button “OK”.

Audit View
In the Audit view all administrative actions that an operator successfully completed on the Security Server via GUI or SOAP are recorded. The actions recorded and shown in this view concern all Security Server modules.
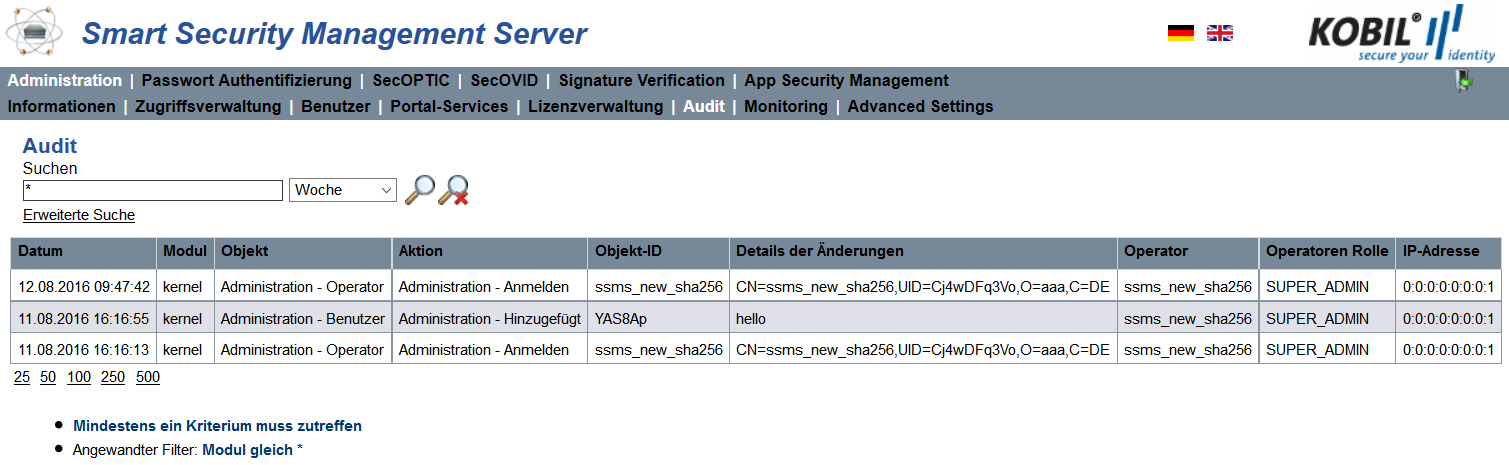
The following table gives information is available about the management actions:
Date | Date and time of the action. |
|---|---|
Module | Module in which the operator carried out the action. |
Object | Area of the module where the action was carried out. |
Action | Description of the action carried out. |
Object-ID | ID of action. The ID is not part of sensitive information; no PINs or passwords are stored. |
Details about Changes | Detailed information about the action. |
Operator | Name of the operator, who carried out the action. |
Operator role | Role of the operator. |
IP-Address | Security Server checks first the following headers in given priority: Request Headers with Priorities 1) X-Forwarded-For 2) Proxy-Client-IP 3) WL-Proxy-Client-IP 4) HTTP_X_FORWARDED_FOR 5) HTTP_X_FORWARDED 6) HTTP_X_CLUSTER_CLIENT_IP 7) HTTP_CLIENT_IP 8) HTTP_FORWARDED_FOR 9) HTTP_FORWARDED 10) HTTP_VIA 11) REMOTE_ADDR If any of the header has IP-Address assigned, it takes the value of the header and store it. |
You can search for specific actions filtering the results according to the information in the table above. You can search for example by object-ID, module name etc. Please find additional information about the search in here.
Monitoring View
The monitoring view offers the Security Server operator an overview about important server information. The information is displayed for one node, MGT or SVC, or for both nodes. You can decide which node to show in the monitoring by choosing one or both in the drop-down list on the top left of the GUI. In addition, you can choose to show the results of a specific time period: unlimited, but also of the last day, week, month or year.
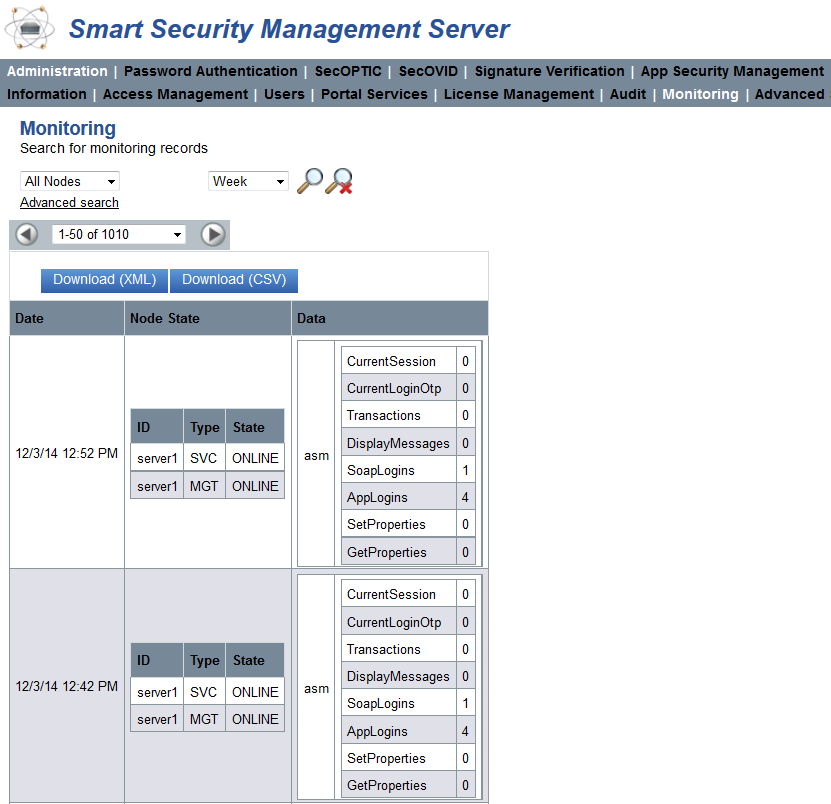
The following table lists the information showed in the view:
| Date | Date and time when the monitoring information was created. You can set the time interval in the Kernel Advanced Settings (check). | |
|---|---|---|
| Node State | ID | Unique name of the node |
| Type | MGT, SVC or both | |
| state | The node(s) can have the states ONLINE and OFFLINE. When the node is offline, no information from the database can be delivered. | |
| Data | Information about the node. Please find more information in here |
When searching within the monitoring, please note that when selecting, only entries for aggregated properties that apply to all nodes are displayed. The Count search cannot be performed on all nodes, but only applied to one node at a time.
Download Monitoring Information
Monitoring information can be downloaded in CSV or in XML format via the button „Download“.
Advanced-Settings View
The Advanced Settings view can only be accessed by the Super Administrator and the Administrator. The other Security Server operators (roles) have no access to this view.
This chapter explains the advanced settings and the configuration possibilities of the KOBIL Security Server. The values in the table are default values:
Description of the Settings
Log Level | Setting of the log mode (WARN, INFO, DEBUG and TRACE). Loggers forward ERROR, WARNING and INFO logs to the chosen logging system. Default value is INFO. |
|---|---|
Rows Per Page | The maximum number of rows per page. Default value is 25. |
Table Maximum Length | The maximum number of table rows that are loaded simultaneously. Default value is 4000. |
Additional Loggers | With this option, you can specify additional loggers. |
Server Time Zone | Information about the currently used date and time format. If you leave the field empty, the Security Server use the system default settings. |
Cluster Registration Port | The port at which to register the cluster node on the management node. If the configured port is already occupied by another application, Security Server will try to open the next higher port number. Default port is 12001. |
Cluster Communication Port | The port range for the communication of the cluster nodes. Default start value is 7600 until 7610. |
Cluster Name | The Cluster Name for all the nodes. Default value is „KOBIL_SSMS_CLUSTER“. |
Cluster Response Timeout | Timeout setting in milliseconds for the response of the cluster. Default value is 5000. |
Cluster Startup Retry Delay | After a cluster communication is failed, the next start-up retry will be delayed by this time given in seconds. Default value is 120. |
Allow to change User ID | Possibility to change user ID if setting is checked. Default value is unchecked. |
Maximum Users in Auto Group | The maximum number of users in an auto group. Default value is 5000. |
Http Proxy Host | The host name of your http proxy in case you use a http proxy. Default value is empty. |
Http Proxy Port | The port of your http proxy in case you use a http proxy. |
Http Non Proxy Hosts | Access to matching IP addresses or host names defined in this setting will bypass a configured http proxy for https and http protocol. The default value is "localhost|127.|[::1]". You can use "" as a wildcard for parts of the IP address or host name. |
Rest Session Default Timeout | The inactivity timeout of a REST session in seconds. An inactive REST session expires after this time. Default value is 300. |
Monitoring Statistic Interval | Time interval in minutes for the creation of monitoring files in the database. The value 0 deactivates the monitoring function. Default value is 1. |
Monitoring History | Hours that the monitoring records should be kept in the database. Default value is 168 hours. |
Diagnostics Max File Size | Maximum file size when creating diagnostics (in MB). If a file is larger than this value, it will be truncated. Default value is 250MB. |
Special Variables | Special parameters to fill in only if advised to do so by KOBIL. |
Banner Text | Title displayed in the page header |
Banner Color | Color of the text in the page header |
Username For RESTServices | Basic-Authentication credentials for REST-Services. Default value is empty. |
Password For RESTServices | Basic-Authentication credentials for REST-Services. Default value is empty. |
Enable Operator Credential Authentification | Operator can login to SSMS-GUI or call SOAP-MGT-methods with operator name and password (HttpBasicAuthentication). Default value is checked. |
Enable SSL Session Verification | During login to SSMS-GUI or for a SOAP-MGT-call Security Server validates the SSL session ID in addition to the ID of the current HTTP session. Default value is unchecked. |
Client Inactivity Timeout | The inactivity time out for management GUI client users defined in seconds. The management GUI client user will be logged off automatically after this time of inactivity in the GUI. The session expired page will be displayed. The user needs to authenticate himself again to re-enter the management GUI. Default: 15 minutes (900 seconds) Minimum: 60 seconds, Maximum: 5400 seconds |
SOAP Session Inactivity Timeout | The SOAP session (management only) will be automatically discarded after this inactivity timeout (in minutes). Default value is 10 minutes. |
Audit Filter | Filter for audit actions (separated by |) that shall be ignored (means: those actions are not stored in database). Format: 'ACTION|ACTION|...'. Example: 'SSMSLOGIN|SSMSLOGIN_SOAP'. Default value is empty. Note: If the format of an action is invalid or the action is unknown actions will be ignored. |
Urls Address Book Servers | Comma-separated list (maximum 2 entries!) of URLs to address book servers. For example, 'http://server:1234/rest/v1/' |
Address Book Eco Identifier | The Eco Identifier is part of the URL of an Address Book server and is required to access certain methods of the Address Book server. If nothing is defined, the node ID of the Security Server is used. |
Address Book User Name | The username for Basic authentication of Address Book server. |
Address Book Password | The password for Basic authentication of Address Book server. |
Address Book Timeout Connect | Period in seconds, how long the Security Server waits until a connection to the Address Book server can be established. 0 means unlimited. |
Address Book Timeout Read | Period in seconds, how long the Security Server waits for a response from the Address Book server. 0 means unlimited. |
Address Book Certificate Ignore | If this parameter is enabled, the certificate server is ignored when establishing an SSL connection to the Address Book server. |
Address Book Task Handlers | Maximum number of processing threads that are handled to communicate with the Address Book server. |
Address Book Task Accept Count | Maximum number of messages for the Address Book server that are buffered by the Security Server when all the processing threads are busy in the Security Server. If the number is exceeded, each additional message is not sent to the Address Book server but stored in a file until processing threads are available again. |
Address Book Idle Connection Timeout In Pool | Address Book Server: Timespan in seconds indicates how long connection stays idle in an Address Book Connection Pool. |
Trace Exporter | Export traces to chosen Trace Exporter (Default: None). This denotes the backend for the collected trace data. The setting 'None' implies turning off the tracing feature at all. In particular, messages sent from Security Server to external components will not carry any span context information. |
Trace Sampler | Process/Export trace span based on chosen sampling method (Default: Never). This setting has an effect only in the case when Security Server initiates a root span, and thus a new trace. In all other cases, Security Server will export or drop spans as given in the context of the foregoing (remote) parent span. Note: External component may override the sampling flag of spans inside an ongoing trace during their processing. Security Server does not do this. Note: Opting for 'Never' sampling in combination with the 'Trace Exporter' set to something other than 'None', will keep internal processing of traces, spans and their contexts activated. In particular, messages sent from Security Server to external components will carry span context information. |
Trace Exporter Url | URL for Trace Exporter. The URL must be complete, containing the IP/DNS name, port, and path. |
Probability | Probability for probability-based sampling. E.g. With probability 0.1, approximately 1 in 10 traces will be sampled. (Default: 0.0) This setting has an effect only in the case when the ‘Trace Sampler’ is set to ‘Probabilistic’. See the ‘Trace Sampler’ description for more details. |
Trace Auditing | If this flag is activated, auditing data will be placed to distributing tracing. Default value is unchecked. |
⚠️ Please do not change these parameters unless you are fully aware of the consequences of the changes